- Published on
A Developer's Guide to Building Powerful Slack API Apps
- Authors

- Name
- Gabriel
- @gabriel__xyz
Custom Slack apps are the secret sauce for connecting tools like GitHub directly into your workspace. They’re perfect for automating workflows and bringing all your information into one place. For developers, this means getting critical updates—like pull request notifications—right inside the channels where the team is already talking, killing the need to constantly switch context and helping everyone stay in the zone.
Why Build a Custom Slack App?
Sure, the Slack App Directory has tons of off-the-shelf solutions. But building your own Slack API app gives you a level of control and precision that pre-built tools just can't offer. You get to design notifications, actions, and workflows that perfectly match your team's specific process, creating a truly seamless developer experience.
Instead of getting blasted with noisy, generic alerts, you can build something that pipes only the most important information to exactly the right people.
For an engineering team, that’s a game-changer. A custom app can turn a chaotic notification channel into a focused hub for code reviews, CI/CD statuses, and deployment alerts. This is why so many developers end up building their own integrations.
Setting the Foundation for Productivity
Before you even think about writing code, you need to lock down the "why" behind your app. The main goal is almost always to reduce friction and cut down on context switching. A well-designed app keeps developers focused by pushing external events, like a GitHub pull request update, directly into their main communication hub.
With Slack's daily active user base on the rise—jumping from 25.7 million in 2022 to a projected 47.2 million by 2025—the demand for smart, integrated tools is only growing. The data is clear: 95% of users say apps make their existing tools more valuable, proving that effective, time-saving integrations are what people want.
The Principle of Least Privilege should be your north star from day one. By only asking for the permissions your app absolutely needs, you build trust and end up with a more secure, maintainable application.
Understanding Scopes and Permissions
Every Slack app’s power is defined by its scopes—the specific permissions it asks for when someone installs it. For our GitHub PR notifier, we don’t need to read every message in a channel or peek at user profiles. All we need is permission to post messages.
Adopting this "least privilege" mindset right from the start is non-negotiable for security and user trust. Thinking about how different integrations are built and used can give you some great ideas; it’s worth checking out this piece on Slack Integration for Companies for a broader perspective. Building on that, if you're looking for more inspiration, we put together a guide covering other GitHub Slack integrations to try in 2024.
When building a GitHub PR notifier, it's tempting to request broad permissions, but sticking to the bare minimum is always the best practice. This table breaks down the essential scopes you'll need and why.
Essential Scopes for a GitHub PR Notifier App
| Scope Name | Purpose | Why It's Needed |
|---|---|---|
incoming-webhook | Allows the app to post messages to a specific channel using a webhook URL. | This is the most direct and secure way to send notifications without needing broader permissions. |
commands | Lets the app receive and respond to slash commands from users. | Useful for actions like /subscribe owner/repo to manage notifications from within Slack. |
chat:write | Grants permission to post messages in channels the app has been invited to. | A more flexible alternative to webhooks if your app needs to post in multiple channels dynamically. |
channels:read | Allows the app to read basic information about public channels. | Necessary if you want to let users select a channel from a list when setting up notifications. |
By keeping your scope requests minimal, you not only enhance security but also make it much easier for admins to approve your app. It’s a win-win.
Getting Started With Slack's OAuth and Authentication Flow
Authentication is the first hurdle you need to clear when building any useful Slack API app. Without it, your app is just an empty shell—it can’t access information or take any action. Slack uses the industry-standard OAuth 2.0 protocol, giving your app a secure way to get permission from a user to act on their behalf, all without ever needing their password. It's essentially a secure handshake between your app, Slack, and the user.
The whole process kicks off when someone decides to install your app. They'll get redirected to a Slack authorization page that spells out exactly what permissions (we call these scopes) your app is asking for. If they click "Approve," Slack sends them back to a redirect URL you've specified, but with a special, temporary authorization code in tow. Your app's backend then takes this code, bundles it with your app's unique client ID and client secret, and trades it for a permanent access token.
The OAuth Handshake Explained
You can think of your client ID as your app's public username and the client secret as its private password. This secret needs to be guarded carefully; never expose it on the client side. When the user approves the installation, Slack uses these credentials to make sure the request for an access token is coming from your app and not an imposter.
This diagram lays out the three essential setup steps for any new Slack app you build.
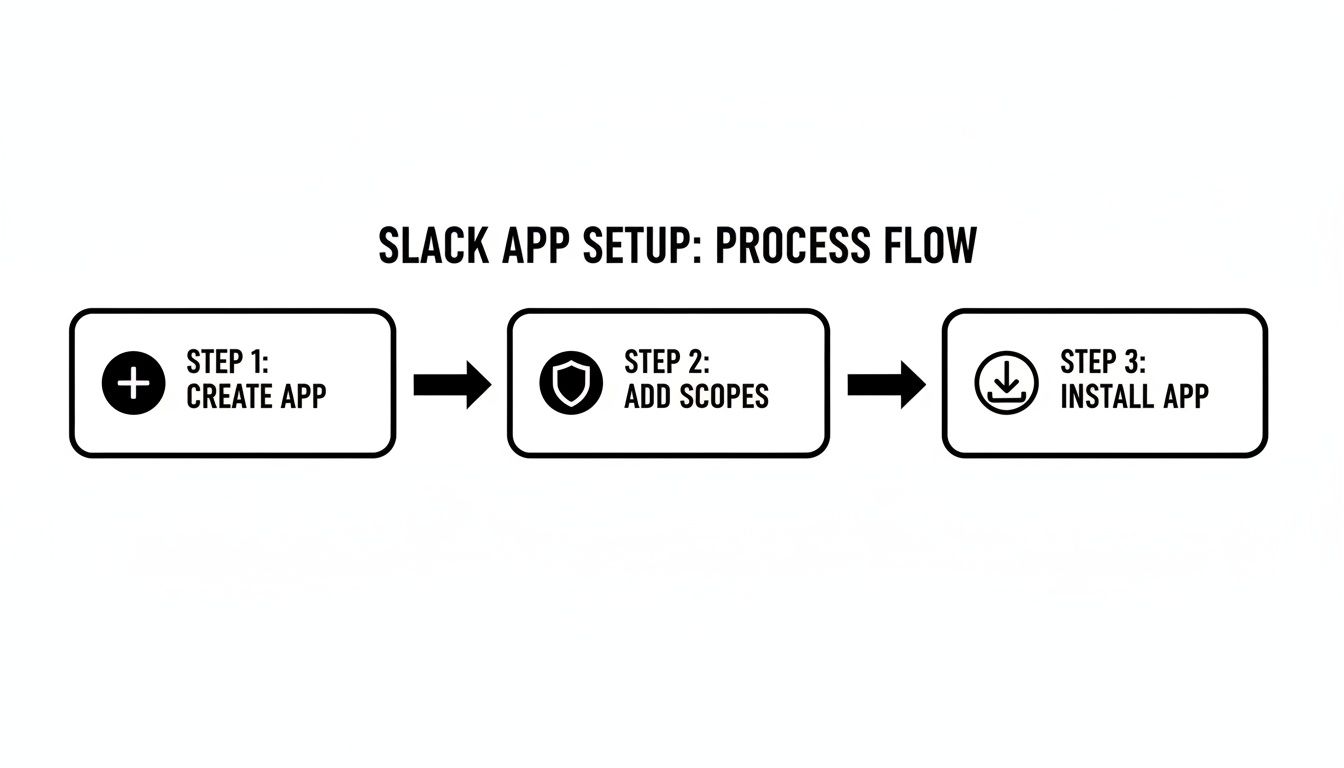
As you can see, it's a straightforward path: first, you create the app in your Slack workspace. Then, you define what it can do by adding scopes. Finally, you install it. This sequence is the foundation for getting any integration up and running securely.
Once that handshake is complete and you have the access token, you need to store it somewhere safe, like in a database, and tie it to the workspace that just installed the app. This token is your key to the kingdom—it's what you'll use for every future API call.
A critical distinction to understand is the difference between a bot token (starts with
xoxb-) and a user token (xoxp-). A bot token lets your app act as a standalone bot, posting messages and reacting as itself. A user token, on the other hand, lets your app act on behalf of the specific user who installed it. For our GitHub notifier, a bot token is the perfect fit.
Choosing the Right Token Type
For an app like our GitHub pull request notifier, the whole point is to post updates into a channel. A bot token is the way to go here because you want the notifications to come from the "app," not a random person on the team. This approach also keeps the permission model clean and simple, ensuring the app continues to work even if the person who installed it leaves the channel or the company entirely.
Using a bot token gives you a few nice advantages:
*   **Clear Attribution:** Messages are clearly from your app, which avoids any confusion.
*   **Persistent Access:** The token is tied to the app's installation, not a user account, so it stays valid as long as the app is installed.
*   **Scoped Permissions:** A bot's abilities are strictly limited to the scopes you requested during setup, which is a great way to follow the principle of least privilege.
Handling Real-Time Events and Interactions
A static, one-way notification app is fine, but the real magic happens when your app can listen and respond. This is where you unlock the true power of building with the Slack API. You can go beyond simple alerts and create a genuine two-way street for communication using Slack’s Events API and Interactive Components.

The Events API is what allows your app to subscribe to specific activities happening in Slack. Think of it as setting up a listener. For our GitHub notifier, we can subscribe to the pull_request event. Whenever a PR is opened, updated, or merged in a repository we're watching, GitHub fires off a payload to our webhook. Our app then springs into action, notifying the right Slack channel.
While we're focusing on GitHub here, the core principles are the same no matter the platform. If you're working with a different Git provider, you might find this guide on GitLab Slack integration useful for exploring similar concepts.
At the heart of all this is your app's public Request URL. This is simply an endpoint on your server where Slack will send HTTP POST requests every time an event you've subscribed to occurs.
Securing Your Event Endpoint
Just getting a request isn't enough—you have to be absolutely sure it came from Slack. If you skip this step, anyone on the internet could send bogus data to your endpoint and cause all sorts of chaos. Thankfully, Slack makes verification straightforward with a signing secret.
Every single request from Slack comes with a special X-Slack-Signature header. Your job is to take your unique signing secret, compute your own signature using the request's body and timestamp, and then compare it to the one Slack sent. If they don't match, you drop the request on the floor. This is a non-negotiable security step for any production app.
Pro Tip: Always, always perform signature verification before you even think about parsing the JSON payload or taking any action. This is your first line of defense, ensuring you only process legitimate requests from Slack and protecting your app from spoofing attacks.
Making Notifications Interactive
Now for the fun part. This is how your app graduates from a simple announcer to a genuinely helpful assistant. By adding interactive components like buttons to your notifications, you let users take action right from the comfort of Slack.
For a new pull request notification, you could easily add a few buttons:
*   **Acknowledge:** Lets a reviewer signal they've seen the PR and will get to it.
*   **View Diff:** Pops open a link directly to the file changes on GitHub.
*   **Claim for Review:** Assigns the PR to whoever clicked the button.
When someone clicks a button, Slack sends an interaction payload back to your Request URL. Your app can then handle that payload—maybe by updating the original message to show "Reviewed by [User]" or even making an API call back to GitHub. This interactive loop is what makes modern Slack apps so incredibly effective.
It's not just a cool feature; it's a productivity booster. Slack's own analytics show that integrations save teams an average of 97 minutes per week and help speed up decisions by 37%. That's the kind of ROI that comes from building truly interactive workflows. You can learn more about how Slack measures app engagement on their help page.
Designing Notifications That People Actually Read
Let's be honest: a wall of plain text is the fastest way to get your app muted. If you want to build Slack API apps that teams actually rely on, you have to move beyond basic messages. The goal is to create rich, structured notifications that grab attention and drive action.
This is where Slack's Block Kit becomes your best friend. Block Kit is a UI framework made of stackable "blocks"—things like headers, dividers, and text sections—that let you build visually appealing and highly functional messages. Think of it as building with LEGOs instead of just writing a sentence. For a GitHub pull request alert, this is a game-changer.
Building a Better PR Notification
A great notification gives you context at a glance, so you know exactly what’s needed without clicking away to another tool. Let's break down how to structure a high-impact PR alert using different Block Kit elements.
Your mission is to convey key information instantly. A well-designed message might include:
*   A bold **Header block** with the PR title.
*   A **Context block** for metadata like the repository name, branches, and the author.
*   A **Section block** with `mrkdwn` to show a short description of the changes.
*   An **Actions block** with buttons like "View on GitHub" or "Approve."
This approach transforms a simple alert into a mini-dashboard. It respects your team’s time by putting all the essential context right inside Slack, making the whole review process way more efficient. If you’re automating this, understanding how to construct these messages is critical; you can see how the pieces fit together by learning about using GitHub Actions to send Slack notifications.
When building these notifications, choosing the right Block Kit element for each piece of information is key. It's the difference between a cluttered message and one that's scannable and actionable.
Here's a quick comparison to help you decide which elements to use for your PR alerts:
Block Kit Element Comparison for PR Notifications
| Block Kit Element | Best Use Case | Example in PR Notification |
|---|---|---|
Header | The main title of the notification | PR #123: Add New User Authentication |
Section | Primary content, descriptions, and key info | Description: This PR introduces OAuth 2.0 for user sign-in. |
Context | Secondary info and metadata | `Repo: my-app |
Actions | Interactive elements like buttons or menus | Buttons for "View on GitHub," "Approve," or "Request Changes" |
Image | Visual context (e.g., diagrams, screenshots) | An architecture diagram showing the new auth flow. |
Divider | Visually separating distinct content sections | A line separating the PR details from the action buttons. |
By mixing and matching these blocks, you can create a dynamic, easy-to-read alert that gives developers everything they need in one place, which is exactly what a great notification should do.
Keeping Channels Clean and Focused
One of the biggest mistakes developers make with Slack API apps is creating absolute notification chaos. Every single update to a pull request—a comment, a commit, a status check—should not generate a brand new message in the channel. That's how you get muted.
The solution is simple but incredibly effective: use threads.
When you send that first PR notification, grab its unique message timestamp (the ts value). From then on, every update related to that specific pull request should be posted as a reply in a thread, using that original timestamp.
By threading all related updates under the initial alert, you create a single, consolidated conversation for each pull request. This keeps the main channel clean and provides a complete, chronological history of the PR's lifecycle in one organized place.
Strategic user mentions are also crucial. Don't blast @channel and annoy everyone. Instead, use user IDs (<@U12345678>) to ping only the assigned reviewers or the PR author directly. This ensures the right people see the update without contributing to notification fatigue for the rest of the team.
Mastering these small details is what separates a merely functional app from one that truly improves a team’s workflow.
Deploying Your App for Production at Scale
Getting your app running locally is one thing, but pushing it live is where the real work begins. A functional app is just the starting point; the true test is how it holds up under the pressure of a real team's daily workflow. A reliable, scalable deployment is what turns a side project into a production-grade tool people can actually count on.
This means you have to start thinking about the operational realities of the Slack platform, and one of the biggest hurdles is the API rate limit. Slack uses different rate limit tiers to keep the platform stable for everyone, and your app absolutely must play by these rules. If you ignore them, you’re just asking for your requests to get throttled, which leads to missed notifications and a very frustrated team.
For example, Slack is always tweaking API limits, especially for apps not on their Marketplace. While some methods might get capped, the Events API can still handle a massive volume, sometimes peaking at 30,000 events per workspace every 60 minutes. You can read about how these changes affect third-party apps to get a better sense of why building for efficiency from day one is so important.
Handling Rate Limits Gracefully
So, what happens when you hit a rate limit? The Slack API will send back a 429 Too Many Requests status code, along with a helpful Retry-After header. Your code needs to be smart enough to handle this gracefully instead of just crashing and burning.
The classic, battle-tested strategy here is to implement an exponential backoff algorithm. When a request fails, your app should pause for the duration specified in that Retry-After header. If the header isn't there for some reason, just wait a second before trying again. If it fails a second time, double the wait time, and so on. This prevents you from hammering the API with a constant flood of failing requests.
For apps expecting heavy traffic, you might need something more sophisticated.
- Request Queuing: Instead of firing off API calls the moment they're generated, pop them into a queue. A separate worker process can then pull from this queue and execute requests at a controlled pace, making sure you stay comfortably under the rate limits.
Adopting Production Best Practices
Beyond just managing API calls, a production-ready deployment demands serious attention to security and how you manage your environments. First rule of thumb: never, ever hardcode sensitive credentials like your bot token or signing secret directly into your code. That’s a massive security hole waiting to be exploited.
The gold standard is to use environment variables. This approach completely separates your secrets from your codebase. It makes it a breeze to manage different credentials for development, staging, and production without accidentally leaking them in your version control history.
Setting up distinct environments is another non-negotiable step. You need a staging environment that’s a perfect mirror of production. This gives you a safe sandbox to test new features and bug fixes with real Slack API interactions before you roll them out to your entire team. This "test before you deploy" mindset is what prevents unexpected bugs from blowing up your team’s workflow and ensures every release is solid.
Answering the Tough Questions on Slack App Development
As you start building more complex Slack apps, you're bound to hit a few common roadblocks. Questions around security, testing, and which API to use pop up all the time. Getting these fundamentals right from the start will save you a ton of headaches down the road. Let's walk through some of the most frequent questions I see developers ask.
How Should I Store My App Credentials?
This is a big one, and it's all about security. Your app's secrets, like the bot token and signing secret, are the keys to your kingdom. The golden rule is simple: never, ever hardcode them directly into your source code. Committing secrets to a Git repository is a recipe for disaster and creates a massive security hole.
The best practice is to use environment variables.
*   **For local development:** A simple `.env` file, paired with a library like `dotenv`, is your best friend. It lets you load secrets into your app's environment without ever committing the file itself.
*   **For production:** Every modern hosting platform like [Heroku](https://www.heroku.com/), [AWS](https://aws.amazon.com/), or [Vercel](https://vercel.com/) has a built-in way to manage environment variables. Use it. Always.
This approach not only keeps your sensitive data safe but also makes it easy to use different credentials for your development, staging, and production environments. No more swapping out keys manually.
Events API vs. RTM API: What's the Difference?
Sooner or later, every Slack developer asks which API they should use for getting data from Slack. You have two main options: the Events API and the Real Time Messaging (RTM) API. They both get the job done but in very different ways.
The RTM API uses a WebSocket connection. Think of it as a persistent, open phone line to Slack that streams events to your app as they happen. It can feel simpler for a tiny, single-workspace bot, but it's generally less scalable and not as robust for a real-world application.
The Events API, which is what Slack recommends for all modern apps, works over standard HTTP. You give Slack a public Request URL, and it sends a POST request with a JSON payload whenever an event you've subscribed to occurs. It's built to scale, is more secure, and comes with handy features like request verification using signing secrets. For just about any serious project, especially an app you plan to distribute, the Events API is the way to go.
Takeaway: While both APIs deliver data, the Events API is built on a more modern, secure, and scalable foundation. It's the industry standard for building production-grade Slack apps you can rely on.
How Can I Test My App Locally?
Testing interactive features and event listeners locally can feel like a real chore. Slack needs to send payloads to a public URL, but your development server is running on localhost. Deploying every single time you make a small change is a massive time sink and will grind your progress to a halt.
The solution is a tunneling service like ngrok.
Ngrok is a nifty tool that creates a secure, public URL that forwards all requests directly to your local development server (like localhost:3000). Just run it, and you get a temporary public URL that you can plug right into your Slack app's configuration. This setup lets you receive and debug real-time events and interaction payloads straight from Slack on your local machine, which will dramatically speed up your development workflow.
Tired of noisy GitHub notifications and manual tracking? PullNotifier integrates directly into your Slack workspace to deliver clean, threaded, and actionable pull request updates. Cut through the chaos, reduce review delays by up to 90%, and keep your engineering team focused and in sync. Join over 10,000 developers and get started for free at pullnotifier.com.