- Published on
Docker update container: Seamless zero-downtime deployments and live changes
- Authors

- Name
- Gabriel
- @gabriel__xyz
Updating a Docker container is about more than just swapping out old code for new—it's a fundamental practice for keeping your applications healthy, secure, and performant. This process is how you roll out new features, patch security holes, and take advantage of the latest optimizations baked into your base images.
Why Mastering Container Updates Is Critical

In any fast-moving development environment, being able to perform a seamless docker update container operation isn't just a routine task; it's a strategic advantage. It directly impacts your app's reliability and your team's ability to move quickly. A bungled update can lead to downtime, lost data, or frustrating bugs. A well-mastered process, on the other hand, becomes a complete non-event.
The biggest driver for consistent updates is security. Base images, like Alpine or Ubuntu, are constantly being patched for critical vulnerabilities. If you delay updates, you're leaving your application exposed to known exploits that automated scanners can pick up in minutes. Building updates into your regular workflow is one of the easiest ways to harden your security posture.
But it's not just about security. A disciplined update strategy helps you sidestep two major operational headaches:
*   **Performance Degradation:** Newer base images and application dependencies often ship with significant performance boosts and bug fixes that can make your service faster and more stable.
*   **Configuration Drift:** This is what happens when your production environment slowly wanders away from your codebase and its original setup. Regular updates act as a reset, forcing consistency and ensuring every deployment starts from a clean, known state.
A robust update process is the backbone of any reliable CI/CD pipeline. It turns deployments from a source of anxiety into a routine, automated action that bolsters security, performance, and operational stability.
Ultimately, getting good at container updates is about building confidence in your deployment pipeline. When your team can push changes quickly and safely, you can innovate faster, react to issues more effectively, and deliver a better, more reliable product to your users.
Updating Live Configurations Without a Restart
While blowing away and recreating a container is the go-to for most updates, what if you just need to tweak a running container's resource limits? This is where the docker update command comes in. It's a niche but incredibly powerful tool for adjusting a container's runtime constraints on the fly, no restart required.
Imagine your web server container gets hammered with traffic during a Black Friday sale. The CPU is redlining, and you need to give it more processing power right now to avoid a crash. Instead of taking the service down to redeploy, docker update lets you dynamically increase its CPU shares instantly.
Real-World Tuning Scenarios
This command is perfect for those "uh-oh" moments or for temporary performance tuning. Maybe a data processing job is chewing up way more memory than you expected, threatening the stability of the whole server. You can use docker update to cap its memory usage and bring it back under control.
A few practical situations where this comes in handy:
*   **Temporarily boosting resources** for a container that's suddenly under heavy load.
*   **Throttling a rogue container** that's hogging all the CPU or memory.
*   **Fine-tuning resource allocation** in a dev environment to see how your app performs under different constraints.
Let's say you need to give a container named api_service a bit more CPU priority while capping its memory. You'd run a command like this:
docker update --cpu-shares 768 --memory 4G api_service
This tells Docker to give api_service a higher relative CPU share (768 instead of the default 512) and limits its memory to 4 gigabytes. The best part? The changes take effect immediately.
For a quick reference, here are some of the most common flags you'll use with docker update and when you might need them.
Common Docker Update Flags and Their Use Cases
| Flag | Description | Practical Example Scenario |
|---|---|---|
--memory | Sets a hard memory limit. | A background job container starts leaking memory; you cap it at 2G to prevent it from crashing the host machine. |
--cpu-shares | Adjusts the container's relative CPU weight. | You have two containers: a critical API and a low-priority logging service. You give the API a higher share (1024) and the logger a lower one (256). |
--cpus | Limits the number of CPU cores a container can use. | A container is running a single-threaded process. You limit it to 1.5 CPUs to reserve resources for other containers. |
--restart | Changes the container's restart policy. | A non-critical container is set to always restart, but it's failing repeatedly. You change the policy to on-failure:3 to stop it from spamming the logs. |
These flags give you granular control over your running containers, which is a lifesaver for live performance tuning and emergency interventions.
CRITICAL CAVEAT: Remember,
docker updateis only for resource constraints and a few other runtime options. You can't use it to change the container image, expose new ports, or add environment variables. For those kinds of changes, you still need to follow best practices and recreate the container.
The Go-To Method for Updating a Container Image
When it's time to roll out a new version of your app—which is the most common reason to touch a container—the gold standard is a pattern called immutable infrastructure.
What that really means is you don't change a running container. Ever. Instead, you treat it like a disposable part: stop it, toss it out, and replace it with a brand new one built from your updated image.
This stop-and-replace method sounds almost too simple, but its real power is in how predictable it is. When you launch a fresh container, you're guaranteeing it starts from a perfectly clean, known state defined by the new image. This completely wipes out the risk of "configuration drift" and makes sure what you tested in development is exactly what you get in production.
The Immutable Update Workflow
The whole process boils down to a straightforward sequence of commands that gives you a clean switch from the old version to the new. It's a reliable pattern that's incredibly easy to script and automate.
Here’s the breakdown:
- Pull the new image: First, you grab the latest version of your application image from your container registry, like Docker Hub.
- Stop the old container: You gracefully shut down the container that's currently running.
- Remove the old container: Once it's stopped, you get rid of it. This frees up its name and any ports it was using.
- Run the new container: Finally, you launch a new container using the image you just pulled.
The explosive growth of container image repositories shows just how central this workflow is to modern development. For instance, Docker Hub saw its total image pulls nearly double in just eight months, reaching an incredible 242 billion by mid-2020. You can learn more about the dramatic growth in Docker usage to see how much teams rely on this pull-and-replace cycle.
A Practical Command Sequence
So, what does this actually look like in your terminal? Let's say your container is named webapp and you're updating it from v1 to v2.
1. Pull the latest version of your application image
docker pull myapp:v2
2. Stop the currently running container
docker stop webapp
3. Remove the stopped container to free up the name
docker rm webapp
4. Run a new container from the new image
docker run -d --name webapp -p 8080:80 myapp:v2
Pro Tip: One of the most common slip-ups is forgetting the exact
docker runcommand you used the first time. Before you stop the old container, rundocker inspect webapp. This will spit out its full configuration—volume mounts, environment variables, network settings, everything. That way, you can be certain your new container starts with the exact same runtime setup.
Getting to Zero-Downtime Updates
For any service running in production, even a few seconds of downtime during an update can be a big deal. The simple stop-and-replace method we've discussed is fine for your local development machine, but professional applications need a seamless transition. This is where you bring in the big guns: deployment strategies that ensure your users never even know an update is happening.
This diagram shows the basic manual process we're about to level up.
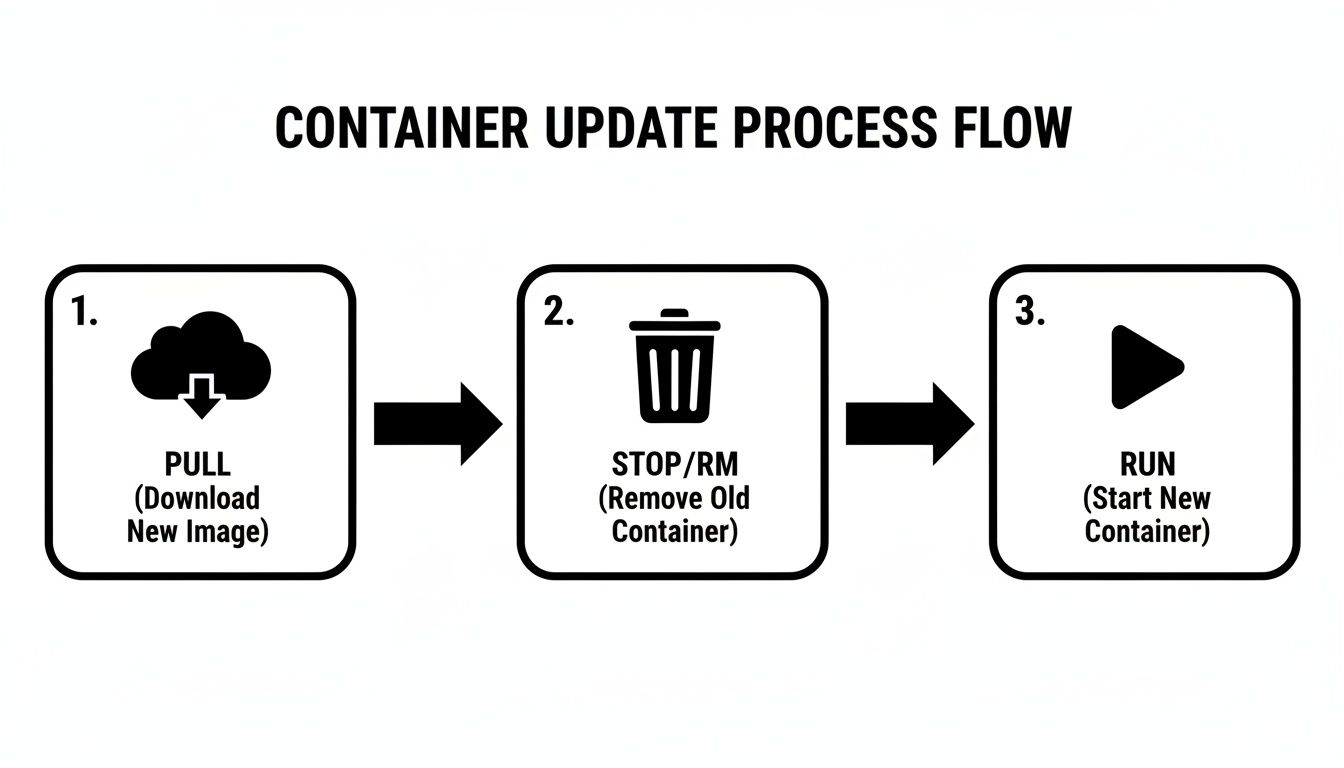
While this pull, stop/remove, and run flow is the foundation, it has one major flaw: a gap where your service is completely offline. The key to zero-downtime is making sure a new, healthy container is ready and waiting before you ever touch the old one.
Blue-Green Deployment Strategy
A Blue-Green deployment is one of the most popular and easiest patterns to understand for this. The core idea is simple: you run two identical production environments, which we’ll call "Blue" (the current live version) and "Green" (the new version). At any given time, all your user traffic is going to only one of them.
When it's time to update, you deploy the new version of your application to the Green environment while Blue keeps humming along, serving all live traffic. Once Green is fully deployed, tested, and you've confirmed it’s working perfectly, you just flip a switch in your reverse proxy (like Nginx or Traefik) to route all incoming traffic from Blue to Green. The change is instant.
The old Blue environment is now idle. You can keep it on standby for a bit, ready for a lightning-fast rollback if something goes wrong with Green. If the new version is stable, you can tear down Blue and it becomes the staging ground for your next update.
This approach completely separates the deployment from the release. You can take your time deploying and testing the new version without a single user being affected, making the final release a low-risk, single-step traffic switch.
Rolling Update Approach
Another battle-tested technique is the rolling update. This is the native approach used by container orchestrators like Docker Swarm and Kubernetes, and it’s a bit more gradual. Instead of a single, massive switch, a rolling update replaces old container instances with new ones, one by one.
For example, let's say you have five containers running the old version of your app. An orchestrator would:
- Start a new
v2container. - Wait for it to become healthy and pass its health checks.
- Once the new container is ready, it stops one of the old
v1containers. - It repeats this process until all
v1containers have been replaced byv2instances.
This gradual replacement ensures your application’s total capacity never drops during the update. Mastering these patterns is fundamental to building resilient, professional systems. To see how you can automate these workflows, check out our guide on what is continuous deployment to streamline software releases.
Using Docker Compose to Simplify Updates
Managing a single container is one thing, but real-world applications are rarely that simple. They're usually a collection of interconnected services—a web server, a database, a caching layer, maybe a message queue. This is where Docker Compose steps in, turning the manual task of updating containers into a clean, declarative action.
Instead of juggling a bunch of complex docker run commands, Compose lets you define your entire multi-service application stack in a single docker-compose.yml file. This file becomes the single source of truth for what your application should look like.
The Declarative Update Workflow
So, how do you update a service? You don't have to manually stop and remove containers. You just change a single line in your docker-compose.yml file—typically, this means updating the image tag. For example, you might change image: myapi:v1.2.0 to image: myapi:v1.3.0.
Once you've saved the file, a single command does all the heavy lifting:
docker-compose up -d --build
Compose is smart. It compares the containers currently running against your updated YAML file. It figures out which service's configuration has changed and automatically recreates only that specific container, leaving everything else untouched. This approach is not just more efficient; it's repeatable and way less prone to human error than doing it all by hand.
By defining your application's state in code, Docker Compose ensures consistency across all your environments. It’s the blueprint for your application, making your container update process reliable and incredibly easy to automate.
As containers become the standard for modern infrastructure, tools like Compose are absolutely essential for managing complexity. The Docker Container Market is even projected to hit USD 19.26 billion by 2031, a clear sign that robust management solutions are in high demand. If you're looking to push automation even further, you might find our guide on how to create reusable GitHub Actions useful.
A Few Common Questions About Container Updates
As you get comfortable with updating your Docker containers, a few common questions tend to pop up. Getting these details straight is the key to building a deployment workflow you can actually trust.
What's the Difference Between Docker Update and Recreating a Container?
This is a big one. The docker update command is a very specific tool designed for one job: changing resource constraints on a running container. Think CPU shares or memory limits. You can do this live without a restart.
But for everything else—like moving to a new image version, changing environment variables, or mapping new ports—you must recreate the container. That means stopping the old one, deleting it, and then launching a fresh container with your new configuration.
How Do I Update a Container Without Losing My Data?
The golden rule here is to store your application's state outside the container. This is exactly what Docker volumes and bind mounts are for.
By keeping your databases, logs, or user uploads in a volume, the data is completely separate from the container's lifecycle. You can safely stop and remove the old container, launch the new one, and just re-attach the same volume. Your data will be right there, untouched and instantly available.
Can I Automate This Whole Update Process?
Absolutely, and you definitely should. Automation is the foundation of any reliable deployment pipeline.
For a simple setup, a basic shell script that runs the pull, stop, rm, and run sequence can work just fine. If you want something more hands-off, tools like Watchtower can automatically watch for new image pushes and restart your containers for you.
In a professional CI/CD pipeline, this is all managed by services like GitHub Actions or GitLab CI. You can even set it up to send notifications to keep your team in the loop, like using GitHub Actions to send Slack notifications after every successful deployment.
Stop letting pull request notifications drown your team in noise. PullNotifier integrates directly with GitHub and Slack to deliver clear, real-time PR updates in dedicated channels, cutting review delays by up to 90%. Join over 10,000 engineers and streamline your code review workflow today at https://pullnotifier.com.