- Published on
How to Link GitHub with Jira for a Seamless Workflow
- Authors

- Name
- Gabriel
- @gabriel__xyz
To get GitHub and Jira talking to each other, you'll need to connect your repositories using the official GitHub for Jira app from the Atlassian Marketplace. This integration is what closes the loop between your code and your project management, letting development activities like commits and pull requests show up right inside your Jira issues. The process involves installing the app in Jira and then authorizing it in your GitHub organization.
Why Connecting GitHub and Jira Is a Game Changer
Let's be real: linking your development workflow in GitHub with your project tracking in Jira is more than just a nice-to-have. It’s a fundamental shift in how effective engineering teams operate.
By creating a single source of truth, you kill the need for developers to constantly jump between tools just to update a ticket. For product managers and team leads, it offers a live, real-time window into development progress directly on the Jira board, no "what's the status on this?" meetings required.
This direct line of sight between tasks and code delivers some powerful benefits:
*   **Kill the Context Switching:** Developers can update Jira issues using Smart Commits straight from their terminal, letting them stay in the zone and focused on coding.
*   **Massively Improve Project Visibility:** Product managers can see exactly which branches, commits, and pull requests are tied to a user story, giving them an accurate, live pulse on progress.
*   **Speed Up Team Velocity:** When links and status updates are automated, the entire feedback loop—from a code push to QA—gets faster and more transparent.
*   **Actually Boost Developer Productivity:** Automating the boring administrative stuff is a cornerstone of [boosting productivity in engineering](https://blog.pullnotifier.com/blog/boosting-productivity-in-engineering-a-practical-guide), freeing up that precious time for deep work.
Choosing Your Integration Path
Before you jump into the setup, it’s worth taking a moment to understand the different ways you can link GitHub with Jira. For most teams on Jira Cloud, the official Atlassian Marketplace app is the way to go. It's straightforward and handles the vast majority of use cases.
However, if your team is running a self-hosted GitHub Enterprise instance or needs a highly customized workflow, you might need to look at third-party connectors or even roll your own solution with webhooks.
This decision tree gives you a quick visual on which path might be the right fit.
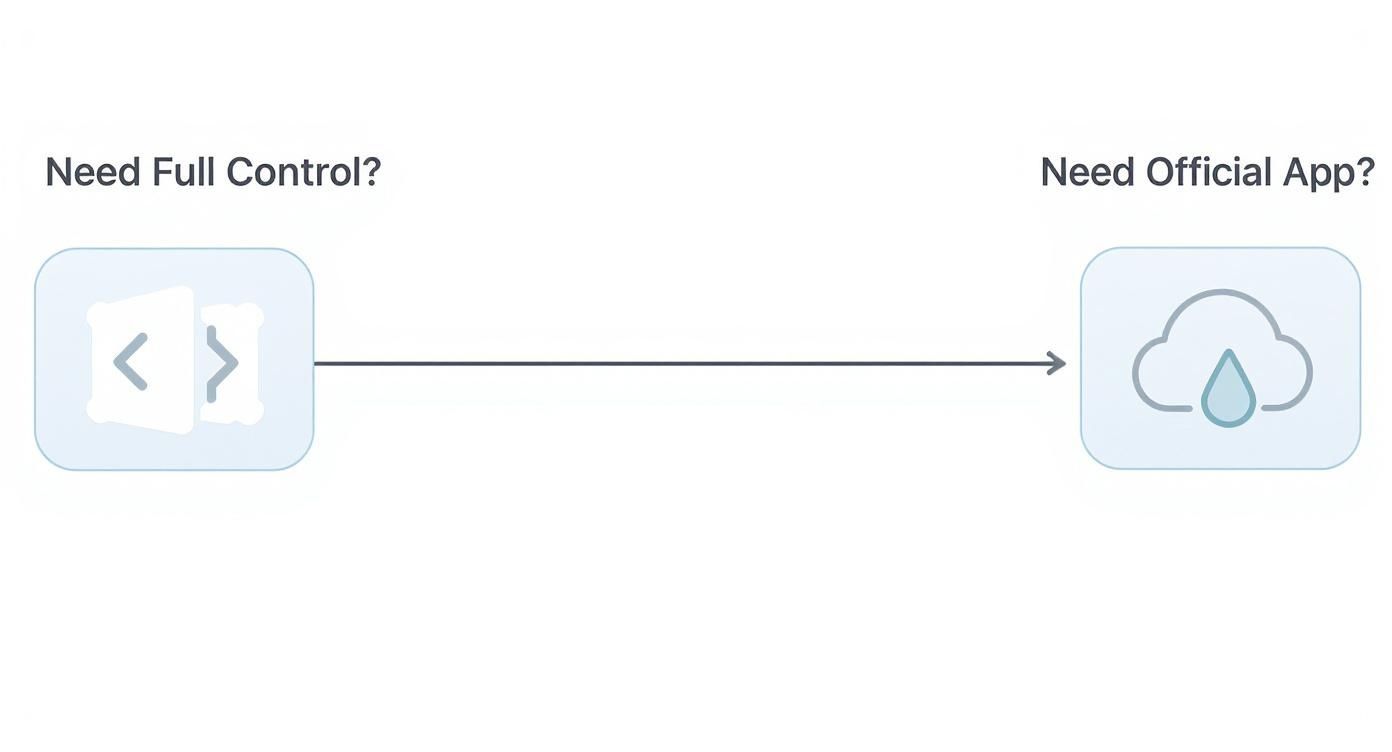
As you can see, the official cloud app is the default for most standard setups. But if you need absolute control for more complex requirements, a custom solution might be in the cards. Knowing these options upfront helps you set a clear direction for a successful integration.
Integration Methods at a Glance
To make the choice even clearer, here’s a quick comparison of the primary ways to link GitHub with Jira. This should help you decide which path is the right one for your team.
| Method | Best For | Key Feature | Setup Complexity |
|---|---|---|---|
| Official GitHub App | Most teams using Jira Cloud. | Seamless, officially supported, easy to set up. | Low |
| Webhooks & Custom Code | Teams needing unique, highly tailored workflows. | Complete control over data and actions. | High |
| Third-Party Connectors | Teams with specific needs not met by the official app. | Niche features and specialized integrations. | Medium |
Ultimately, the official app is the best starting point for 90% of teams. It's robust, well-maintained, and gets the job done without any fuss. Only venture into custom solutions if you have a specific, compelling reason to do so.
Integrating with the Official GitHub for Jira App
For most teams, the cleanest and most direct way to link GitHub with Jira is by using the official "GitHub for Jira" app. This isn't some third-party workaround; it's developed and maintained by GitHub, lives right in the Atlassian Marketplace, and is built to be the main artery between your code and your project plan. Think of it as the native bridge that brings development context where it’s most needed: right inside your Jira issues.
This integration is more than just a link. It embeds a dynamic development panel directly into your Jira tickets, showing every associated branch, commit, and pull request. It even pipes in build statuses. Anyone—from the project manager to the CTO—can get an instant, accurate snapshot of the work in progress without ever leaving Jira.
And teams are catching on. The demand for this kind of tight-knit synchronization is booming. One popular connector saw a 19% jump in installations in just one month, making it the second most installed tool of its kind. You can dig into more of these trends in this report on Jira-GitHub integration growth.
Kicking Off the Installation from Jira
Everything starts inside your Jira Cloud instance. You'll need to grab the app from the Atlassian Marketplace, which you can get to straight from your Jira settings.
- Head to the Atlassian Marketplace: From your Jira dashboard, click the Settings gear icon and choose Apps. From there, select Explore more apps.
- Find the Official App: In the search bar, just type in "GitHub for Jira." You’ll likely see a few options, but you want the official one made by GitHub. It’s always clearly marked.
- Install It: Hit the Get app button, then Get it now. Jira takes care of the rest, and it usually only takes a moment.
Once it's installed, you’ll be guided to the configuration page. This is where you’ll connect the dots between Jira and your GitHub organization.
Here's what you'll see in the Atlassian Marketplace when you find the right app. It’s your starting point.
This page is great for a final check. You can see the app's features, read reviews, and confirm you’re installing the officially supported integration.
Authorizing and Connecting Your GitHub Organization
With the app installed, Jira will hand you off to GitHub to authorize the connection. This is a critical security step where you grant Jira permission to read repository information—don't worry, it doesn't get write access to your code.
You'll land on a GitHub authorization screen asking for a specific set of permissions. This is where you tell GitHub which organization you want to hook up to your Jira site.
Pro Tip: You need to be an owner or have admin rights for the GitHub organization you want to connect. If you don't, the authorization will fail. This is easily the most common snag people hit during setup, so make sure you have the right permissions or ask an org owner for help beforehand.
Once you grant access, you'll be sent right back to Jira. Now you should see your GitHub organizations listed, ready to be linked.
Adding and Verifying Your First Repository
The last piece of the puzzle is telling Jira which specific repositories to pay attention to. You don't have to link everything; you can be as selective as you need to be.
*   On the Jira GitHub app configuration page, find the organization you just added.
*   Click **Configure** next to its name.
*   From here, you can connect all repositories at once or pick and choose. For bigger organizations, it's often better to connect repos on a per-project basis to keep things from getting cluttered.
As soon as you’ve added a repository, the integration is live. But how do you know it's really working? The easiest way is to check for the development panel inside a Jira issue.
Just navigate to any issue in a project linked to your repo. In your local terminal, create a branch using the issue key—something like git checkout -b PROJ-123-new-feature. Make a quick commit and push it to GitHub.
Within a few moments, a new development section should pop right up on the Jira ticket, showing your new branch. That's it. That's your confirmation that the link between GitHub and Jira is active and information is flowing correctly.
Automating Your Workflow with Smart Commits
Simply connecting your tools is just the beginning. The real magic starts when you make that connection work for you. That's where Jira Smart Commits come in, turning a simple data link into an automation powerhouse that keeps your team moving.
Smart Commits are specially formatted commit messages that Jira actually understands. By embedding simple commands right into your commit, you can update issues without ever leaving your terminal. Forget constantly switching tabs just to move a ticket, log time, or add a quick comment.
The Anatomy of a Smart Commit
The syntax is refreshingly straightforward and easy to remember. It always follows a clean, predictable pattern:
<ISSUE_KEY> <#command> <optional_params>
This simple structure is your key to automation. When you push a commit using this format, the GitHub-Jira integration parses it and triggers the right action on the corresponding Jira ticket.
For instance, a basic Smart Commit looks something like this:
git commit -m "DEV-42 #in-progress Started work on the new login flow"
This message tells Jira to find ticket DEV-42, transition it to "In Progress," and add the comment, "Started work on the new login flow." It's a ridiculously efficient way to keep your project board in perfect sync with your coding.
Core Smart Commit Commands You'll Use Daily
While there are a few commands available, you'll find a handful of them become part of your daily muscle memory. Mastering these will save you a surprising amount of administrative overhead every week.
*   **Transitioning Issues:** Move a ticket through your workflow with ease.
    *   `#in-progress`: Shifts the issue to the "In Progress" status.
    *   `#done`: Resolves the issue and moves it into your "Done" column.
    *   `#<transition-name>`: You can also use custom transition names from your Jira workflow, like `#code-review` or `#qa-testing`.

*   **Adding Comments:** Keep the team updated.
    *   `#comment`: Adds the rest of your commit message as a comment on the issue.

*   **Logging Time:** Track your effort on the fly.
    *   `#time`: Logs time against an issue. Use simple formats like `2w` (weeks), `4d` (days), `6h` (hours), and `30m` (minutes).
The real power move here is stacking multiple commands in a single commit message. This lets you perform several actions at once, creating an incredibly efficient update.
For example, this one commit logs time, adds a comment, and moves the ticket to the next stage:
git commit -m "DEV-42 #time 2h 30m #comment Finished the initial API endpoint #in-review"
That one-liner accomplishes what would have otherwise taken several manual clicks in the Jira UI.
Beyond Commits: Linking Branches and Pull Requests
The power of referencing Jira issue keys doesn't stop at commit messages. To build a truly cohesive development history, get in the habit of including the issue key in your branch names and pull request titles.
When you do this, the integration automatically links those development artifacts right back to the Jira ticket. A fantastic practice is to name your branches with the issue key as a prefix:
DEV-42-implement-oauth-flow
The moment you push this branch to GitHub, it will pop up in the development panel on the DEV-42 ticket in Jira. The same goes for pull requests. Titling your PR "DEV-42 Implement OAuth Flow" ensures it gets linked, giving your team a complete, end-to-end view of all related work.
The technical capabilities unlocked by this approach dramatically improve project tracking. By weaving Jira tickets into your commits, branches, and pull requests, you eliminate manual updates and gain crystal-clear visibility into development history directly from Jira. You can explore more about how this Git and Jira integration streamlines workflows and boosts team coordination.
Ultimately, these automations are about more than just convenience. They enforce good development habits, improve data accuracy, and ensure your Jira board is always a reliable source of truth for the entire team.
Exploring Alternative Integration Methods

The official GitHub for Jira app is a solid choice for most teams, no doubt. But what happens when your workflow demands more than the basics? Maybe you need to sync custom Jira fields, connect to a self-hosted GitHub Enterprise Server, or create complex, two-way updates.
This is where you have to look beyond the standard integration. These alternative methods aren't necessarily replacements but are powerful tools for specific, tricky situations. Think of them as the next level up, perfect for companies with unique security rules, legacy systems, or highly customized Jira setups that need more than just dev panel updates.
Setting Up Custom Workflows with Webhooks
One of the most direct ways to build a custom, one-way data flow is with webhooks. A webhook is just a simple notification system. When something specific happens in GitHub—like a pull request getting merged or a new comment being posted—GitHub sends a bundle of data to a URL you provide.
This gives you incredibly fine-grained control. For instance, you could set up a webhook that triggers an action in Jira whenever a PR is approved with a specific label. This could automatically move the linked Jira issue to a "Ready for QA" status, something you can't do with Smart Commits alone.
Getting one running involves two main parts:
- In GitHub: Head to your repository settings, find the "Webhooks" section, and add a new one. You'll need to give it a "Payload URL," which is the endpoint that will listen for the data.
- Your Endpoint: This URL points to a service you manage—it could be a serverless function or a small app—that waits for data from GitHub and uses the Jira API to do something with it.
It's a great approach for straightforward, event-driven automations.
When to Use Third-Party Connectors
For more advanced needs, especially bi-directional syncing, building a custom solution from scratch can turn into a massive project. That's when third-party connectors from the Atlassian Marketplace really prove their worth. These apps are specifically built to handle the tough synchronization challenges that are way beyond the official app's scope.
These connectors are designed to solve the really tricky edge cases. They handle things like syncing comments back and forth, mapping GitHub users to Jira users, and ensuring custom fields stay aligned between both systems.
If the official app isn't quite cutting it, exploring solutions from third-party API integration services can give you the functionality you’re missing.
You should seriously consider a third-party connector in these scenarios:
*   **GitHub Enterprise Server**: If your team uses a self-hosted GitHub instance, many of these tools are designed from the ground up to connect it with Jira Cloud or Data Center.
*   **Bi-Directional Syncing**: You need changes in Jira (like a status update or a new comment) to show up in the corresponding GitHub pull request.
*   **Multi-Instance Connections**: Your company has multiple Jira sites or GitHub orgs that need to be linked together in a complex web.
These tools usually come with a solid UI for mapping fields and setting up sync rules without touching a line of code. They do have a price tag, but they can easily save you hundreds of engineering hours. This all ties back to a broader strategy of using the right tool for the right job, much like how teams can refine their chat notifications by looking at the best GitHub Slack integrations to kill the noise and stay focused.
Troubleshooting Common Integration Problems
Even a perfectly configured integration can have its off days. When you link GitHub with Jira, a few common snags can throw a wrench in your workflow. The good news? They’re almost always easy to fix once you know where to look.
Most problems boil down to permissions, sync status, or a simple typo in a commit message.
Before you start digging too deep, try a quick refresh. Head over to the GitHub app settings in Jira and trigger a manual sync. You’d be surprised how often this simple step resolves temporary data lags and gets Jira caught up with your latest repository changes.
The Development Panel Is Missing in Jira
One of the most common frustrations is setting everything up perfectly, only to find the Jira development panel is nowhere in sight. If your commits and pull requests aren't showing up on your tickets, run through this quick diagnostic checklist.
*   **Is the Repo Actually Connected?** Go back into Jira’s GitHub app settings and double-check that the specific repository is actually connected. It's an easy one to miss, especially if your organization has dozens of repos.
*   **Did Organization Permissions Change?** The integration needs your GitHub organization to grant access to Jira. If those permissions were changed or the authorization token expired, the connection can silently fail. Re-authorizing the app in GitHub usually sets this right.
*   **Are Your Issue Keys Correct?** Your branch names or commit messages have to use the exact Jira project key, like `PROJ-123`. A tiny typo such as `PRJ-123` is all it takes to prevent Jira from making the connection.
Commits or Branches Not Linking Correctly
What if the panel is there, but specific activities are missing? This usually points to a problem with how the information is being sent from Git to Jira. A commit will only link up if it includes the full and correct issue key in the message.
Also, keep in mind that the initial sync isn't instant. If you just connected a massive repository with a long history, Jira needs time to index everything. Give it a few minutes before you start thinking something’s broken.
The whole point of this integration is to get to a single source of truth where code contributions are tied directly to project tasks. This traceability is gold for tracking sprint progress, spotting bottlenecks, and killing off manual status updates.
For more general advice on diagnosing technical issues, this General Troubleshooting Guide is a great resource.
Handling Permission and Notification Errors
Permission errors usually show up during the initial setup, but they can also pop up later if your organization’s security policies get an update. If you hit a permission wall, confirm you have admin-level permissions in the GitHub repository or organization you're trying to connect.
Notification issues can be a sign of a misconfiguration, too. If Smart Commits aren't changing ticket statuses or your team isn't getting updates, the problem might not even be with the core Jira integration. Often, it’s a related tool in your stack. For instance, if your workflow relies heavily on Slack, you might need to troubleshoot those connections separately. We have a guide that dives deep into how to fix GitHub Slack notifications not sending.
Common Questions About the Jira and GitHub Integration

Once you link GitHub with Jira, you'll probably have a few questions about the day-to-day details. Getting the basics set up is one thing, but every team’s workflow has its own quirks.
Let’s tackle some of the most common questions that come up. Here are some clear, direct answers to help you handle specific scenarios and really get the most out of your connected tools.
Can I Connect One GitHub Repository to Multiple Jira Projects?
Yes, you absolutely can. This is a pretty common setup for teams that manage several products from a single monorepo, and the official GitHub for Jira app handles it perfectly.
When you’re configuring the app inside Jira, you get fine-grained control over which repositories link to which projects. You aren't locked into some all-or-nothing connection.
You can pick and choose, making sure a central codebase can serve different teams working on separate Jira boards. This ensures development activity shows up only on the tickets where it’s actually relevant.
Does This Integration Work with GitHub Enterprise Server?
This is a really important distinction to make. The official "GitHub for Jira" app from the Atlassian Marketplace is built for GitHub.com (Cloud) only. It won't natively connect to a self-hosted GitHub Enterprise Server instance.
If your company runs on GitHub Enterprise Server, you’ll need to grab a third-party app from the marketplace. There are several powerful options out there, like the Git Integration for Jira app, built for exactly this purpose.
These third-party connectors often pack in more advanced, enterprise-grade features. Think more complex permission mapping or support for Jira Data Center alongside Jira Cloud.
So, while the official app is a no-go, you definitely have solid, well-supported ways to link GitHub with Jira in a self-hosted environment.
What Happens If I Use the Wrong Jira Issue Key?
We’ve all done it. Using the wrong issue key in a commit message or branch name is a simple mistake, and luckily, the consequence is just as simple: nothing happens. The integration just won't find a matching ticket, so no development info gets linked.
Your commit is still perfectly fine in Git, of course, but from Jira's perspective, it's invisible. The whole system relies on an exact match of the issue key (like PROJ-1234) to tie the activity back to the right place.
*   **Example of an incorrect key:** `PROJ 1234` (with a space) or `PRJ-1234` (typo in the key).
*   **Result:** The commit exists in your repo, but it will never appear in the development panel for any Jira issue.
This is exactly why setting a team convention for branch names and commit messages is so crucial. A quick double-check of your issue key is a small habit that saves a lot of headaches and keeps your workflow connected properly.
Can I Automate More Than Just Status Changes?
Smart Commits are great for transitioning issues and logging time, but what about more complex automations? For instance, can you automatically assign a Jira ticket to whoever is reviewing the pull request?
Not directly with Smart Commits. Their commands are intentionally focused on the issue itself—things like status, time, and comments.
But you can absolutely achieve more advanced automations by layering other tools on top. Your best bet here is GitHub Actions. You could build a workflow that triggers when a pull request opens and then uses the Jira API to do almost anything you want, like assigning the ticket or adding a specific label based on which files were changed. It takes a bit more setup, but the possibilities are pretty much endless.
How Does the Integration Handle Reverted Commits?
This one trips people up sometimes. If you revert a commit that included a Smart Commit command, Jira doesn't automatically undo the action. For example, if a commit with #done moved an issue to the "Done" column, running git revert on that commit won't move the ticket back to "In Progress."
The Jira integration is event-driven. It listens for new commits being pushed and processes the commands it finds. It isn't built to monitor for git revert actions or understand their intent.
If you need to reverse a status change or remove a comment that was added by a Smart Commit, you'll have to pop into the Jira UI and do it manually. It’s an important quirk to be aware of to avoid any confusion about where your tickets really stand.
Are noisy pull request notifications slowing your team down? PullNotifier integrates seamlessly with GitHub and Slack to deliver quiet, focused PR updates right where your team works. Cut through the chatter and accelerate your code reviews by up to 90% with customizable alerts that keep everyone in sync without the spam. Try it for free and see how over 10,000 engineers maintain their flow at https://pullnotifier.com.