- Published on
How to Resolve Conflicts in Git A Practical Guide
- Authors

- Name
- Gabriel
- @gabriel__xyz
Resolving a Git conflict is a multi-step dance: you spot the conflicting files with git status, dive into the code to manually fix the parts between those <<<<<<< HEAD, =======, and >>>>>>> markers, and then wrap it all up with git add and git commit. It might feel like a major roadblock, but it's really just a manageable, routine task.
Why Git Conflicts Happen and How to Spot Them Early
 Before you can fix a merge conflict, you have to understand what’s causing it. At its heart, a conflict is just Git’s way of throwing its hands up and saying, "I have two different sets of instructions for the same lines of code, and I don’t know which one to follow." It’s a pause button, not a panic button.
This usually happens when you and another developer independently change the same lines in the same file on different branches. When it's time to merge those branches, Git can't just guess which version is the "right" one. This isn't a sign of a mistake; it's just a natural part of working on a team.
In fact, handling merge conflicts is one of the most common challenges in development. Studies have shown that a staggering 87% of Git users have run into them. If you want to dive deeper, you can explore more development statistics and see just how universal this problem really is.
H3: Common Scenarios That Cause Conflicts
Conflicts aren't always about two developers editing the exact same line of code. They can pop up in a few different situations:
- Divergent Feature Branches: Imagine two developers branch off from
mainto work on separate features. Both end up tweaking a shared utility file. When the first developer merges their branch back intomain, it updates. Now, when the second developer tries to merge, Git sees their changes and the newly updatedmainbranch... and conflict ensues. - Modify vs. Delete: This one’s a classic. One person modifies a function in a file, while another deletes that same file on a different branch. Git is left scratching its head: should it keep the modified file or honor the deletion?
- Rebase Woes: A long-running feature branch that hasn’t been kept up-to-date with the latest changes from
mainis a ticking time bomb for conflicts. When you finally get around to rebasing or merging it, you’re almost guaranteed to have some issues to sort out.
H3: How to Spot a Conflict Early
The real key to managing conflicts without breaking a sweat is spotting them the moment they happen. Your most trusted friend here is the git status command. As soon as you try a merge that creates a conflict, your command line will let you know.
Sometimes, the signs are subtle until you run the right command. This quick table breaks down what to look for.
Common Git Conflict Indicators
| Command | What to Look For (Output) | Immediate Next Step |
|---|---|---|
git merge <branch-name> | A message like CONFLICT (content): Merge conflict in <file-name> followed by Automatic merge failed; fix conflicts and then commit the result. | Run git status. |
git pull | Similar output to a merge, as a pull is a fetch followed by a merge. Look for Automatic merge failed... | Run git status. |
git status | A section titled "Unmerged paths" listing all files with conflicts. The files will be marked as both modified. | Open the listed files in your editor. |
This table shows how different commands signal a problem, but they all point to the same solution: check the status and start resolving.
Running
git statusright after a failed merge is the single most important first step. It gives you a clean list of "unmerged paths"—the exact files you need to fix. This simple command cuts through the noise and hands you a to-do list.
The output will clearly tell you which files have conflicts. This is your cue to pause, take a breath, and start the resolution process. Catching these signs early is crucial. It stops you from accidentally committing unresolved conflict markers into your codebase, which can create much bigger, messier problems down the line.
Your Hands-On Manual for Resolving Merge Conflicts
When Git flags a conflict, it’s not throwing an error—it's asking you for help. It’s your job to step in, decide what the final code should look like, and then give Git the all-clear.
Let's walk through a classic scenario. You and a teammate are working on the same feature. You’re in a file called config.json, adding a new API endpoint. At the same time, your teammate is on a different branch, tweaking the very same file to update the database connection string. Their changes get merged into the main branch first.
Now, when you try to merge your branch, bam—you’ve got a merge conflict.
This infographic gives you a quick visual on how to spot the files that need your attention.
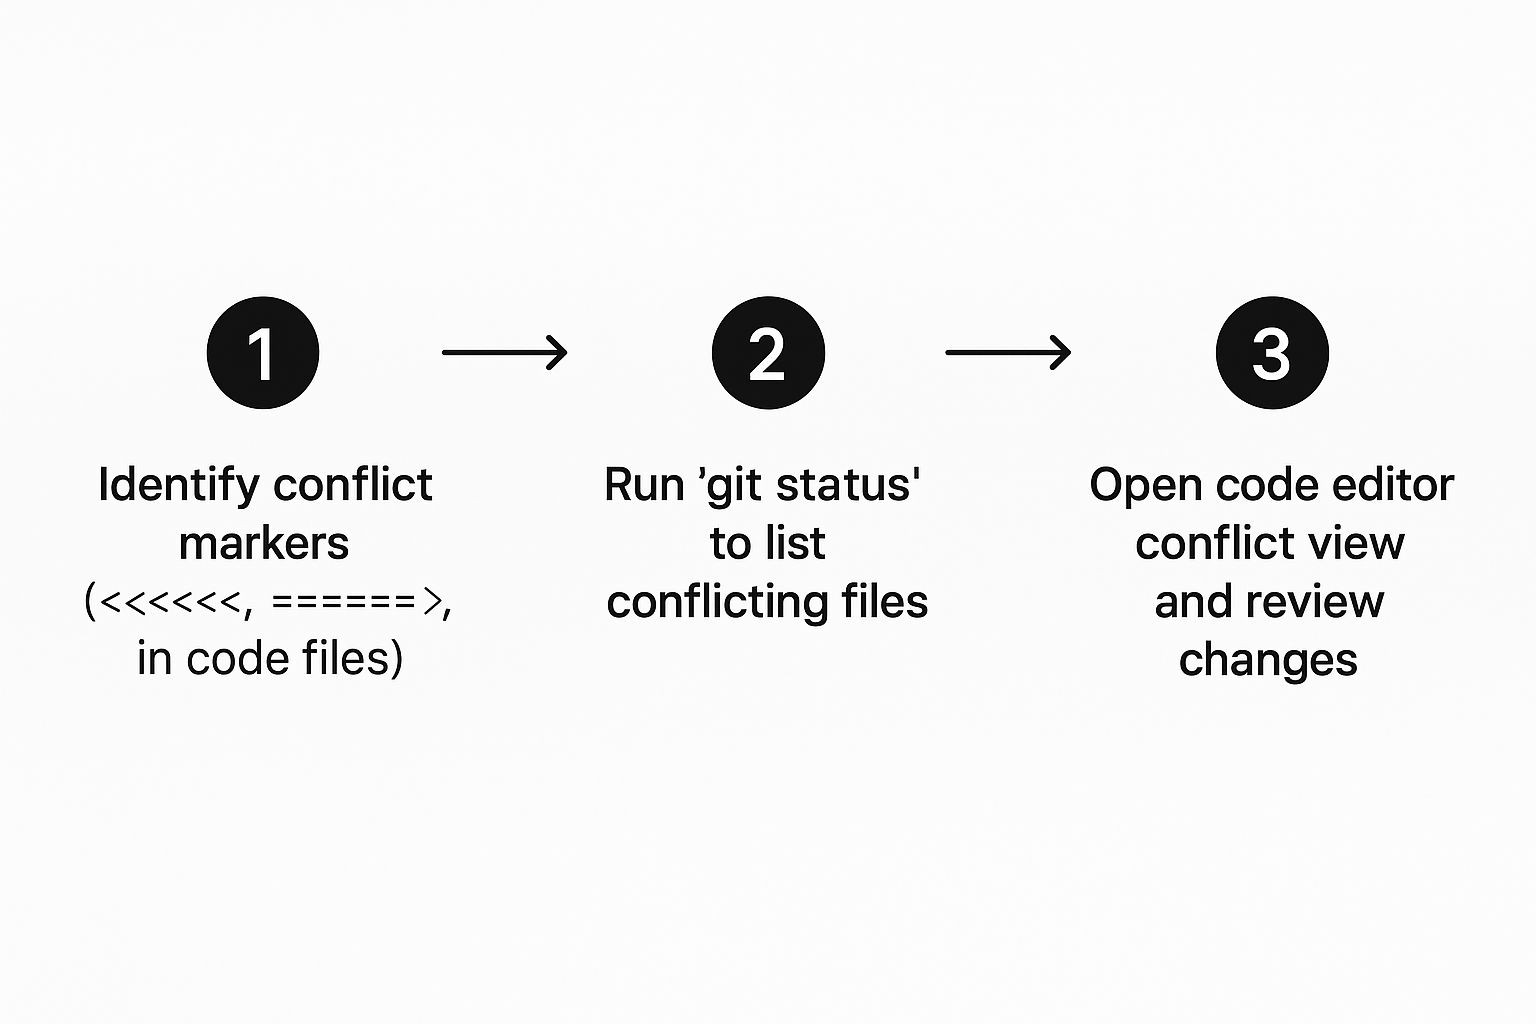
It’s a simple workflow: find the conflict markers Git leaves behind, open the file in your code editor, and get to work.
Deciphering the Conflict Markers
Once you pop open the file—in our case, config.json—you'll see the special markers Git has sprinkled in. These are like dividers that separate the competing changes, making it obvious where you need to focus.
Here’s what they mean:
<<<<<<< HEAD: This is the start of the changes from your current branch (HEAD).=======: This line is the separator. Everything above it is your code.>>>>>>> <branch-name>: This marks the end of the conflict block. The code between the=======and this line is from the branch you're trying to pull in.
So, your config.json might look something like this:
{
  "database": {
<<<<<<< HEAD
    "connectionString": "mongodb://localhost:27017/prod_db",
    "timeout": 5000
  },
  "apiEndpoint": "https://api.newfeature.com/v1"
=======
    "connectionString": "mongodb://prod-server:27017/main_db",
    "timeout": 5000
  }
>>>>>>> feature/db-update
}
Git is showing you that the connectionString has two different values. It also points out that your branch has an apiEndpoint that the other branch (feature/db-update) is missing entirely.
Manually Resolving the Conflict
Now for the hands-on part. You have to edit this file and decide what the final, correct version should be. It's about deciding what to keep, what to toss, and how to blend the two. In this situation, we actually need both changes to make it into the final version.
Your goal is to edit the file to look like this, making sure you get rid of all the conflict markers:
{
  "database": {
    "connectionString": "mongodb://prod-server:27017/main_db",
    "timeout": 5000
  },
  "apiEndpoint": "https://api.newfeature.com/v1"
}
You accepted the new database connection string from your teammate's branch while keeping your new API endpoint. The crucial part is that you must delete the <<<<<<<, =======, and >>>>>>> markers. As long as they're there, Git thinks the conflict is still unresolved.
This is also a great moment to pause and scan for other issues. Just because the lines are combined doesn't mean the logic is sound. It’s a good opportunity to spot potential bugs or some of those common code smells in pull requests.
Pro Tip: Use a code editor with solid Git integration, like VS Code. These tools often give you a side-by-side view where you can accept incoming changes, keep your current ones, or accept both with just a click. It really speeds things up.
Finalizing the Merge
Once you've edited the file and you're happy with the result, you need to let Git know the conflict is handled. It's a quick two-step dance to wrap up the merge.
- Stage the Resolved File: Use
git addon the file you just fixed. This signals to Git that you've sorted out the conflict for that specific file.git add config.json - Commit the Merge: Next, run
git commit. Git will pop open your editor with a pre-filled commit message, usually something like "Merge branch 'feature/db-update'". You can leave it as is or add more detail if you want.
After you save the commit message, that’s it! The merge is complete. Your branch now includes both sets of changes, and you've successfully navigated one of the most common challenges in collaborative coding.
Choosing Your Strategy: Git Merge vs. Git Rebase
Resolving a conflict isn’t just about fixing code; it's also about picking the right strategy to integrate those changes into your team's workflow. The two heavy hitters here are git merge and git rebase. Each has its own philosophy and leaves a different footprint on your project's history, which can change how you tackle conflicts.
Think of git merge as the project's honest historian. It tells the story exactly as it happened, warts and all. When you merge a feature branch back into main, Git creates a special "merge commit." This new commit has two parents—one from main and one from your feature branch—tying the two histories together forever.
This approach is completely non-destructive. Your original commits are left untouched, preserving the exact context of how the work unfolded. While this gives you a full, unfiltered history, it can sometimes create a messy commit graph that’s tough to read.
The Case for Git Merge
For a lot of teams, especially when you're working on public or shared branches, merging is the gold standard. It’s safe, straightforward, and leaves a crystal-clear audit trail of when features were integrated.
When a merge conflict happens, git merge throws all the problems at you at once. You run the command, see a list of every conflicting file, and then resolve them all in a single, dedicated commit. This is great for simple conflicts but can feel like a tidal wave if the branches have drifted far apart. It's a key distinction to understand when comparing a pull request vs. a merge request, since the strategy underneath is what really counts.
The Power of Git Rebase
On the flip side, git rebase is like being an editor for your project's story, cleaning it up for readability. Instead of making a merge commit, rebasing takes the commits from your feature branch and replays them, one by one, right on top of the target branch (like main). The result? A perfectly clean, linear history that’s a breeze to follow.
This is where rebase shines with big conflicts. It presents conflicts one commit at a time. You resolve the conflict for the first commit, continue the rebase, and then Git moves to the next. It breaks down a giant, messy conflict into small, manageable bites.
The golden rule of rebasing: never rebase a branch that other developers are using. Since rebase literally rewrites history, force-pushing a rebased shared branch can blow away their work and cause total chaos. Keep it for your own local, private branches.
When to Use Each Strategy
So, which one should you choose? It really comes down to your team’s workflow and what you value most in your project history.
Use
git mergewhen:- You're working on a shared branch like
mainordevelop. - Preserving the exact historical context of a feature branch is critical.
- Your team prefers a true-to-life commit history over a tidy, linear one.
- You're working on a shared branch like
Use
git rebasewhen:- You're working on your own private, local feature branch.
- You want to clean up your commit history before opening a pull request.
- You're facing a mountain of conflicts and would rather solve them piece by piece.
At the end of the day, both are powerful tools. Knowing when and how to use each one is the key to resolving conflicts without headaches and maintaining a codebase that’s easy for everyone to work with.
Advanced Tools for Untangling Complex Conflicts
When you’re staring down a massive, tangled conflict that spans multiple files, the standard command-line workflow can feel like you’re trying to perform surgery with a butter knife. Those text-based conflict markers are functional, sure, but they often lack the context you need to navigate tricky situations.
This is where graphical merge tools come in, offering a visual—and much more intuitive—way to sort out conflicts in Git.
Many modern code editors and Git clients have powerful three-way merge tools built right in. VS Code, for example, presents a side-by-side view that is incredibly effective. It shows your changes on one side, the incoming changes on the other, and the final merged code in a central pane. This layout lets you see the conflict in its full context and decide what to keep with a simple click.
Standalone clients like GitKraken offer a similar, highly visual environment that turns a complex merge into a straightforward task.
The real magic of a visual merge tool is its ability to make an abstract problem concrete. Instead of trying to decipher
<<<<<<<and>>>>>>>markers in a sea of text, you're looking at the actual code blocks. It makes it far easier to make the right call without accidentally breaking something.
The Power of a Clearer Diff
Before you even start a merge, getting a better perspective on what has changed can save you a world of hurt. The git diff command is your best friend here.
Running git diff <branch_to_merge> before you pull the trigger shows you a complete summary of all the differences between your current branch and the one you're about to merge. It’s like studying a map before a road trip; you get a sense of the terrain ahead and can anticipate where the tricky spots might be.
For an even clearer picture, you can configure Git to use a better diff algorithm or an external tool.
- Histogram Algorithm: This algorithm is especially good at understanding code that has been moved around, not just changed. You can set it globally with
git config --global diff.algorithm histogram. - Visual Diff Tools: You can also tell Git to launch an external visual diff tool, giving you a graphical side-by-side comparison right from your terminal.
These techniques give you the clarity you need to make informed decisions when you’re in the thick of it, ensuring you understand the "why" behind every change.
Your Ultimate Escape Hatch: Aborting a Merge
We’ve all been there. You start resolving a merge and quickly realize you’ve gone down the wrong path. Maybe you accepted the wrong change, or the complexity is just too much to handle at the moment. In those moments, it's critical to know you have a safe way out.
Meet the git merge --abort command. It's one of the most reassuring tools in your entire Git toolkit.
If a conflict becomes overwhelming, this command is your safety net. It instantly stops the merge process and resets your branch to its prior state, giving you a clean slate to try again. It’s the ultimate undo button for a merge-in-progress, safely returning your working directory to the way it was before you started. You can find more practical tips on using this command and other lifesavers by exploring a cheat sheet for Gitflow conflicts.
Knowing you can safely bail on a botched merge attempt removes the fear of making a mistake. It encourages you to tackle conflicts head-on, confident that you can always reset and come at the problem from a different angle if things go sideways.
Proactive Strategies to Prevent Git Conflicts
 While knowing how to fix a merge conflict is a vital skill, the best way to deal with them is to not have them in the first place. Shifting from a reactive mindset to a proactive one can dramatically improve your team's workflow and cut down on development friction. Prevention isn't about mastering complex commands; it's about building consistent, collaborative habits.
The foundation of conflict prevention is surprisingly simple: communication. Before you dive into a big task, especially one that touches shared files like a central config or a common utility function, just talk to your team. A quick message in Slack—"Hey, I'm about to refactor the authService.js file"—can save hours of untangling crossed wires later.
Sync Early and Sync Often
One of the most effective habits you can build is pulling changes from the main branch frequently. The longer your feature branch lives in isolation, the more it drifts from the target branch, basically turning your eventual merge into a high-stakes gamble.
A great way to stay current is using git pull --rebase. This command fetches the latest updates and replays your local commits right on top of them. Instead of facing one massive, terrifying conflict at the end, this approach makes you resolve smaller conflicts one commit at a time, which is far more manageable. Making this a daily ritual, maybe first thing in the morning, keeps your branch from ever getting too far out of sync.
By frequently integrating changes from the main branch into your feature branch, you're essentially breaking down a potentially large future conflict into a series of small, manageable updates. This turns a dreaded task into a minor, routine check-in.
Keep Branches and Commits Small
Long-lived feature branches are a classic source of gnarly merge conflicts. When a branch stays open for weeks, it accumulates a ton of changes while the main branch also moves forward, creating the perfect storm for conflicts.
The antidote is a strategy of short-lived branches and small, atomic commits.
- Short-Lived Branches: Aim to create branches that solve a single, well-defined problem and can be merged within a day or two. This drastically shrinks the window for divergence.
- Small, Frequent Commits: Instead of one giant commit at the end of the day, make several smaller ones. A commit for "Add user validation" is much easier to understand and merge than one for "Implement entire user profile feature."
This approach doesn't just reduce conflicts; it also makes your work way easier for others to review. For more on creating clean, review-friendly branches, check out these essential pull request best practices. When you break your work down, you make the integration process smoother for everyone.
Got Questions About Git Conflicts?
Even the most seasoned developers run into tricky situations when untangling a Git conflict. Let's walk through some of the most common questions that pop up, so you have clear answers ready when you need them.
What Should I Do If I Mess Up a Merge Resolution?
It happens to the best of us. You get deep into a conflict, think you've fixed it, and then realize you've made things worse. Don't panic.
If you're still in the middle of the merge, the safest escape hatch is git merge --abort. This command is your get-out-of-jail-free card. It stops the merge cold and resets your branch to its state right before you started. No harm, no foul. You can just start over.
But what if you've already completed the merge and committed it? You can still undo it with git reset --hard HEAD~1. Just be extremely careful here—this command can permanently discard work, so be absolutely sure it's what you want to do.
Is It Better to Use a GUI Tool or the Command Line?
This is the classic developer debate, and the honest answer is: it depends. Both have their moments to shine.
- The Command Line is fast, powerful, and forces you to understand what Git is actually doing under the hood. For simple, one-or-two-line conflicts, it's often quicker to just pop open the file and fix it manually.
- GUI Tools are a lifesaver for gnarly, complex conflicts. Visual tools built into editors like VS Code or standalone clients like GitKraken give you a side-by-side diff that makes it far easier to see what's going on.
A visual merge tool transforms an abstract mess of
<<<<<<<,=======, and>>>>>>>markers into a concrete, side-by-side comparison. Seeing the actual code blocks helps you make the right call without accidentally deleting something important.
For most developers, a hybrid approach works best. Use the command line for everyday tasks and pull out the GUI when you’re staring down a particularly nasty conflict.
Can I Get a Conflict When Using git pull?
Yes, absolutely. This is probably one of the most common ways developers run into merge conflicts.
Remember, git pull is really a two-step command in disguise: it runs git fetch to download the latest changes from the remote, followed immediately by git merge to integrate those changes into your local branch.
If you’ve made commits locally while a teammate has pushed changes to the same files on the remote branch, git pull will trigger a merge conflict right in your terminal. The resolution process is exactly the same as any other merge conflict—you just have to clean it up before you can continue your work.
Tired of noisy pull request notifications and delayed code reviews? PullNotifier integrates GitHub with Slack to deliver concise, real-time updates that cut through the clutter. Streamline your workflow and accelerate development by trying our tool today at https://pullnotifier.com.