- Published on
Mastering the Pull Request GitHub Workflow
- Authors

- Name
- Gabriel
- @gabriel__xyz
A pull request on GitHub is how you propose changes to a project. It’s the starting point for a conversation about your code, kicking off a process of review and discussion before anything gets merged into the main codebase.
What Is a GitHub Pull Request
Think of it like this: you're on a team writing a book. Instead of everyone scribbling directly on the master copy—which would be a total mess—you each work on your chapter in a separate document. When your chapter is ready, you don't just paste it in. You submit it to the editor and other authors for a look-over.
That submission is exactly what a pull request on GitHub is. It's you saying, "Hey, I've finished this new feature (or fixed this bug), and I'd like to add it to the project. Can you take a look?"
A pull request, or PR for short, isn't just about the code itself. It’s a dedicated space for collaboration built around a specific set of changes. It bundles up your work, notifies the project owners, and gives everyone a forum to discuss it before it becomes a permanent part of the project.
This process is the bedrock of modern, collaborative software development for a few critical reasons:
- It forces a code review. Your teammates can jump in, look over the changes, leave comments, and suggest improvements. This ensures the code is up to snuff before it gets integrated.
- It builds a rich history. Every pull request tells the story of why a change was made. This creates a detailed, searchable log of the project's entire journey.
- It kicks off automated checks. PRs are the perfect trigger for automated workflows. You can set them up to run tests, check for styling errors, and scan for security issues, catching problems long before a human even lays eyes on the code.
A pull request isn’t just a mechanism for merging code; it’s a communication tool. It tells the story of your changes, inviting discussion and ensuring every modification is transparent and deliberate.
Before we dive deeper, let's get on the same page with some key terms. You'll see these pop up again and again.
Key Pull Request Terminology
This table is a quick reference for the essential terms you'll encounter throughout the pull request process.
| Term | Simple Explanation |
|---|---|
| Repository (Repo) | The project's main folder, containing all files and their revision history. |
| Branch | An independent line of development, like a copy of the project where you can work without affecting the main version. |
| Main/Master Branch | The primary, official branch of the repository. It should always be stable and deployable. |
| Feature Branch | A temporary branch created to work on a specific feature, bug fix, or improvement. |
| Commit | A snapshot of your changes at a specific point in time. Think of it as a "save point" for your work. |
| Merge | The action of integrating changes from one branch (like a feature branch) into another (like the main branch). |
| Code Review | The process where other developers examine your proposed changes to provide feedback and ensure quality. |
| Merge Conflict | An issue that arises when two branches have conflicting changes to the same part of a file, requiring manual resolution. |
Getting comfortable with this lingo will make navigating the pull request workflow much smoother.
Ultimately, a pull request in GitHub turns coding from a solo mission into a team sport. It’s the gatekeeper that protects the main branch, allowing dozens of developers to contribute to the same project without stepping on each other's toes. By formalizing how we propose, review, and merge code, pull requests protect the quality and integrity of the entire project, making them a non-negotiable skill for any developer today.
The Anatomy of a Perfect Pull Request
A great pull request on GitHub does more than just throw code over the wall; it tells a compelling story. It walks the reviewer through your thought process, making it dead simple to understand the "what" and the "why" behind your changes. If you want your PRs to get approved quickly, you need to treat them as a complete communication package, not just a code dump.
Think of your pull request as a proposal. You wouldn't submit a messy, confusing proposal and expect it to get signed off, right? Same principle applies here. The goal is to make your reviewer's job as easy as possible, which not only speeds things up but also builds a much better team dynamic.
Start with a Clear Title and Description
The title is the first thing your team sees, so make it count. It should be a crisp, one-line summary of what you did. Steer clear of vague titles like "Bug fix" or "Updates."
Instead, be specific. Something like "Fix user login validation for empty passwords" or "Add caching layer to user profile endpoint" immediately tells the reviewer what they're looking at.
The description is where you lay out the full story. It should answer three key questions:
- What problem does this solve? Clearly explain the issue you're tackling. If it's tied to a ticket, link it directly. Keywords like
Closes #123are your best friend here. - How did you solve it? Give a high-level overview of your approach. This isn't a line-by-line breakdown of the code, but a quick summary of your strategy.
- How can this be tested? Provide simple, step-by-step instructions so reviewers can verify your work. Don't forget to include any special setup instructions or test accounts they might need.
Just look at this screenshot of active pull requests from a major open-source project. The clear titles and labels provide instant context.
See how each title communicates a specific fix or feature? The labels also help categorize the PR, making it easy to filter and prioritize what needs attention first.
Use GitHub Features to Add Context
Beyond just the text, a perfect pull request makes smart use of GitHub's built-in tools to add clarity. These little touches are what separate a good PR from a great one, making it organized and easy to follow. A well-structured PR is also less likely to have hidden problems, which is why it pays to know about the 10 common code smells in pull requests.
Your pull request should be so clear that a new team member could understand the change without needing to ask you a single question. This is the gold standard for PR communication.
Here are a few features you should be using:
- Reviewers: Don't just hope someone sees your PR. Directly assign specific people or teams to review your code. Even better, automate this with a
CODEOWNERSfile. - Labels: Tag your PR with labels like
bug,enhancement,documentation, orneeds-testing. This helps everyone see its purpose at a glance. - Screenshots/GIFs: If your changes touch the UI, a picture is truly worth a thousand words. Pop in some before-and-after screenshots or a short GIF showing off the new functionality. This kind of visual proof is incredibly helpful for reviewers.
How to Create Your First Pull Request
Alright, ready to make your first contribution? Creating a pull request on GitHub can feel a bit daunting at first, but it's really just a few straightforward steps. The best way to think about it is like submitting a draft of a document for review: you make a personal copy, do your work, and then formally ask for it to be merged.
This guide will walk you through the whole process, from getting the code onto your machine to opening up your PR for the world to see. We'll be using a mix of simple Git commands and the GitHub interface to get it done.
Step 1: Fork and Clone the Repository
First things first, you can't just edit the original project directly. You need your own copy to work on. This starts with forking the repository on GitHub.
A fork is your own personal version of the project that lives right in your GitHub account. It’s a safe sandbox where you can make any changes you want without touching the original code.
Once you have your fork, you need to get the code onto your local machine. That’s where cloning comes in.
- Head over to your newly forked repository on GitHub.
- Click the green "<> Code" button.
- Copy the URL you see (HTTPS is usually the simplest option).
- Open up your terminal or command prompt and run
git clonewith the URL you just copied.
This command downloads the entire project—history and all—right to your computer. Now you're all set to start making changes.
Step 2: Create a New Branch
Working directly on the main or master branch is a huge no-no in almost every project. Instead, you'll want to create a new branch specifically for your changes. This keeps your work isolated, which makes it much cleaner and easier to review later on.
Give your branch a descriptive name. If you're fixing a bug with the login form, something like fix/login-validation-error is way more helpful than my-changes.
In your terminal, make sure you're inside the project's directory, then run this command:
git checkout -b your-branch-name
This one command does two things: the -b flag creates the new branch, and checkout immediately switches you over to it. You're now ready to code.
Step 3: Make and Commit Your Changes
This is where the magic happens. Go ahead and make your changes—fix that bug, add that feature, or clean up some documentation.
Once you're happy with your work, you need to save it as a commit. A commit is basically a snapshot of your changes at a specific point in time. It’s best to keep commits small and focused on a single logical change, paired with a clear message explaining what you did.
- Stage your changes:
git add .(this command stages all the files you've modified). - Commit your changes:
git commit -m "Your descriptive commit message"
This saves your work locally on your machine, but no one else can see it yet. For that, you need to push it up to GitHub.
Step 4: Push and Open the Pull Request
To get your new branch and its commits onto GitHub, you have to push them from your local repository to your remote fork.
Just run this command from your terminal:
git push origin your-branch-name
Now, if you go back to your forked repository on GitHub, you'll likely see a big yellow banner pop up with a "Compare & pull request" button. Click it!
You'll be taken to the "Open a pull request" page. This is where you'll give your PR a clear title and write a detailed description of your changes, just like we covered earlier. When you're ready, hit the big green "Create pull request" button.
And that's it! You've officially submitted your work for review.
This infographic gives you a nice visual of what happens next.
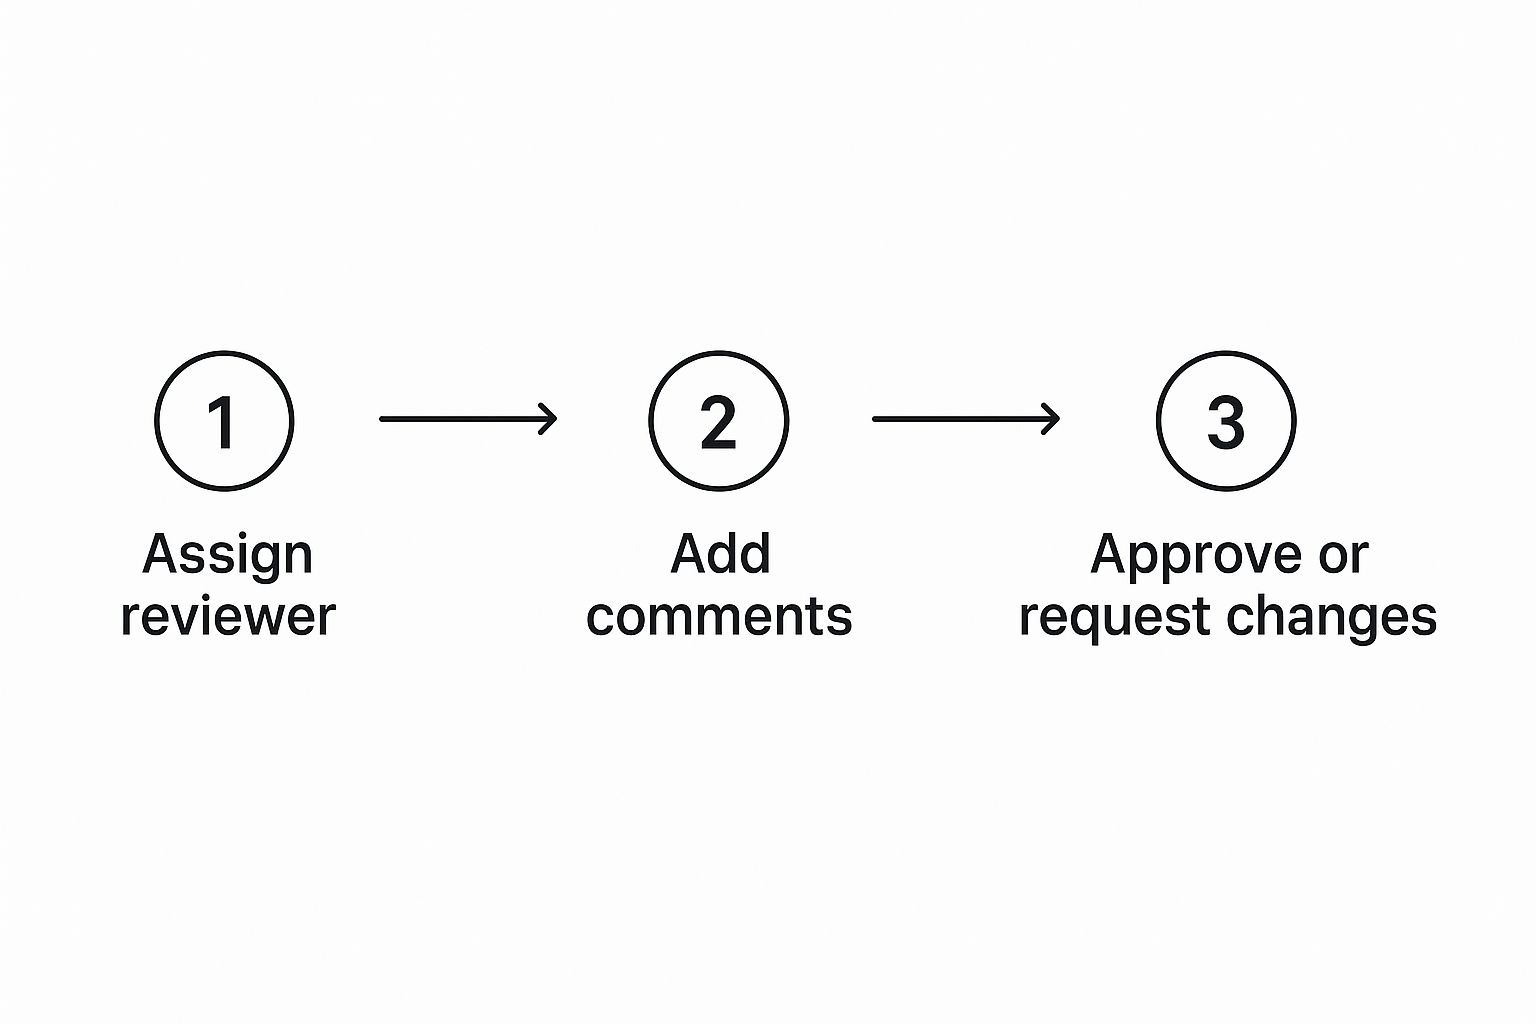
As you can see, once your PR is open, a reviewer is assigned. They'll look over your code, provide feedback, and then either approve it or request changes.
Navigating the Code Review Process
Submitting a pull request on GitHub is just the opening act. The main event? The code review. This is where your teammates dig into your proposed changes, kick the tires, and help refine your work. It's a fundamental part of building software together, ensuring quality, consistency, and a shared understanding of the codebase.
Think of this stage as a two-way street. As the author, you need to be open to feedback and ready to iterate. As a reviewer, your job is to give clear, constructive, and respectful feedback that improves the code without discouraging the person who wrote it.
A healthy code review culture isn't about finding flaws; it's about collective ownership. The goal is to make the code better together, strengthening both the product and the team.
The review process turns your initial code—a monologue—into a productive dialogue. It's an opportunity for knowledge sharing, mentorship, and catching those sneaky little bugs before they ever see the light of day.
The Role of the Reviewer
Being a reviewer is about more than just hitting "Approve" or "Request Changes." Your feedback needs to be thoughtful and actionable. A great way to stay consistent is to follow a checklist; in fact, many teams rely on a comprehensive code review checklist to make sure nothing important gets missed.
Your primary goals should be to:
- Understand the "Why": Before you even look at a line of code, read the pull request description. What problem is this trying to solve? Does the approach make sense?
- Check for Clarity: Is the code easy to follow? Are variable names descriptive? If a piece of logic is complex, is there a comment explaining it?
- Ensure Consistency: Does the new code stick to the project's established style guides and architectural patterns?
- Identify Bugs: Hunt for potential edge cases, logic errors, or performance bottlenecks that might have been overlooked.
When you leave comments, be specific. Instead of just saying "this is confusing," try something like, "Could we rename this variable to userProfile to make its purpose clearer?" GitHub's "Suggest Changes" feature is a lifesaver here—it lets you propose a specific fix that the author can accept with a single click.
Responding to Feedback as the Author
Receiving feedback is a skill in itself. It’s crucial to approach comments with a positive attitude, seeing them as opportunities to improve, not as personal criticism. Make sure to respond to every comment, even if it’s just with a quick emoji to show you've seen it.
If you disagree with a suggestion, explain your reasoning calmly and professionally. You might be surprised how often a short discussion leads to an even better solution that neither of you initially thought of. Once you've pushed new commits addressing the feedback, just let your reviewers know it’s ready for another look.
Leveraging Automated Checks
Modern development workflows lean heavily on automation to handle the repetitive, boring parts of a code review. When a pull request is opened, Continuous Integration (CI) systems can automatically jump in and:
- Run the full test suite to make sure nothing broke.
- Perform static code analysis to catch style violations or common bugs.
- Scan for security vulnerabilities in any new dependencies.
These automated status checks act as a critical quality gate. A green checkmark gives reviewers the confidence that the basics are covered, so they can focus their energy on the more nuanced parts of the code. Keeping an eye on metrics like PR approval rates is also key for improving team efficiency. Teams that actively monitor and refine their review process can slash their average pull request lifetime by up to 30%, giving a serious boost to productivity.
Pull Request Best Practices for Teams
A solid pull request workflow is the engine of a productive development team. When authors and reviewers are in sync, changes flow smoothly from a branch to the main codebase, speeding up delivery and seriously improving code quality. It all comes down to setting shared expectations and having clear processes.

For anyone authoring a PR, the golden rule is simple: keep pull requests small and focused. A monster PR that touches hundreds of files to fix three unrelated bugs is a reviewer's worst nightmare. Stick to one PR for one logical change. This makes the review process way faster, reduces the mental load, and makes it a breeze to track down issues if something breaks later on.
For reviewers, the mission is to give feedback that’s both kind and effective. Don't leave your teammates hanging—timely reviews are critical. Aim to offer constructive, specific suggestions instead of vague critiques. A well-oiled review process is a must, and you can dive deeper into strategies in our guide on https://blog.pullnotifier.com/blog/pull-request-best-practices.
Establish Team-Level Strategies
Beyond individual habits, team-wide agreements are what really cut down on friction and create consistency. Just implementing a few core strategies can make a massive difference in your pull request GitHub workflow, getting everyone on the same page.
These strategies help automate key steps and set clear expectations for everyone involved:
- Use PR Templates: Set up a default pull request template for your repository. This is a game-changer, ensuring every author includes crucial context, like a link to the relevant issue tracker and clear steps for testing.
- Implement CODEOWNERS: Create a
CODEOWNERSfile in your repository to automatically assign specific people or teams as reviewers based on which files were changed. This takes all the guesswork out of figuring out who needs to see what. - Define Contribution Guidelines: A
CONTRIBUTING.mdfile is your rulebook. It lays out clear expectations for anyone submitting code, covering your branching strategy, code style, and review process. For teams, keeping a clean record of who has contributed is also great practice, often found in a dedicated list of project contributors.
Adopting these practices transforms your review process from a potential bottleneck into a collaborative quality gate. It fosters a culture of shared ownership and continuous improvement.
We're also seeing a big shift toward data-driven development, which means keeping a close eye on your workflow metrics. Modern analytics tools let you track in-depth stats across your repositories. This kind of analysis helps teams pinpoint weaknesses in the review pipeline, like slow testing phases or PRs that need too many revisions, which ultimately delay releases.
Automating Your Pull Request Workflow
Let's be real: manually checking every single detail in a pull request on GitHub is a huge time suck and an open invitation for human error. Automation is how you get that time back. It lets you offload the tedious, repetitive stuff to bots so you can focus on solving the real problems. This isn't just about moving faster; it's about creating a rock-solid, consistent development process.
GitHub has some powerful features built right in to help you put your workflow on autopilot. It all starts with simple but effective tools. For instance, a Draft Pull Request is a game-changer. It’s the perfect way to signal to your team, "Hey, I'm working on this, but it's not ready for a formal review yet." This lets you get early feedback without triggering a full-blown review cycle and preventing premature comments.
Using GitHub Actions for Quality Control
But the real magic happens with GitHub Actions. This is GitHub’s built-in automation engine that can run jobs directly from your repository. You can set up workflows that kick off automatically anytime a pull request is opened or updated.
Here are a few common tasks you can automate:
- Running Tests: Automatically fire up your entire test suite to make sure your changes didn't accidentally break something else.
- Code Linting: Have a bot check your code against style guides to catch formatting goofs before a human reviewer ever lays eyes on it.
- Security Scans: Scan for vulnerabilities in your code and its dependencies, adding a crucial layer of defense.
These automated checks are like a quality gatekeeper. They give you instant feedback and ensure every PR meets a baseline standard of quality. To take it a step further, you can set up protected branches to enforce these checks, making it literally impossible to merge a pull request until all the automated tests pass.
Automation transforms your pull request from a simple code submission into a self-validating package. It ensures that by the time a human gets involved, the foundational quality checks are already complete.
The GitHub Marketplace is also packed with tools to take your automation even further. You can find a huge variety of actions ready to integrate.
This ecosystem lets you plug in specialized checks for everything from code coverage to performance analysis. The rise of tools that tap into GitHub's API and marketplace actions shows just how valuable pull request data has become. For example, tools like 'Pull Request Analytics' can crunch this data to generate reports on team performance and pinpoint bottlenecks, giving you incredible insight into your development cycle. You can find more discussions on these data-driven workflows on the GitHub community forums.
Common Pull Request Questions
As you get comfortable with the pull request workflow, you’ll naturally run into a few common questions. These are the kinds of things every developer bumps into at some point. Let's walk through some practical answers to get you unstuck and back to shipping code.
How Do I Update an Active Pull Request
So, you've gotten some feedback on your PR and need to make a few tweaks. Good news: you don’t need to close it and start over.
Just make the changes on your local feature branch, commit them like you normally would, and then push to the same branch on GitHub.
git push origin your-branch-name
That’s it. The pull request will automatically pick up your new commits. This lets reviewers know you’ve addressed their feedback and keeps the whole conversation in one place. It’s a super smooth way to iterate on your work.
What Is a Merge Conflict
A merge conflict pops up when Git can't automatically figure out how to combine changes from your branch with the target branch. This usually happens when you and a teammate have edited the exact same line in a file, just in different ways. When this occurs, GitHub will block the merge and show you which files are causing the problem.
A merge conflict isn't an error; it's just Git's way of saying it needs a human to step in and make a final decision. You'll have to manually resolve the conflict by picking which changes to keep before the merge can move forward.
Merge vs Squash vs Rebase
When it's time to get your changes into the main branch, you have three main options: Merge, Squash, and Rebase. Each one integrates your code differently, leaving a unique footprint on your project’s history.
Here’s the quick breakdown:
- Merge: This is the default. It creates a special "merge commit" that ties the history of your feature branch into the main branch, preserving every single commit you made.
- Squash and Merge: This option takes all the commits from your PR and squashes them down into one single, clean commit on the main branch. It’s great for keeping the project history tidy.
- Rebase and Merge: This approach replays your branch's commits on top of the main branch, creating a perfectly linear history without any merge commits.
Tired of chasing down pull request reviews in noisy Slack channels? PullNotifier delivers clean, real-time PR updates right where you need them, cutting through the chaos and helping your team merge faster. Get started for free at pullnotifier.com.