- Published on
Merge GitHub Branches: A Quick Guide to Mastering merge github branches
- Authors

- Name
- Gabriel
- @gabriel__xyz
Merging GitHub branches is the heart of collaborative coding. It’s the final step where your new features, bug fixes, and updates move from an isolated branch into the main codebase, becoming an official part of the project. This process typically involves integrating changes from a feature branch into a target branch like main or develop.
Why Mastering Branch Merging Is Critical for Development Teams

Learning to properly merge branches is way more than just a technical skill—it's a foundational practice for any high-performing software team. It's what allows multiple developers to hammer away at different features at the same time without tripping over each other. A solid merge workflow keeps the codebase stable, the project history clean, and the whole development cycle moving faster.
And this isn't a small-scale activity. Merging via pull requests is now the industry standard. GitHub is home to over 150 million developers managing more than 1 billion repositories, with developers making over 5 billion contributions in just one year. Those numbers paint a clear picture: branch merges aren't just routine tasks; they are the critical gateways connecting day-to-day development work to production-ready code.
The Foundation of Collaborative Workflows
A defined merging process is the bedrock of modern software engineering. Without it, you get pure chaos—overwritten code, a confusing project history, and a constant nightmare of integration problems. By adopting clear standards, teams can unlock a much smoother workflow.
*   **Isolate development:** You can work on new features or tricky bug fixes in separate branches without any risk of destabilizing the main codebase.
*   **Facilitate code review:** Pull requests act as a formal checkpoint to review, discuss, and improve code quality *before* it gets merged.
*   **Enable parallel work:** Multiple developers or entire squads can contribute to the same project at the same time, which is a massive productivity booster.
*   **Maintain a clean history:** Using strategies like squashing or rebasing helps create a logical and easy-to-follow project timeline.
Ultimately, a mastery of branch merging translates directly to shipping higher-quality software, faster. It reduces friction, prevents bugs, and allows teams to focus on building features rather than untangling version control messes.
Mastering branch merging not only streamlines code integration but also fosters a collaborative culture, contributing significantly to broader strategies for broader team alignment within your organization. This guide will walk you through the essential methods—from the command line to the GitHub UI—and the strategies that turn a simple technical step into a powerful team process.
Your Toolkit for Merging Branches: The Three Core Methods
When it's time to merge branches, every developer has their go-to method. There’s no single "right" way—the best approach really depends on your comfort level, the task at hand, and how your team works together. Let's break down the three primary ways you'll get your code from a feature branch into the main line of development.
Each one strikes a different balance between control, visibility, and convenience. Knowing the strengths of each will help you pick the most efficient tool for the job, whether you're doing a quick solo merge or navigating a complex team collaboration.
The Power and Precision of the Git Command Line
For developers who practically live in the terminal, the Git command line (CLI) is the most direct and powerful way to merge github branches. It gives you fine-grained control over every single step, which is a lifesaver for complex situations or when you need to run specific Git commands that just aren't available in graphical tools.
Working with the CLI forces you to understand what Git is doing under the hood. There are no buttons to hide the mechanics, and that direct interaction builds a much deeper knowledge of how version control actually works.
To merge a branch using the CLI, the process is pretty straightforward. Let's say you just finished work on a branch called new-user-auth. You'd start by making sure your main branch is up-to-date, then switch to it and run the merge.
Here’s how it usually goes:
- Fetch the latest changes from the remote repository to make sure you have the most current version of all branches.
git fetch origin - Check out the target branch, which is typically
mainordevelop. This is the branch you want to merge your changes into.git checkout main - Pull any recent updates into your local
mainbranch to sidestep potential conflicts.git pull origin main - Execute the merge command, pointing it to the branch you want to bring in.
git merge new-user-auth - Push the updated main branch back to GitHub to share the newly merged code with your team.
git push origin main
This method is fast, scriptable, and works on any system with Git installed. The main downside? It has a bit of a learning curve. It can feel intimidating for newcomers, and a simple typo in a command can cause some real headaches if you're not careful.
The Collaborative Hub: The GitHub Web UI
The GitHub web interface is the undisputed champion for teams that put a premium on code review and collaboration. Merging through a pull request (PR) is about so much more than just combining code—it’s an entire workflow that weaves in discussion, automated checks, and formal approvals.
When you open a PR, you create a space for your team to talk about the changes. Teammates can comment on specific lines of code, suggest improvements, and request fixes before anything gets merged. For a deeper dive, our guide on mastering the GitHub pull request workflow covers this process from top to bottom.
This visual, discussion-driven approach is invaluable for maintaining code quality and ensuring team alignment. It turns a merge into a transparent, documented event rather than a silent command run on a local machine.
The whole process is visual. After you push your feature branch to GitHub, you just head over to the repository, and GitHub will usually greet you with a prompt to create a pull request. From there, you can assign reviewers, wait for CI/CD checks to pass, and once it’s approved, a repo admin can hit that big green "Merge pull request" button. This approach hides the underlying Git commands, making it accessible to everyone on the team, even less technical stakeholders.
The Best of Both Worlds: GitHub Desktop
For those who crave a visual interface but don't want to give up local control, GitHub Desktop hits the sweet spot. It wraps most day-to-day Git operations, including merges, in a clean, graphical user interface (GUI). It turns complex actions into simple clicks, which can seriously cut down on the cognitive load.
GitHub Desktop is especially great for visualizing your branch history and seeing exactly what you're about to commit. This visual feedback loop helps prevent a lot of common mistakes and makes version control feel way more approachable.
The interface makes it obvious what branch you're on, shows incoming changes, and simplifies the whole process of creating and merging pull requests. Its simplicity makes it a fantastic tool for developers new to Git or for seasoned pros who just want a faster way to handle their daily tasks.
Merging in GitHub Desktop is just as intuitive. You can switch branches, pull updates, and merge directly from the app's menu. It'll walk you through creating a pull request and even helps you sort out merge conflicts with a visual diff editor. It truly combines the safety of the web UI with the local power of the CLI.
Choosing Your Merge Method
Deciding which tool to use often comes down to the specific task and your personal workflow. Here’s a quick table to help you pick the right one for the job.
| Method | Best For | Key Advantage | Potential Drawback |
|---|---|---|---|
| Git CLI | Experienced developers, complex merges, scripting, and automation. | Maximum control and power over every Git operation. | Steeper learning curve; mistakes can be harder to undo. |
| GitHub Web UI (PRs) | Team collaboration, code reviews, and projects needing formal approvals. | Visibility and discussion are built into the workflow. | Slower for simple, individual merges; requires internet access. |
| GitHub Desktop | Visual learners, developers new to Git, and quick, everyday tasks. | Simplicity and safety with a user-friendly visual interface. | Fewer advanced features compared to the command line. |
Ultimately, many developers find themselves using a mix of all three. You might use the CLI for complex rebasing, the GitHub UI for team pull requests, and GitHub Desktop for quickly committing daily work. The key is knowing which tool fits the moment.
Choosing the Right Merge Strategy for a Clean Git History
Once you’ve figured out how you’re going to merge—whether you're a command-line purist, a fan of the web UI, or you live in a desktop app—the next big decision is picking the right strategy. This isn't just a matter of preference; the method you choose will either shape your project's Git history into a clean, readable story or a tangled mess.
It's a strategic choice that directly impacts team collaboration, how easily you can track down bugs later (code archaeology!), and the overall health of your project.
GitHub puts three main strategies right at your fingertips in the pull request interface. Getting a handle on the trade-offs between a classic merge commit, a squashed commit, or a rebased history is a core skill for any developer or tech lead looking to build a logical project timeline.
This decision tree can help you map your preferred workflow to a merge strategy.
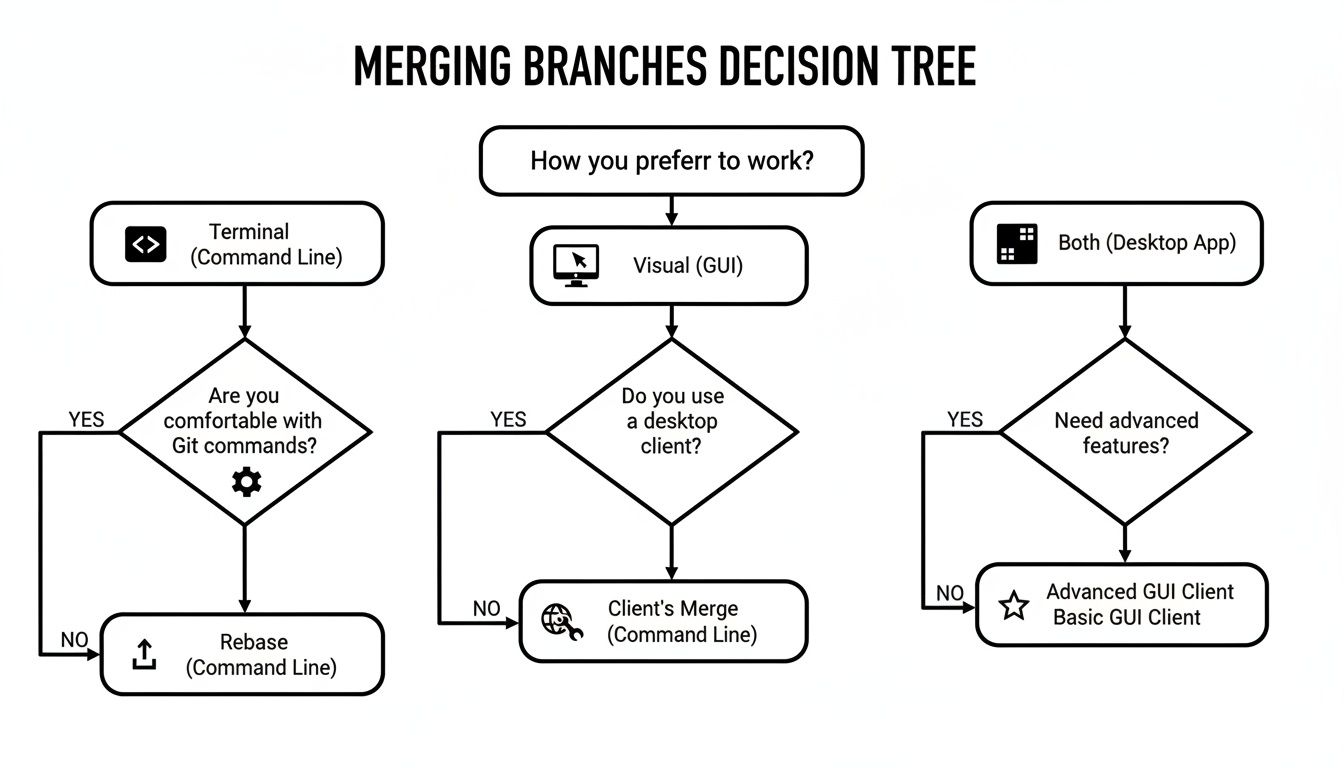
As you can see, your tool of choice often nudges you toward a particular approach. Your workflow and your merge strategy are deeply connected.
The Classic Merge Commit
The default option, "Create a merge commit," is the most straightforward and history-preserving way to go. When you use this method, Git creates a brand-new "merge commit" on the target branch that neatly ties the histories of both branches together. This special commit has two parents: one from your target branch and one from your feature branch.
This approach is fantastic for a couple of key reasons:
*   **Full historical context:** It keeps the entire commit history of the feature branch, exactly as it happened. Every single commit, message and all, stays right where it is.
*   **Traceability:** It’s super easy to see exactly when and where a feature branch was integrated and to identify every commit that was part of that chunk of work.
The biggest downside? It can clutter up your Git history, especially in a busy repository. The timeline can get filled with merge commits, making it tougher to follow the linear story of the project.
Squash and Merge for a Tidy Timeline
"Squash and merge" has become a huge favorite for teams that want a clean, linear project history. This strategy takes all the messy, incremental commits from your feature branch and squashes them into one single, comprehensive commit on the target branch.
Think about it: your feature branch might have ten tiny commits like "fix typo," "add console log," and "oops, revert that." Squashing rolls them all into one meaningful commit, like "Implement new user authentication flow." This keeps your main branch history incredibly concise and easy to read.
Key Takeaway: Use squashing when the individual commits on a feature branch are just noise and not important for the project's long-term history. It’s perfect for bundling up minor fixes into a single, logical change.
The move toward more efficient merge methods reflects broader trends in development. For example, the rise of CI/CD tools like GitHub Actions, which saw continuous deployment jump by 50% in a recent year, pairs perfectly with cleaner merge strategies. While a merge commit saves every detail, "squash and merge" creates a compact history that’s much friendlier for automated pipelines.
Rebase and Merge for a Linear History
"Rebase and merge" is the go-to for purists who want a perfectly straight, linear Git history with zero merge commits. This option takes the commits from your feature branch and "re-plays" them, one by one, on top of the latest version of the target branch.
The result is a clean, straight line of commits, almost as if all the work was done serially right on the main branch. This makes the history incredibly easy to follow, and it's a preferred method for many large open-source projects.
However, rebasing rewrites commit history (it changes the commit hashes), which can be dangerous if multiple developers are working on the same branch. It requires a solid understanding of Git and should be used with caution on any shared branches. To go deeper on managing code evolution and finding what works for your team, it's worth exploring different effective branching strategies.
Ultimately, the best strategy depends on your team’s philosophy. Do you value the raw, detailed history of merge commits, the clean summary of squashing, or the pristine linearity of rebasing? The most important step is to pick one and stick with it.
Navigating and Resolving Merge Conflicts Like a Pro

Sooner or later, every developer working on a team will see it: the dreaded "unable to merge" message. This is a merge conflict, and it happens when Git can’t automatically figure out how to combine changes from two different branches.
Don't panic. This isn't a bug or an error; it's just Git’s way of hitting pause and asking for a human to make a decision.
Conflicts pop up when two people edit the exact same lines in the same file. When you try to merge github branches, Git gets stuck. It sees two different sets of instructions for the same piece of code and doesn't know which one to follow, so it hands the keys back to you.
While they can look intimidating at first, resolving merge conflicts is a routine part of the development workflow. Learning to handle them calmly is a key skill for any developer.
Understanding Conflict Markers
When a conflict happens, Git modifies the affected file to show you exactly where the problem is. It injects a set of visual markers directly into your code to highlight the competing changes.
You'll see a block that looks something like this:
<<<<<<< HEAD
// Code from your current branch (e.g., main)
const greeting = "Hello, World!";
=======
// Code from the incoming branch (e.g., feature-branch)
const greeting = "Greetings, Planet!";
>>>>>>> feature-branch
Here's what each part means:
<<<<<<< HEAD: Marks the start of the conflicting code from your current branch.=======: Separates the two conflicting versions.>>>>>>> feature-branch: Marks the end of the conflicting code from the branch you're merging in.
Your job is to jump into this block, remove all the <<<, ===, and >>> markers, and decide which version of the code to keep. You might keep one, the other, or even combine elements from both to create the final, correct version.
Resolving Conflicts in a Visual Editor
Manually editing those markers is one way to do it, but modern code editors like Visual Studio Code have made this process much, much easier. They provide a side-by-side "diff" view that clearly lays out the differences and gives you one-click actions to resolve them.
This screenshot shows how VS Code's source control panel visually flags files with merge conflicts, making them impossible to miss.
The interface presents simple, clickable options right above the conflict block: "Accept Current Change," "Accept Incoming Change," or "Accept Both." It turns a messy manual edit into a few quick clicks.
When you open a conflicted file in an editor like VS Code, here’s the typical flow:
- Review the Changes: Look at both the "current" and "incoming" changes to understand the intent behind each one. What was each developer trying to accomplish?
- Choose an Action: Click the button that corresponds to the code you want to keep.
- Manually Edit if Needed: Sometimes, the right solution is a mix of both versions. In that case, you can ignore the buttons and edit the code directly inside the conflict block until it's perfect.
- Save the File: Once you're happy with the resolution, save your changes.
- Stage and Commit: Use
git add <file-name>to stage the newly resolved file, then create a final merge commit withgit commit.
The most important step in resolving a conflict isn't technical—it's communication. If you're unsure why a change was made, a quick five-minute chat with your teammate can save you from making the wrong decision and introducing a bug.
This methodical approach turns a potentially stressful situation into a manageable task. For a more detailed breakdown, check out our practical guide on how to resolve conflicts in Git. By understanding the markers and leaning on modern tools, you can confidently tackle any merge conflict that comes your way.
Advanced Merging Workflows and Branch Protection
As your team and codebase grow, the way you merge github branches has to evolve, too. What works for a solo dev or a small crew—just merging code directly—starts to become a real liability in a larger, faster-moving environment. It's time to graduate from simply merging code to building a development pipeline that's resilient, automated, and secure.
This means putting up some guardrails. You need to protect your most important branches, like main, from half-baked or unvetted changes. By setting up these more advanced workflows, you create a system that enforces quality automatically, freeing up your team to ship features instead of scrambling to fix broken builds.
Establishing Branch Protection Rules
Branch protection is your first line of defense against chaos. These are just sets of rules you configure right inside GitHub that control how and when code gets merged into your critical branches. Think of them as the automated bouncers for your codebase, making sure every single change meets a minimum quality bar before it gets in.
These rules aren't just about blocking direct pushes; they're the bedrock of a professional development lifecycle. When you enforce them, you're standardizing how your team works, creating a clear, predictable path for code to get from a developer's laptop to production.
Here are a few essential rules every team should have in place:
*   **Require a pull request before merging:** This is the big one. It completely disables direct pushes and forces every change through a pull request. This simple step opens up a crucial window for review and discussion.
*   **Require approvals:** You can set a rule that at least one—or even several—teammates must approve a pull request before it can be merged. It’s a simple way to guarantee a second set of eyes on every line of code.
*   **Require status checks to pass:** This rule is a game-changer. It plugs your CI/CD pipeline directly into the merge process, blocking any merge until all your automated tests, linting checks, and builds come back green. No more broken code hitting `main`.
When you combine these rules, you build a powerful safety net. A change can only be merged if it's been formally proposed via a PR, reviewed by a peer, and validated by your automated test suite.
For organizations managing complex projects, particularly those using structured monorepos, these rules are absolutely non-negotiable. If you're curious about how this fits into bigger-picture strategies, check out these different monorepo branching strategies for teams, which lean heavily on this kind of protection.
Managing High Velocity with Merge Queues
Once your team starts moving fast, you'll hit a new kind of snag: the "race to merge." Multiple developers get their PRs approved around the same time. As soon as one PR gets merged, all the others are suddenly out of date. Now they need to be updated with main, re-tested, and re-approved. It's a frustrating bottleneck, especially in busy repositories.
This is exactly what a merge queue is designed to solve. A merge queue automates the process of lining up and merging pull requests one after another. When a PR is approved and added to the queue, GitHub creates a temporary branch that includes the latest main plus the changes from the other PRs ahead of it. It then runs all the required CI checks on this temporary, "what-if" branch.
If the checks pass, the merge goes through. If they fail, the problematic PR is kicked out of the queue without ever touching or destabilizing the main branch. It's a brilliant system that ensures your main branch is always green.
The productivity gains from this are huge. With over 420 million repositories on GitHub, the demand for features like merge queues and auto-merge has skyrocketed. You can learn how to get these settings configured for your own protected branches by diving into GitHub's official documentation.
Frequently Asked Questions About Merging GitHub Branches
Even when you've got the basics down, merging branches in GitHub can throw some curveballs. Let's dig into a few common questions that pop up in the real world—the kind of stuff that goes beyond the official docs.
These are the "what if" moments that can trip up even seasoned developers, so knowing how to handle them is key.
How Can I Undo a Pushed Merge?
So, you've merged something, pushed it, and now you're having second thoughts. It happens. Reversing a merge that's already out in the wild on a shared branch requires a delicate touch to avoid messing up your team's work. The safest way to handle this is with git revert.
For a typical merge, you'd run git revert -m 1 <merge-commit-hash>. This command doesn't erase history. Instead, it creates a brand-new commit that perfectly undoes the changes from the merge. This keeps the project's timeline intact and is completely safe for shared branches.
Whatever you do, avoid using git reset on a shared branch like main. It rewrites history, and that can cause a world of pain for anyone who has already pulled those changes.
What Is the Difference Between Fast-Forward and Merge Commit?
This really comes down to what your target branch's history looks like.
A fast-forward merge is the simple path. It only happens when your target branch (let's say main) hasn't had any new commits since you created your feature branch. In this clean scenario, Git just scoots the main branch's pointer up to the latest commit of your feature branch. The result is a perfectly straight, linear history with no extra merge commit cluttering things up.
On the other hand, a three-way merge commit is what Git does when the target branch has moved on and has new commits of its own. The two branches have diverged. To bring them back together, Git has to create a special new commit with two parents, unifying the two different lines of work.
Interestingly, you can force a merge commit even when a fast-forward is possible by using the --no-ff flag. Some teams actually prefer this because it explicitly marks where each feature was integrated into the main branch.
Should My Team Use Squash or Rebase Merges?
The "Squash and Merge" vs. "Rebase and Merge" debate ultimately comes down to what kind of Git history your team wants to maintain.
*   **Squash and Merge**: This is the go-to for teams that love a clean, high-level history on their main branch. It takes all the commits from your pull request—even the messy "fix typo" and "WIP" ones—and squishes them down into a single, well-crafted commit. This makes the project's timeline incredibly easy to read and understand at a glance.

*   **Rebase and Merge**: This one's for the purists who want a perfectly linear history with no merge commits in sight. It works by taking your feature branch's commits and "replaying" them, one by one, on top of the target branch. It creates the illusion that all the work was done in a single, straight line. Just be aware that this rewrites commit history, so your team needs to be comfortable with interactive rebasing.
The best move here is to talk it out as a team. Pick one primary strategy for your main branch and stick with it. Consistency is what will keep your project’s history predictable and easy for everyone to work with.
Stop drowning in pull request noise. PullNotifier delivers clean, real-time PR updates directly to your Slack channels, cutting through the clutter and accelerating your team's review process. Join over 10,000 engineers who trust PullNotifier to keep their development cycles moving. Streamline your workflow today at https://pullnotifier.com.