- Published on
A Developer's Guide to Generate Self Signed Certificate OpenSSL
- Authors

- Name
- Gabriel
- @gabriel__xyz
If you need to get a project running on https locally, a self-signed certificate is the quickest way to get it done. You can use a single OpenSSL command to create both a private key and a certificate, letting you secure a local API or test server in seconds. It completely bypasses the cost and hassle of dealing with a traditional Certificate Authority.
Why Self-Signed Certificates Are a Developer's Best Friend

In a developer's world, you need to move fast without compromising on security. Self-signed certificates are perfect for bridging that gap, giving you instant, no-cost encryption for anything that isn't facing the public internet.
Think about the everyday situations where this comes in handy:
*   **Local Dev Servers:** When you're building a web app on your machine, you often need HTTPS to mimic production or use browser features that require a secure context.
*   **Internal APIs:** Got a front-end on `localhost:3000` talking to a back-end on `localhost:8080`? A self-signed cert keeps that local traffic encrypted.
*   **CI/CD Pipelines:** Automated tests and deployment pipelines often have services that need to communicate securely. Self-signed certs handle this without adding external dependencies to your build process.
The Power of Local Trust
The concept is straightforward: instead of paying a third party to vouch for your server's identity, you vouch for it yourself. This isn't some new hack; it's a practice that goes way back. When OpenSSL first landed back in 1998, it quickly became the go-to toolkit for internal crypto. By 2010, tons of major companies were using it for internal SSL/TLS simply because self-signed certs were a free, instant solution for their dev environments. For a deeper dive, you can explore insights on SSL/TLS history on networksolutions.com.
A self-signed certificate is essentially a developer's digital passport for their local machine. It grants secure access between services without needing approval from an external authority, which is exactly what you want for fast, iterative development cycles.
This approach is a massive boost to the developer experience because it removes friction. Instead of waiting around for a "real" certificate or fighting with a complex setup, you just generate what you need and get back to coding. A smooth workflow is everything, and you can learn more about improving the developer experience in our guide.
Throughout this guide, we'll walk through the exact openssl commands you need for every common scenario.
Alright, let's jump right in and generate a self-signed certificate with a single, powerful command. This is easily the fastest way to get an HTTPS server up and running for local development or testing. OpenSSL is smart enough to bundle several steps into one clean action, creating both your private key and the certificate in one go.
Here's the command that does all the heavy lifting:
openssl req -x509 -newkey rsa:4096 -keyout private.key -out certificate.pem -days 365 -nodes
When you run this, OpenSSL kicks off an interactive process. It'll ask you for some information to build out the certificate’s "Distinguished Name" (DN).
Breaking Down the Command Flags
Understanding what each part of that command does is the key to really mastering OpenSSL. It’s not just a block of magic text; every flag has a specific job.
*   **`-x509`**: This is the most important flag here. It tells OpenSSL you want a self-signed certificate, not just a certificate signing request (CSR).
*   **`-newkey rsa:4096`**: This creates a brand new **4096-bit RSA** private key. Using a **4096**-bit key is a solid security practice, even if it's just for local development.
*   **`-keyout private.key`**: This just tells OpenSSL what to name your new private key file. Simple enough.
*   **`-out certificate.pem`**: And this one sets the filename for the actual certificate.
*   **`-days 365`**: This sets how long the certificate is valid for. We've set it to one year, which is a pretty sensible duration for a dev cert.
*   **`-nodes`**: This stands for "no DES." It makes sure your private key isn't encrypted with a passphrase. While that’s technically less secure, it's super convenient for development servers that need to restart automatically without you having to type in a password every time.
Navigating the Interactive Prompts
Once you hit enter, OpenSSL will start asking you for a few details. For a self-signed certificate used in a local dev environment, most of these fields aren't a big deal, but one of them definitely is.
The most important field is the Common Name (CN). For a local setup, you absolutely need to set this to
localhostor whatever local domain you're using, likemy-app.dev. This is what tells browsers and other clients which hostname the certificate is actually valid for.
The other fields—like Country Name, State, and Organization—can be filled with placeholder info. You can even leave them blank by just entering a period (.). They won't affect how the certificate works in a local context. For example, if you're setting up a local web server for testing, you might be following a process like the one in our guide on how to build a home server, where localhost is your main focus.
After you answer the prompts, you'll see two new files in your directory: private.key and certificate.pem. And that's it! You've just used OpenSSL to generate a self-signed certificate and its private key, ready to be plugged into your local web server.
Handling Modern Browser Requirements with SAN Certificates
If you've ever fired up a local server using a basic self-signed certificate, you've no doubt run into that dreaded browser privacy warning. Modern browsers are strict, and for good reason. Just having a certificate's Common Name (CN) match localhost doesn't cut it anymore. They now demand a Subject Alternative Name (SAN).
This becomes especially critical when you're trying to get a single certificate to cover multiple hostnames in your development environment. Imagine your app needs to respond to localhost, its IP address 127.0.0.1, and maybe a custom local domain like dev.myapp.local. A SAN certificate is the only clean way to manage this without juggling multiple certs or clicking through security errors all day.
Moving Beyond the One-Liner
To generate a self-signed certificate OpenSSL can use across multiple domains, we have to graduate from the simple one-line commands. The right way to do it involves a few clear stages: creating a private key, generating a Certificate Signing Request (CSR), and then, the crucial part, signing that CSR using a custom configuration file.
This multi-step process gives you fine-grained control over the final certificate, making sure it ticks all the boxes for modern security standards. It might seem a bit more involved, but it’s a core skill for anyone who takes local development security seriously.
The process is pretty straightforward when you break it down.
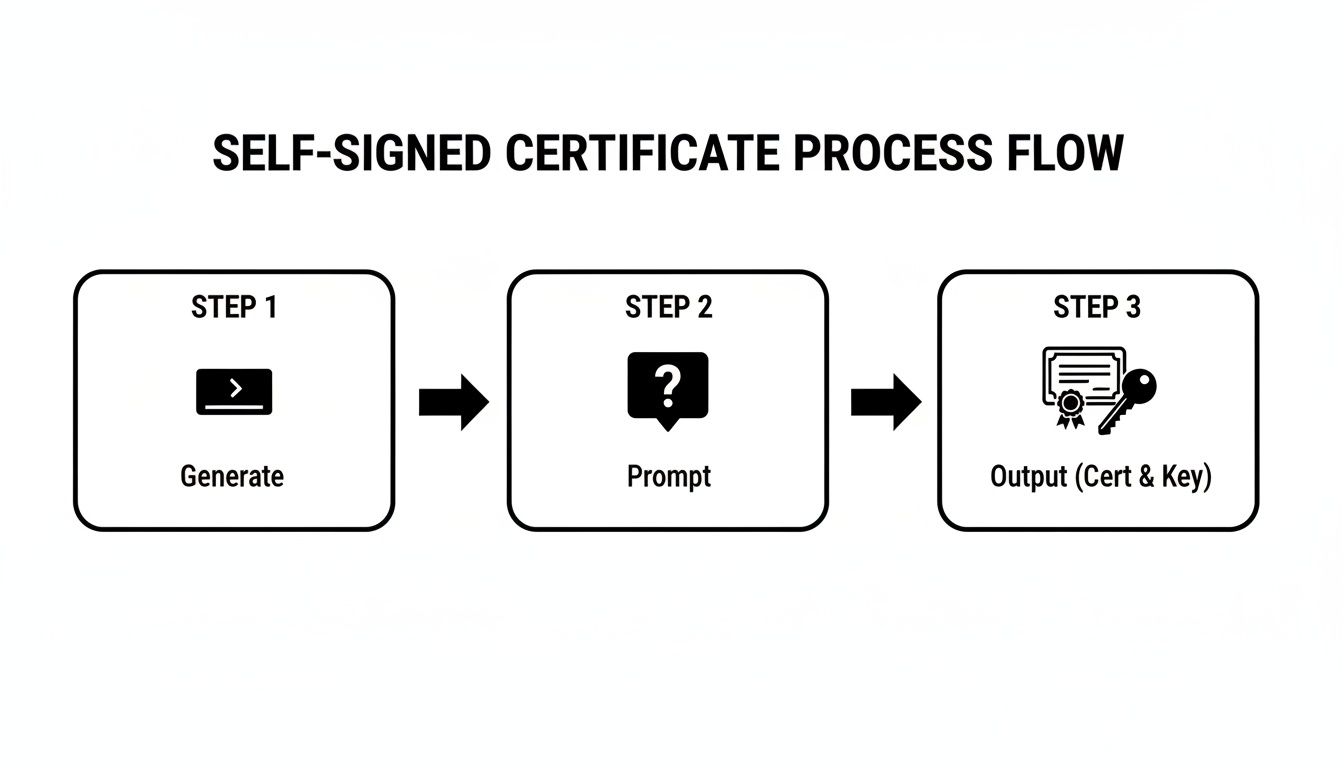
This visual shows the three main actions: running the command to generate the request, filling out the info when prompted, and getting your final certificate and key files as the output.
The Power of a Custom OpenSSL Config
The real magic behind creating a SAN certificate lies in a small configuration file, which we can call openssl.cnf. This file is what tells OpenSSL exactly which extensions to bake into the certificate—including our all-important list of hostnames.
First up, let's generate our private key.
Choosing Your Key Type RSA vs ECC
When you create a private key, you have to pick an algorithm. The two most common choices are RSA and ECC. RSA has been the standard for decades and is widely supported, while ECC is the newer kid on the block, offering smaller key sizes for the same level of security. Here’s a quick breakdown to help you decide.
| Feature | RSA (Rivest-Shamir-Adleman) | ECC (Elliptic Curve Cryptography) |
|---|---|---|
| Key Size & Performance | Larger keys (e.g., 2048, 4096 bits) mean slower performance. | Smaller keys (e.g., 256 bits) provide equivalent security with much faster performance. |
| Security Strength | Considered secure, but requires much longer keys to keep up with modern threats. | Stronger security per bit, making it more resistant to future attacks. |
| Compatibility | Universally supported by almost all browsers, servers, and devices. | Widely supported by modern systems, but some older or legacy software might not recognize it. |
| Best For | Maximum compatibility, especially when dealing with older systems. | High-performance environments, mobile, and IoT devices where efficiency is key. |
For our example, a strong 4096-bit RSA key is a perfectly good choice, balancing robust security with broad compatibility.
openssl genpkey -algorithm RSA -out server.key -pkeyopt rsa_keygen_bits:4096
Next, we'll create the CSR using our brand-new key and the configuration file.
openssl req -new -key server.key -out server.csr -config openssl.cnf
Here's what a minimal openssl.cnf for our purposes looks like:
[req] distinguished_name = req_distinguished_name req_extensions = v3_req prompt = no
[req_distinguished_name] C = US ST = California L = San Francisco O = My Dev Corp CN = localhost
[v3_req] subjectAltName = @alt_names
[alt_names] DNS.1 = localhost DNS.2 = dev.myapp.local IP.1 = 127.0.0.1
Key Insight: Pay close attention to the
[v3_req]and[alt_names]sections. The linesubjectAltName = @alt_namesis what directs OpenSSL to include all the hostnames and IP addresses you've listed under[alt_names].
Finally, we sign the CSR with our private key. This creates the final, SAN-enabled certificate that will be valid for one year.
openssl x509 -req -in server.csr -signkey server.key -out server.crt -days 365 -req -extensions v3_req -extfile openssl.cnf
With universal HTTPS adoption now at 88.08% of websites, the role of self-signed certs in development has never been more relevant. In fact, over 40% of GitHub Enterprise users generate self-signed certificates for internal webhooks and APIs. This practice enables secure integrations for tools like PullNotifier without needing to expose anything publicly. You can discover more insights about SSL certificate usage at w3techs.com.
By getting comfortable with this configuration-driven approach, you'll be able to create certificates that work seamlessly across all modern browsers and applications. That means no more security warnings and a much smoother local development workflow.
How to Inspect and Manage Your OpenSSL Certificates
Creating a certificate is only half the battle. Real mastery comes from knowing how to inspect, manage, and package it for different applications. These next steps will give you the essential commands to handle your certificates like a seasoned pro, saving you countless hours of future troubleshooting.
Verifying Certificate Details
Before you deploy a certificate, even on a local server, it's always a good idea to double-check its contents. A quick inspection can confirm everything from the expiration date to the crucial Subject Alternative Names (SANs) you configured.
The command for this is pretty straightforward. It just decodes the certificate file and prints its data in a human-readable format.
openssl x509 -in certificate.pem -noout -text
This command spits out a ton of information. You'll want to pay close attention to a few key areas:
*   **Issuer:** For a self-signed certificate, this should be identical to the Subject.
*   **Validity:** Check the "Not Before" and "Not After" dates to make sure the certificate is currently valid.
*   **Subject:** This contains the distinguished name fields like your Common Name (CN).
*   **X509v3 Subject Alternative Name:** This is the most important part. You should see all the DNS names and IP addresses you specified, confirming it's ready for modern browsers.
Packaging for Applications with PKCS#12
Many application servers, especially in Java or .NET environments, don't want separate key and certificate files. They often require a PKCS#12 archive, which you'll usually see with a .p12 or .pfx extension. This single file securely bundles the private key, the public certificate, and any intermediate certificates.
Thankfully, OpenSSL makes creating this bundle simple.
openssl pkcs12 -export -out certificate.p12 -inkey private.key -in certificate.pem
When you run this, OpenSSL will prompt you to create an "export password." This password encrypts the private key inside the .p12 file, adding a critical layer of security. Anyone who gets this file will also need the password to extract and use the key.
This step is more than just a format conversion; it's a security best practice. By bundling your key and certificate into an encrypted PKCS#12 file, you ensure they are transported and stored together as a single, protected unit.
The increasing reliance on secure internal development mirrors broader web trends. As HTTPS adoption hit 88% and Google reported 95% of its traffic as encrypted by 2025, the use of self-signed certificates for internal tasks grew to 22 million instances yearly in major markets. This is particularly vital for enterprise tools like PullNotifier, which uses them to secure webhooks between GitHub and Slack. Devs prefer this method for its speed and zero cost, a sentiment echoed in developer surveys. To learn more about these figures, you can review comprehensive SSL certificate statistics on my-ssl.com.
Ensuring Your Key and Certificate Match
Have you ever configured a server with a key and certificate, only to have it fail with a cryptic error? A surprisingly common cause is a mismatch between the private key and the certificate. This happens all the time if you've generated multiple versions and mixed up the files.
Thankfully, there's an easy way to verify they are a matching pair. The trick is to compare the modulus of the key with the modulus of the certificate; if they are identical, they belong together.
You can get these values with two separate commands:
openssl rsa -noout -modulus -in private.keyopenssl x509 -noout -modulus -in certificate.pem
For a quick check, you can pipe the output of both to a hashing tool like md5 or sha256. If the resulting hashes are the same, you've got a match. This simple diagnostic can prevent a major headache down the line.
Smart Practices and Common Mistakes to Avoid

It’s surprisingly easy to generate a self signed certificate OpenSSL can use, but using this tool responsibly is what separates a secure development workflow from a risky one. A few smart habits can save you from major headaches down the road and keep your projects buttoned up, even when they're not in production.
First and foremost, the golden rule: never use self-signed certificates in production. They belong in development, testing, or on internal-only services where you have complete control over the environment. Public-facing websites and applications absolutely need a certificate from a trusted Certificate Authority to protect users and maintain credibility. No exceptions.
Beyond that cardinal rule, a couple of technical best practices will elevate your setup from a quick hack to something more professional and secure.
Strengthen Your Security Posture
Even for local development, good security hygiene is a muscle worth building. It develops solid habits and ensures your test environment more accurately reflects modern security standards.
Here are a few non-negotiables I stick to:
*   **Use Strong Keys:** Don't skimp here. Always go for robust key algorithms. A **4096-bit RSA key** is an excellent, widely compatible baseline for strength. If you want something more modern, Elliptic Curve (EC) keys like `prime256v1` deliver comparable security with smaller key sizes, which means better performance.
*   **Set Reasonable Expiration Dates:** It might be tempting to create a certificate that’s valid for 10 years, but that's just bad practice. Shorter lifespans, like **90 or 365 days**, force you to think about automation and prevent forgotten, potentially compromised certificates from hanging around your systems.
A self-signed certificate is an assertion of trust you make to yourself. Treat it with the same respect as a production certificate by using strong cryptography and maintaining control over its lifecycle. This discipline prevents sloppy habits from spilling into production.
Avoid Dangerous Shortcuts
When you're in a rush, it’s all too easy to bypass those pesky security warnings with insecure flags in tools like curl or git. This is a super common mistake, but it's a risky one you should avoid at all costs.
The Wrong Way: Reaching for flags like --insecure or -k in your scripts. This approach completely turns off TLS verification, effectively teaching your tools to ignore all certificate warnings. It's the digital equivalent of leaving your front door unlocked and wide open.
The Right Way: Add your self-signed certificate to your local trust store. By importing your certificate.pem or .crt file into your operating system's keychain or your browser's list of trusted authorities, you are explicitly telling your system, "Hey, I made this one, and I trust it." This resolves the security errors correctly without blowing a hole in your overall security, ensuring only your certificate is trusted, not just any random invalid certificate out there.
Frequently Asked Questions About OpenSSL Certificates
When you're just starting to generate a self signed certificate OpenSSL can feel like it has a pretty steep learning curve. Don't worry, that's normal. Below are answers to some of the most common questions and roadblocks developers hit, all aimed at getting you unstuck and back to coding.
Why Does My Browser Show a NET ERR CERT AUTHORITY INVALID Error
This is the classic "welcome to self-signed certificates" error. It’s practically a rite of passage. This happens because your browser simply has no reason to trust the certificate's issuer—which, in this case, is the certificate itself.
Unlike a certificate from a trusted authority like Let's Encrypt, your homemade certificate isn't part of any default trust store. For local development, the fix is to manually import your certificate file (.pem or .crt) into your operating system's keychain or directly into your browser's certificate settings. This action explicitly tells your machine, "Hey, I know the creator of this certificate, and I trust it," which resolves the error for your local environment only.
How Can I Automate Creating Self Signed Certificates
For any kind of repeatable setup, automation is your best friend. The simplest method is to just drop your OpenSSL commands into a shell script, like generate-cert.sh. You can make it way more robust by using a configuration file to manage your SANs and passing in variables for things like domain names.
For a truly seamless workflow, integrate this script directly into your project's
package.jsonscripts, aMakefile, or even a Dockerfile. This ensures a fresh, consistent certificate is generated automatically every time you or a teammate starts up the development environment.
Taking this a step further, many teams use tools like step-ca to run a tiny, internal Certificate Authority for their homelab or development network. If you're running into issues or need more advanced support for your automation scripts, you can always check our comprehensive help documentation for additional guidance.
Whats the Real Difference Between Self Signed and CA Signed Certificates
The core difference really just boils down to one simple concept: trust.
A CA-signed certificate is issued by a globally recognized authority (think DigiCert or Let's Encrypt) whose root certificates are already built into every major browser and operating system. This creates a chain of trust that is universally accepted right out of the box.
A self-signed certificate, on the other hand, is signed by its own private key. There's no external party vouching for its authenticity. This makes it perfect for internal or development use where you can manually establish that trust, but completely unsuitable for public-facing websites where that built-in, universal trust is non-negotiable.
At PullNotifier, we believe in streamlined, secure development workflows. Our tool integrates GitHub with Slack to cut through notification noise and accelerate your code reviews, all while maintaining strict security standards. Try PullNotifier for free and see how much faster your team can ship.