- Published on
Build Slack Apps That Actually Get Used
- Authors

- Name
- Gabriel
- @gabriel__xyz
At its core, building a Slack app is a two-part dance: first, you define what your app can do with a manifest file, and second, you write the code to make it happen. This means registering your app on Slack's API dashboard, carefully choosing its OAuth scopes (think of these as permissions), and then firing up a server to listen for things like a user typing a slash command or clicking a button.
Setting Up Your First Slack App Correctly

Before you even think about writing code, the most important thing you can do is get the foundation right inside Slack's API dashboard. Mess this up, and you're setting yourself up for security headaches and a pile of technical debt down the road. This part isn't about fancy coding; it's about smart planning.
Your journey starts at api.slack.com/apps, where you'll create a new app from scratch. One of the first things you'll do is decide its purpose, which directly impacts the permissions it needs. I've seen so many new developers stumble here by requesting way too many permissions "just in case."
The Principle of Least Privilege
This is non-negotiable. Your app should only ask for the permissions it absolutely needs to do its job. If your app just needs to post messages, don't ask for permission to read a channel's entire history. Sticking to this principle builds trust with your users and massively shrinks your app's potential attack surface.
It's a critical mindset for building secure and well-behaved apps. If you want a more detailed walkthrough, this complete guide on how to create a Slack bot is a fantastic resource for getting started from the ground up.
My personal rule of thumb is to start with zero bot token scopes. Then, I add them one by one only when the app breaks and throws a
missing_scopeerror. This forces me to justify every single permission my app asks for.
Understanding Scopes And Bot Users
Scopes are the permissions that give your app power. Each one, like chat:write or commands, unlocks a specific ability. It's crucial to know what each scope does before you add it. The "bot user" is the face of your app—it's the entity that actually performs actions in the workspace.
After registering your app, head over to the "OAuth & Permissions" page to add your scopes. For the GitHub bot we're building, we'll need a few key ones.
Essential Slack App Scopes For Your GitHub Bot
Here's a quick rundown of the most common scopes you'll need for an app that reports GitHub PR updates into Slack. This isn't an exhaustive list, but it's the core set you'll almost certainly need.
| Scope Name | What It Allows | Common Use Case |
|---|---|---|
chat:write | Lets the bot post messages. | Sending PR notifications to a channel. |
commands | Allows the bot to use slash commands. | Creating a /github subscribe command. |
users:read | Allows the bot to see user info. | @mentioning a PR author by their Slack name. |
Picking the right scopes from the start saves a ton of headaches later. It ensures your app works as expected without overstepping its bounds.
Choosing your scopes carefully is a sign of a seasoned developer. To keep building on that foundation, check out our guide to master Slack for developers for more tips. Get this setup right, and you're well on your way to building an app your team will love to use.
Creating Real Interactions with Slash Commands and Modals
Static, one-way notifications are a good start, but the real magic happens when users can talk back to your app. This is the point where your project evolves from a simple notifier into a genuinely interactive tool. We'll kick things off with slash commands—the universal entry point for just about every Slack app—before diving into more complex, multi-step interactions using modals.
Slash commands are the bread and butter of Slack app interactivity. They give users a predictable, memorable way to kick off an action. Instead of fumbling through menus, a user just types /github-repo, and your app springs to life. With a framework like Bolt.js, listening for these commands is incredibly simple.
When a user runs your command, you're not just getting a trigger; you're receiving a whole payload of context. This includes who triggered it, the channel they're in, and any text they typed after the command. That's everything you need to craft a personalized, relevant response.
Crafting Dynamic Responses with Block Kit
Responding with plain text works, but let's be honest—it's pretty boring. This is where Block Kit, Slack's UI framework, completely changes the game. It lets you build rich, interactive messages using different "blocks" like formatted text sections, images, and, most importantly, buttons.
Imagine a user types /github-repo subscribe. Instead of just replying with a flat "OK," you could send a slick message with a "Confirm Subscription" button or another one that says "Change Repository." This small touch immediately makes the app feel more polished and intuitive.
Here’s a quick Bolt.js snippet that listens for a slash command and responds:
// Listen for the /github-subscribe slash command
app.command('/github-subscribe', async ({ command, ack, say }) => {
  // Acknowledge the command fast—within 3 seconds!
  await ack();

  // Now send a more useful follow-up message with Block Kit
  await say({
    blocks: [
      {
        "type": "section",
        "text": {
          "type": "mrkdwn",
          "text": `Hey <@${command.user_id}>! Let's get you set up with GitHub notifications.`
        }
      },
      {
        "type": "actions",
        "elements": [
          {
            "type": "button",
            "text": {
              "type": "plain_text",
              "text": "Configure Repository",
              "emoji": true
            },
            "value": "click_me_123",
            "action_id": "configure_repo_button"
          }
        ]
      }
    ]
  });
});
This code handles two critical tasks: it acknowledges the command immediately to avoid a timeout error from Slack, and then it follows up with a much richer message that includes an interactive button.
Gathering User Input with Modals
So, what happens when the user clicks that "Configure Repository" button? You'll probably need more information, like the repository URL. Asking a series of questions back-and-forth in a channel is clunky and unprofessional. The perfect tool for this job is a modal—a pop-up form that appears right inside Slack.
Modals are ideal for gathering structured input without cluttering up a channel. You can build them with all sorts of input elements:
*   **Plain-text inputs** for things like URLs or project names.
*   **Dropdown menus** to let users select from a predefined list.
*   **Checkboxes** for toggling settings on or off.
When a user fills out and submits the modal, your app gets another payload containing all their answers. This is how you collect the data you need to complete the task, like subscribing a channel to a specific GitHub repository's updates.
Modals are the key to building complex workflows inside Slack. They turn a single command into a guided, multi-step process, which dramatically improves the user experience for configuration tasks.
For more advanced interactions and automated responses, you might also want to explore tools specifically designed for bot development that can plug right into the Slack platform.
Responding to Button Clicks and Other Actions
Every interactive component in Block Kit, whether it's a button, a dropdown, or a date picker, has an action_id. This is how your app knows exactly what the user clicked.
Let's continue our example. When the user clicks the button with action_id: "configure_repo_button", your Bolt app will catch this event. Inside that listener, you can grab the trigger_id from the event payload to pop open your configuration modal.
This creates a seamless, intuitive flow for the user:
- User types a slash command.
- Your app replies with a Block Kit message and a button.
- User clicks the button.
- Your app listens for that button's
action_idand opens a modal. - User fills out the form and submits it.
- Your app gets the data and finishes the job.
By connecting these interactive elements, you guide the user through a logical workflow without ever forcing them to leave Slack. This is the foundation for building powerful, native-feeling Slack apps that people actually want to use.
Alright, let's get our Slack app talking to the outside world.
So far, our app is pretty good at responding to things that happen inside Slack, like slash commands and button clicks. But to build something truly powerful, we need to teach it to listen for events happening elsewhere. This is how you automate workflows, connect different services, and push proactive, useful information to your team right where they're working.
We'll use GitHub as our real-world example. The goal is to set up a webhook that automatically notifies a Slack channel whenever a new pull request is opened.
This simple connection completely changes the game. Your app goes from a reactive tool that waits for commands to a proactive engine that drives your workflow. Instead of developers constantly checking GitHub for new PRs, your app brings the updates directly to the conversation. This kind of automation is a cornerstone of solid DevOps and a huge reason teams build custom Slack apps in the first place.
The magic behind this is a webhook. Think of it as a doorbell for your app. When something specific happens in GitHub—like a PR getting opened—GitHub "rings the bell" by sending an HTTP POST request to a URL you've given it. Your app's job is to answer the door, see who's there, and then do something with that information.
Setting Up Your Webhook Endpoint
First things first, you need to create a new endpoint in your server specifically to catch these incoming payloads from GitHub. This route, maybe something like /webhooks/github, must be publicly accessible so GitHub's servers can actually reach it.
Once that endpoint is live, pop over to your GitHub repository's settings and find the webhooks section (Settings > Webhooks > Add webhook). You'll need to fill in a few key details:
*   **Payload URL**: This is the public URL for the endpoint you just created.
*   **Content type**: Stick with `application/json`. It's the standard for modern APIs.
*   **Secret**: This is a random string of text you create. It’s absolutely critical for security, and we’ll get into why in a moment.
*   **Events**: Choose which events should trigger the webhook. For our example, we'll just select "Pull requests."
After you save it, GitHub will send a little test "ping" event to your URL just to make sure it can connect. That ping is the first handshake between the two platforms. If you want to dive deeper into this, we have a complete guide to Slack and GitHub integration that covers it all.
The Critical Importance of Signature Verification
This next part is non-negotiable: never, ever trust an incoming webhook payload blindly.
Without proper verification, anyone who stumbles upon your webhook URL could send bogus or even malicious data to your app and cause all sorts of chaos. Both Slack and GitHub solve this with HMAC signatures.
When GitHub sends a webhook, it includes a special header, usually X-Hub-Signature-256. This signature is a hash created by combining your secret token with the raw request body. Your app must perform the exact same calculation on its end and check if the results match. If they do, you can be 100% certain the request is authentic and really came from GitHub.
Failing to verify webhook signatures is one of the most common and dangerous security mistakes developers make when building Slack apps. It's not an optional step; it's a fundamental requirement for a secure application.
This process is so vital that frameworks like Bolt.js have built-in middleware to handle signature verification for requests coming from Slack. You'll need to write or find a similar function to verify requests coming from GitHub.
The diagram below shows how a typical interaction flows, from the initial user command to the final action.
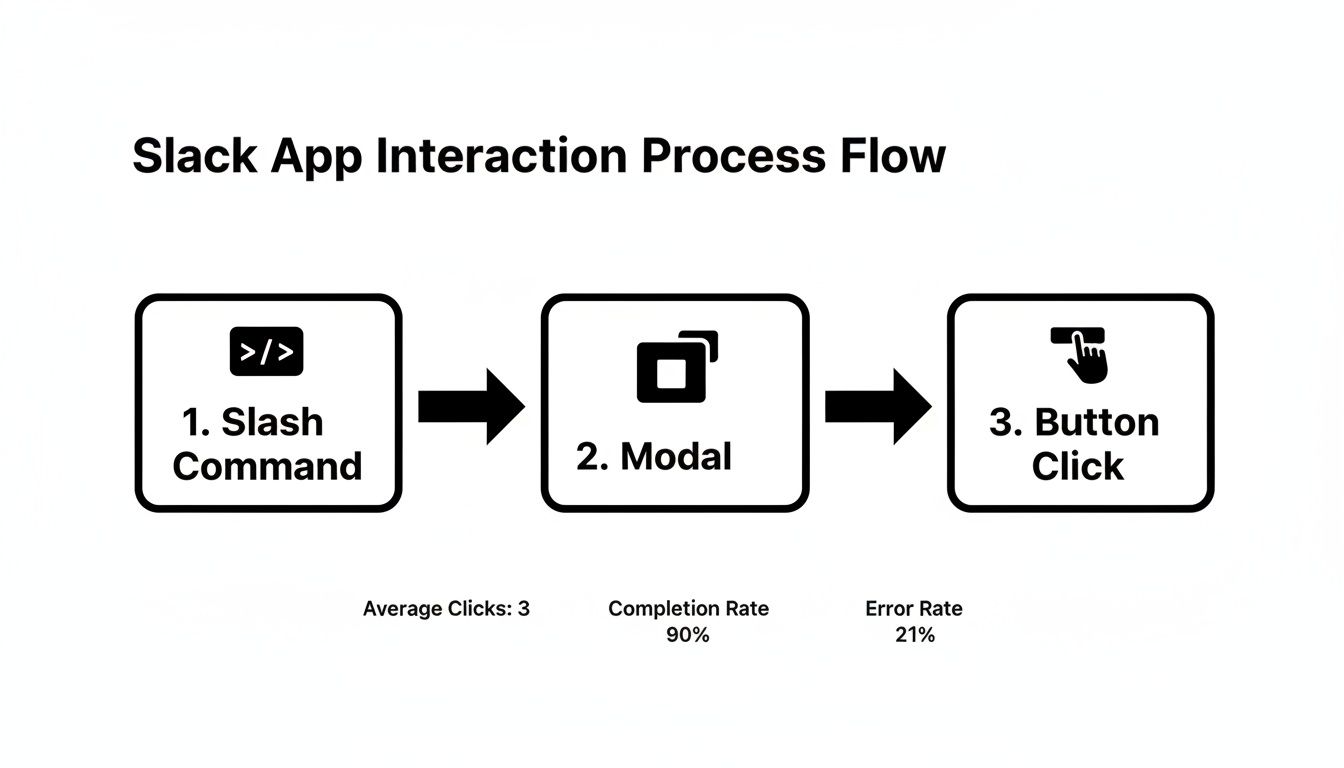
This visual really highlights the step-by-step nature of these interactions, where one event logically kicks off the next to create a smooth, seamless workflow.
Processing the Payload and Posting to Slack
Once you've verified a request is legit, you can safely parse the JSON payload. The data GitHub sends over is incredibly rich, containing everything from the PR title and description to the author's username and branch details. Now you can pick out the exact information you need to build a genuinely helpful Slack message.
Using Block Kit, you can format this data into a notification that's both clear and actionable. A solid PR notification might include:
*   The repository name and PR number.
*   A direct link back to the pull request on GitHub.
*   The PR title and who opened it.
*   Buttons for "Approve" or "View Diff" that take the user right where they need to go.
The official GitHub-Slack integration has come a long way, hitting general availability for GHES 3.8 in late 2023 and enabling thousands of enterprise teams to get project updates in Slack. You can learn more about the official integration on GitHub's site. By building your own, however, you get total control over the notification's content, style, and actions, letting you create the perfect workflow tailored to your team's exact needs.
An app that only works on your local machine is just a prototype. To turn it into a tool your team can actually rely on, you need a solid process for testing and deployment. This is where we bridge the gap between your development environment and a live, production-ready application.

The first big hurdle you'll hit when building a Slack app is that Slack’s APIs need a public URL to send events like slash commands or button clicks. Your localhost server just won't cut it, since it isn't accessible from the internet. This makes live testing seem impossible.
That’s where a tool like ngrok becomes an absolute game-changer.
Ngrok creates a secure tunnel from a public URL directly to your local machine. With a single command, you get a temporary public endpoint that you can plug into your Slack app's settings. This lets you receive real-world events from Slack, allowing you to debug interactive features and webhooks live as you code.
Managing Your Credentials Securely
As you get ready for deployment, handling your app's secrets becomes a top priority. Your Slack Bot Token and Signing Secret are highly sensitive credentials. Hardcoding them directly into your source code is a massive security risk and a rookie mistake that can get your app compromised.
The industry-standard solution is to use environment variables. These are variables that live outside your application's code and are loaded into the app's environment at runtime. This approach has a few key advantages:
*   **Better Security**: Your secrets are never committed to your Git repository, preventing them from being accidentally exposed.
*   **Flexibility**: You can easily switch between different credentials for development, staging, and production without changing a single line of code.
*   **Clean Code**: Your application code stays clean and completely independent of its configuration.
For local development, a .env file is a simple and effective way to manage these variables. Just be sure to add .env to your .gitignore file so it never gets checked into version control.
The Deployment Process
With your app tested and your secrets properly managed, you're ready to deploy. The goal is to get your Node.js application running on a cloud service where it can operate 24/7. Popular and developer-friendly platforms like Heroku, Vercel, or AWS Elastic Beanstalk are all excellent choices.
Most of these platforms integrate directly with GitHub, enabling continuous deployment. This means every time you push a change to your main branch, the platform can automatically build and deploy the new version of your app. This kind of automation is a core part of modern development workflows. You can learn more about setting up these pipelines by exploring how to start using GitHub Actions to send Slack notifications.
Remember to configure your production environment variables within your chosen cloud provider's dashboard. This is the final, critical step to ensure your live app can securely authenticate with Slack's APIs.
Once deployed, your app will have a permanent public URL. The last step is to update your Slack app's configuration—in the "Event Subscriptions" and "Interactivity & Shortcuts" sections—to use this new, permanent URL instead of your temporary ngrok one.
With that, your app is officially live, stable, and ready for your team to use. Congratulations on launching your custom Slack app
Adding Professional Polish and Advanced Features
Getting your first version launched is a fantastic milestone, but the real journey begins now. This is where you transform a functional tool into an indispensable part of your team's daily workflow. The focus shifts to reliability, user experience, and forward-thinking features that make your app genuinely great, not just good.
These details matter because they build trust. An app that anticipates user needs and handles errors gracefully is one that people actually want to use. Skip this polish, and you risk your hard work becoming shelfware.
Building for Reliability and Scale
Once your app is live, you're not just a developer anymore—you're a service provider. That means thinking seriously about operational concerns like rate limiting and error handling. If you want your app to be stable and dependable, these aren't optional.
Like any major platform, Slack uses rate limits to keep its API stable and ensure fair use for everyone. If your app bombards the API with too many requests too quickly, Slack will temporarily block it. That leads to a broken experience for your users. Always be mindful of how often you’re hitting the API, especially in response to events that might kick off a chain reaction of actions.
Thoughtful error handling is just as critical. What if the GitHub API is down when your app tries to fetch PR data? Or what if a user tries to subscribe a private channel your app hasn't been invited to? Your code needs to anticipate these hiccups and respond with clear, helpful messages instead of crashing or timing out.
A simple
try...catchblock that posts an ephemeral message like, "Sorry, I couldn't connect to GitHub right now. Please try again in a moment," is infinitely better than your app simply failing in silence.
Enhancing the User Experience
A little bit of UX polish goes a long way in making your app feel intuitive and friendly. Small touches can dramatically reduce friction and turn interactions with your app from a chore into a pleasure.
Here are a few high-impact ideas that are pretty easy to implement:
*   **A Welcoming Onboarding Message**: The first time your app joins a channel, have it post a brief, helpful message. Introduce what it does, list its commands, and maybe link to a quick guide.
*   **A Universal `/help` Command**: It's a standard for a reason. A simple `/your-app help` command that explains its functions and lists available slash commands is an essential, user-friendly feature.
*   **Use Threaded Replies for Updates**: Instead of spamming a channel with a new message for every single update on a pull request (e.g., comment added, test failed, approved), post the initial notification and then add all subsequent updates as replies in a thread. This keeps the main channel clean and conversations focused.
These features require minimal coding but have an outsized impact on how professional and well-designed your app feels. In the world of developer tools, this kind of polish is key. In fact, building integrated Slack apps for GitHub has become a huge productivity driver; some teams see as much as a 40% reduction in release cycle time. You can explore the full findings on GitHub-Slack integration benefits to see more on this.
Building a Slack app that developers love means anticipating common issues before they happen. Many apps stumble over the same hurdles—like hardcoding secrets or creating noisy notifications—which can turn a promising tool into a frustrating experience.
The table below breaks down some of these frequent mistakes and lays out the best practices to steer clear of them.
Common App Pitfalls And How To Avoid Them
| Common Pitfall | Why It's A Problem | Recommended Best Practice |
|---|---|---|
| Hardcoding secrets (tokens, webhooks) | Exposes sensitive credentials in your codebase, creating a major security risk if the code becomes public. | Store all secrets as environment variables and access them dynamically in your code. Use a secrets management tool. |
| Ignoring rate limits | Your app gets temporarily blocked by Slack's API, causing it to fail unexpectedly and appear unreliable to users. | Implement exponential backoff for failed requests and design features to be mindful of API call frequency. |
| Spamming channels with notifications | Creates excessive noise, causing users to mute or ignore the channel, defeating the purpose of the app. | Use threaded replies for updates on a single item (like a PR). Offer digest notifications or configurable alert levels. |
Lack of a /help command | New users have no easy way to discover the app's features or commands, leading to confusion and low adoption. | Implement a universal /help command that provides a clear, concise summary of what your app does and how to use it. |
| Silent failures or generic error messages | When something goes wrong, the user is left guessing what happened, which erodes trust and makes debugging difficult. | Catch specific errors and provide clear, actionable feedback in an ephemeral message (visible only to the user). |
By proactively addressing these areas, you can build an app that’s not just functional, but also secure, respectful of users' attention, and genuinely helpful.
Brainstorming Next-Level Features
Once your app is stable and your users are happy, it's time to think bigger. What other problems can your app solve? How can you deliver even more value?
Here are a few ideas to get the gears turning:
*   **Customizable Settings**: Let users configure the app’s behavior on a per-channel basis using a modal. They could choose which PR events to be notified about (e.g., only comments and approvals) or even set "quiet hours."
*   **Digest Notifications**: Instead of real-time pings for everything, offer a daily or hourly digest of all pull requests that are still pending review. This is a game-changer for busy teams looking to minimize interruptions.
*   **Track Team Metrics**: Go beyond notifications and start tracking useful engineering metrics. Think average PR review time or the number of PRs merged per week. Your app could post a weekly summary to a team leadership channel.
Features like these evolve your app from a simple notification bot into a true workflow assistant, delivering targeted insights and automation that help your team ship code faster and more efficiently.
Got Questions About Building Slack Apps?
Building a Slack app is an exciting process, but let's be real—questions are going to pop up. Over the years, I've seen the same handful of queries trip up developers time and time again. Let's get ahead of them.
Answering these common questions now will save you a ton of time debugging later and set you on the right path from the start.
Bolt vs. Web API: What's The Difference?
Think of Slack's Bolt framework as your trusty sidekick. It handles all the tedious, boilerplate stuff for you—verifying incoming requests, parsing payloads, and routing events where they need to go. It’s built to get you coding faster and sidestep common security pitfalls right out of the gate.
Going directly with the Web API is like building from scratch. You get total control, sure, but you're also on the hook for every single detail, including the absolutely critical signature verification process. For over 95% of use cases, especially when you're just starting, Bolt is simply the faster and safer bet.
The bottom line is this: Bolt lets you focus on your app's killer features, not on reinventing the wheel for basic Slack app architecture. Start with Bolt unless you have a very specific, advanced reason not to.
How Do I Manage App Permissions Without Freaking Users Out?
The golden rule here is the principle of least privilege. Only ask for the OAuth scopes your app absolutely needs to do its job. Nothing sends users running for the hills faster than an endless list of permissions during installation. It feels invasive and is a massive red flag.
Start small. If you add a new feature later that needs more access, Slack's incremental OAuth lets you ask users to approve just the new permissions when they're needed.
And be transparent! Use your app's description to explain why you need each permission. A little clarity goes a long way in building trust.
What's The Right Way To Handle My App Secret Tokens?
This one is non-negotiable: never, ever hardcode secrets like your bot token or signing secret directly into your code. Pushing those to a Git repository is a security nightmare waiting to happen. The industry standard is to manage them with environment variables.
Here’s the right way to do it:
*   **For local development**: Use a `.env` file to store your secrets. And please, for the love of all that is secure, add `.env` to your `.gitignore` file so it never gets committed.
*   **For production**: Every serious cloud provider (like [Vercel](https://vercel.com), [Heroku](https://www.heroku.com), or [AWS](https://aws.amazon.com)) gives you a secure dashboard to manage environment variables. Plug your production tokens in there, and the platform will make them available to your app safely.
This approach keeps your code clean, makes switching between environments a breeze, and is a fundamental requirement for building a secure, professional-grade Slack app.
Tired of noisy GitHub notifications and delayed code reviews? PullNotifier transforms your workflow by delivering clean, actionable pull request updates directly in Slack. Our tool cuts through the clutter, reduces review times by up to 90%, and keeps your team focused. Start for free on pullnotifier.com and see the difference today.