- Published on
A Developer's Guide to Git Remove File Scenarios
- Authors

- Name
- Gabriel
- @gabriel__xyz
So, you're staring at a file that needs to disappear from your Git project. The most straightforward way to handle this is with the git rm <filename> command. This one-liner is a powerful shortcut because it deletes the file from your local folder and stages that deletion for the next commit, all in a single step.
The Essentials of Removing Files in Git
As a project evolves, files become obsolete. Temporary build artifacts get added by mistake, or old configurations need to be tossed out. Knowing the basic git remove file commands is just part of good digital housekeeping for your repository.
The main tool for this job is git rm. It’s much more than a replacement for your operating system's delete command. It acts as the bridge between your local file system and Git’s staging area, making sure your intent to delete a file is officially recorded in version control.
Deleting and Staging in One Command
Let's say you accidentally added a temporary log file named debug.log to your project. To get rid of it for good, you’d just run this:
git rm debug.log
As soon as you run that command, two things happen:
- The
debug.logfile is gone from your working directory. - The deletion is immediately added to the staging area (also known as the index).
If you run git status, you'll see deleted: debug.log under "Changes to be committed." From here, all you need to do is commit the change with a clear message, like git commit -m "Remove temporary debug log". This method is perfect for files you are absolutely sure you no longer need. If you're new to version control, our beginner's guide to Git covers these core concepts in more detail.
Unstaging an Accidental Deletion
But what if you moved too fast? We’ve all been there. You run git rm on a file and immediately regret it, realizing you still need the local copy.
Don't panic. As long as you haven't committed the change, undoing a
git rmis straightforward. It’s a two-step recovery that separates the staging action from the file restoration.
First, you need to "unstage" the deletion. This tells Git you no longer want to include this removal in your next commit. You can do this with git reset:
git reset HEAD config/database.yml
This command takes the deletion out of the staging area. But wait—the file is still gone from your local folder. To get it back, you just need to use git checkout:
git checkout -- config/database.yml
This final command restores the file from the index, putting it right back into your working directory as if nothing ever happened. Getting comfortable with these simple removal and restoration commands gives you the confidence to manage your repository without fearing an irreversible mistake.
Untracking Files While Keeping Them Locally
It’s a classic developer mishap: you accidentally commit a file that should have stayed private. We've all been there. Whether it’s a .env file with credentials, a local config.yml, or user-specific IDE settings, you need a way to tell Git to forget about it without blowing away your local copy.
This is precisely what the git rm --cached command was built for. It removes the file from Git's tracking index but leaves your local version completely untouched. It’s the perfect tool for correcting a tracking mistake while preserving your development setup.
A Real-World Scenario
Let's say you've been working on a new feature and just realized your app.config file, packed with sensitive database connection strings, was committed in your last push. You need to get it out of version control immediately, but you still need that file for your local environment to work.
Here’s how you’d handle it.
First, run the git rm command with the --cached flag to untrack the file.
git rm --cached app.config
Next, run git status to see what happened. You'll get an output that looks something like this:
On branch main
Your branch is up to date with 'origin/main'.

Changes to be committed:
  (use "git reset HEAD <file>..." to unstage)

    deleted:    app.config

Untracked files:
  (use "git add <file>..." to include in what will be committed)

    app.config
Notice two things here: Git has staged the deletion (deleted: app.config), but it also now sees the same file as an "untracked file." This is the confirmation that the command worked perfectly—it’s no longer tracked, but it still exists right where you left it.
Using
git rm --cachedis like telling Git, "Stop paying attention to this file, but don't you dare touch my local copy." It's a fundamental skill for keeping your repository clean and secure.
Preventing Future Mistakes
Untracking the file is only half the battle. If you don't tell Git to ignore it permanently, you or a teammate will almost certainly add it again by mistake down the road. The final, crucial step is to add it to your .gitignore file.
Open your .gitignore file and add a new line with the name of the file you just untracked.
# .gitignore

# Local Configurations
app.config
Now, commit both of these changes—the removal from the index and the update to .gitignore—with a clear, descriptive message.
git commit -m "Stop tracking local app.config and add to gitignore"
This two-step process is the definitive way to handle tracking errors. You untrack the file with git rm --cached and then update .gitignore to safeguard your repository against future accidents.
Git Remove Command Comparison
To make sense of the different git rm options, it helps to see them side-by-side. Each command has a very specific effect on your working directory and the staging area (also called the index). This table breaks down what each one does and when you'd typically use it.
| Command | Effect on Working Directory | Effect on Staging Area (Index) | Common Use Case |
|---|---|---|---|
git rm <file> | Deletes the file | Stages the deletion | Standard file deletion you want to commit. |
git rm --cached <file> | Leaves the file untouched | Stages the deletion | Untracking a file (like a config or log) without deleting it locally. |
git rm -f <file> | Forcibly deletes the file | Forcibly stages the deletion | Overriding safety checks to delete a file that has local modifications. |
rm <file> | Deletes the file | No effect | Just a standard file system delete. You still need to git add the deletion. |
Choosing the right command comes down to your intent. Are you just removing a file from the project, or are you correcting a mistake where a private file was tracked? Understanding the difference between what happens locally and what gets staged is key to using Git effectively.
Permanently Removing a File from Git History
Sometimes, just running git rm won't cut it. When you accidentally commit a sensitive file—think API keys, private certificates, or configuration files with passwords—it gets baked into your repository's history forever. Deleting it with a new commit only removes it from the latest version. The sensitive data is still lurking in previous commits, ready to be found by anyone with access to the repo's full history.
This is a much bigger deal than you might think. Accidentally committing secrets is a massive security blind spot, with millions of them reportedly leaked on public GitHub repositories every year. A single misplaced file can expose your entire system, and for a company, that kind of mistake can be incredibly costly to fix.
To truly get rid of a file, you have to rewrite your repository's history. A simple git rm only stages a deletion for the next commit, leaving the file's ghost to haunt all the previous ones.
Using git-filter-repo for a Deep Clean
For this kind of serious cleanup, the modern, recommended tool is git-filter-repo. It's a powerful and much safer alternative to the older git filter-branch command, built specifically for rewriting history. It's also impressively fast.
Before you get started, you’ll need to install it. It's usually a pretty simple process:
- On macOS with Homebrew:
brew install git-filter-repo - Using Python's package manager:
pip install git-filter-repo
Once it's installed, the first step is to make a fresh clone of your repository. This is a critical safety net. In fact, git-filter-repo will refuse to run on a repository that isn't a clean, fresh copy, which helps prevent you from accidentally wrecking your main working directory.
The Rewriting Process
After you’ve cloned a fresh copy, cd into the new directory. From there, you can run the command to scrub the file from every single commit in your history.
Let's say the file you need to remove is src/config/keys.json. The command would be: git filter-repo --path src/config/keys.json --invert-paths
The --invert-paths flag is what does the magic here. It tells git-filter-repo to remove everything matching that path instead of keeping only that path. Once the command finishes, it will confirm that it has processed your repository and rewritten the history.
This diagram shows the general flow for fully untracking a file, from running the command to updating your .gitignore and checking the status. 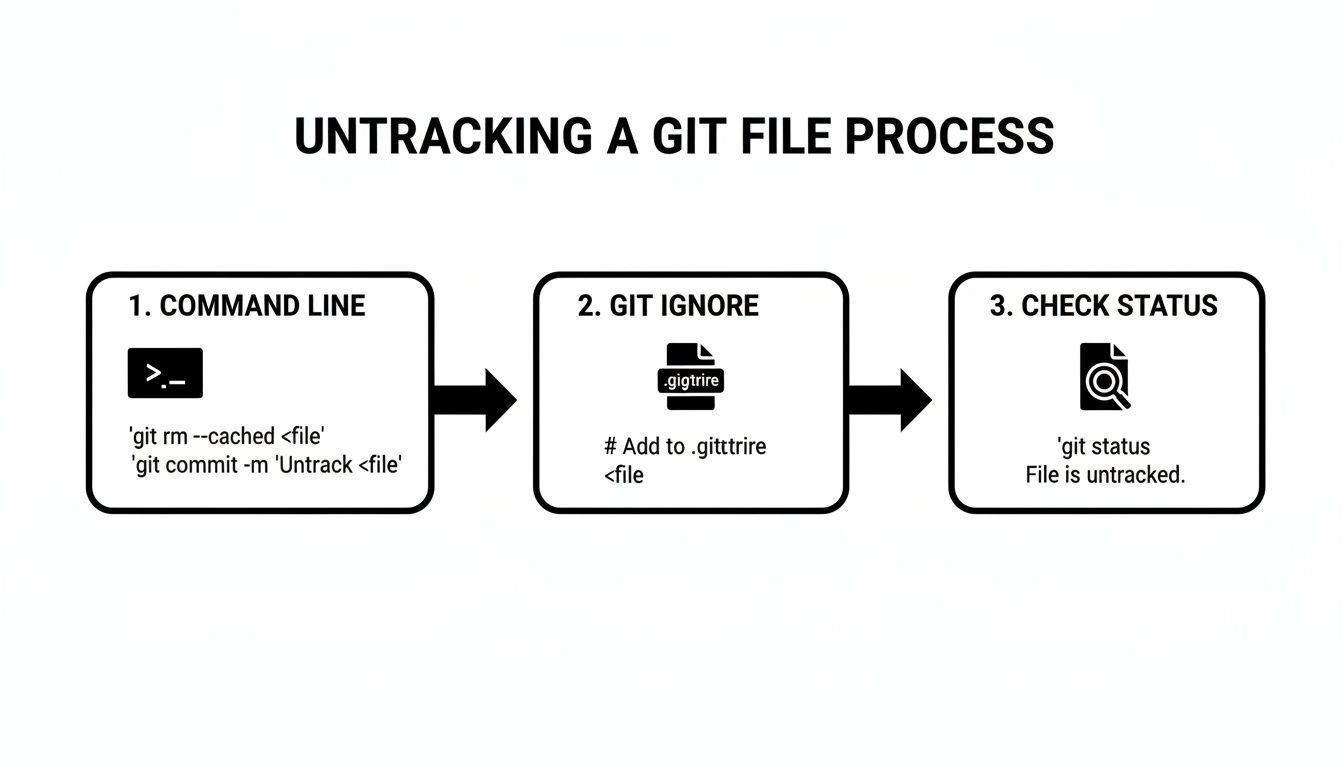 As the flowchart shows, simply removing the file isn't enough; you also need to update
.gitignore to prevent it from being accidentally committed again.
Warning: Rewriting repository history is a destructive and disruptive action. It changes the SHA-1 hash for every single altered commit. This will break all open pull requests and require every team member to re-clone or very carefully rebase their local work.
Coordinating with Your Team
Because this action rewrites your shared history, clear communication is non-negotiable. Before you even think about force-pushing the clean history to your remote, you have to get your entire team on the same page.
Everyone needs to stop pushing to the old branches and get ready to update their local clones. If you don't coordinate this, you'll end up with a confusing mess of divergent histories that can be a nightmare to sort out.
Beyond just removing files, a deep understanding of how to manage file changes, like knowing how to apply a patch file with Git, is essential for keeping a clean and accurate repository history over the long term.
Managing and Removing Files from Git LFS

Git Large File Storage (LFS) is a lifesaver for handling big binaries like game assets, videos, or datasets. But when you need to remove a file from LFS, it’s a whole different ballgame than a standard git rm.
Simply deleting the file from your latest commit won’t cut it. The large object still lives on the LFS server, eating up your storage space. To truly purge a large file and shrink your repository's size and clone times, you have to rewrite your entire Git history. It’s the only way to get rid of the LFS pointers that reference those bulky files on the remote.
Rewriting History for LFS Files
Just like when you’re scrubbing sensitive data from your history, the best tool for the job is git-filter-repo. The process is almost identical: you make a fresh clone of your repo and run a command to strip out the file. The main twist is how you deal with the LFS tracking itself.
Let's say you accidentally committed a massive 1GB video file called raw-footage.mp4. Here’s how you’d tackle its removal:
- Untrack the file in
.gitattributes. Before you do anything else, open your.gitattributesfile. Find and delete the line that tracks the video, which might look something like*.mp4 filter=lfs diff=lfs merge=lfs -text. - Rewrite your history. Run
git-filter-repoto obliterate the file from every single commit. The command is the same one we used before:git filter-repo --path path/to/raw-footage.mp4 --invert-paths. - Commit the changes. Once the history rewrite is complete, you need to commit the updated
.gitattributesfile to seal the deal.
This sequence removes both the file itself and its LFS tracking rule from your project's history. That last part is key to ensuring it won't be accidentally tracked again later.
Cleaning Up the Remote Server
Now for the critical detail that trips up so many developers: rewriting history and force-pushing does not automatically delete the LFS objects from the remote server. Those orphaned files will just sit there, continuing to count against your storage quota.
Git LFS mishaps are common, with many repositories blowing past their free 1GB quotas. Removing these large files is tricky, as LFS objects can linger on servers and count toward quotas even after history is rewritten. In monorepos, a single unremoved 500MB file can inflate clone times by 300%. Discover more about the challenges of managing LFS files in the official documentation.
After you've successfully rewritten your repository's history and force-pushed it, you have one final step. You must contact your Git hosting provider—like GitHub or GitLab support—and ask them to run garbage collection on your LFS store.
This is the step that actually frees up the storage space on the server. If you skip it, your efforts to remove the LFS file are incomplete, and your storage quota will remain stubbornly high.
A Playbook for Team Collaboration During File Removal
Permanently removing a file by rewriting Git history isn’t a solo mission—it’s a coordinated team effort that needs crystal-clear communication. When a single developer force-pushes without warning, it can unleash chaos, breaking everyone's branches and grinding productivity to a halt.
Executing a history rewrite is a high-stakes operation. To make sure everything goes smoothly when removing files in a collaborative environment, it's vital to follow established version control best practices for teams. This playbook provides a framework for leading your team through these sensitive tasks without causing widespread disruption.
Establish a Clear Communication Protocol
Before you even think about running git-filter-repo, you need a communication plan. Announcing your intentions is the single most important step to prevent confusion and duplicated work. This isn't just a courtesy; it's a project management necessity.
Your communication plan should include:
- Announcing a Maintenance Window: Tell the entire team you'll be rewriting history and force-pushing to the main branch. Clearly state the start and end times.
- Creating a "Pause" on Merges: Ask all developers to hold off on merging new pull requests into the main branch until the cleanup is complete.
- Providing Simple Instructions: Get a clear, step-by-step guide ready for your team on how they'll need to update their local repositories after the force-push is done.
Simply running
git rmleaves a file's history intact, which can lead to repository bloat or security risks. While tools likegit-filter-reposolve this, the required force-pushes fail in 28% of collaborative pushes without coordination. The friction from these issues contributes to an estimated $1.2 billion in annual productivity loss from Git-related problems. You can learn more about the impact of Git operations and how to manage them effectively.
Executing the Post-Rewrite Update
Once you've rewritten history and force-pushed the changes, the real team coordination begins. Every developer will need to update their local environment to align with the new, clean history. If they don't, you'll end up with a messy repository full of divergent histories that are a nightmare to reconcile. You can also explore our guide on how to resolve conflicts in Git for more complex scenarios.
Here’s a simple set of instructions you can give your team:
- Fetch the Updated History: First, fetch all the changes from the remote, which now includes the new history.
git fetch origin - Reset Local Main Branch: Hard reset the local
mainormasterbranch to match the freshly pushed remote version.git checkout maingit reset --hard origin/main - Rebase Feature Branches: For any active feature branches, developers will need to rebase their work on top of the new
mainbranch.git checkout my-feature-branchgit rebase main
For managers, the notification chaos after a history rewrite can be overwhelming. This is where tools like PullNotifier are built to help, consolidating status updates into a single, actionable Slack thread. This clarity allows leads to track progress, confirm all pull requests are updated, and verify the sensitive data is truly gone—all without the noise that slows teams down.
Common Questions About Removing Files in Git
Working with Git always brings up a few tricky situations, especially when you're trying to git remove file under pressure. Let's walk through some of the most common questions and edge cases developers run into.
This quick-fire Q&A will help you tackle specific problems and get a better handle on Git's file removal commands.
How Do I Undo a Git RM Before I Commit?
We've all been there. You run git rm on a file and immediately realize it was a mistake. Good news: as long as you haven't committed, it's easy to fix.
When you run git rm, you've only staged the deletion. The first thing you need to do is unstage it using git reset. This tells Git you've changed your mind about including this deletion in the next commit.
git reset HEAD <file-path>
But that only unstages the change—the file is still gone from your local directory. To get it back, you just need to restore it from the index with git checkout.
git checkout -- <file-path>
Run that second command, and the file will pop right back into your working directory, safe and sound.
Is Git RM Different from Just Deleting the File?
Yes, absolutely. Using git rm is much more direct than just right-clicking and deleting a file in your file explorer. Think of git rm <file> as a convenient two-for-one command.
It actually performs two actions at once:
- Deletes the file from your working directory, just like a standard
rmcommand would. - Stages that deletion for the next commit, which is the same as running
git addon the path of the file you just deleted.
If you were to just delete the file manually, Git would only see a missing file in your working tree. You'd then have to take the extra step of staging that deletion yourself with git add <deleted-file-path>. Using git rm is simply a cleaner and less error-prone workflow.
Will Removing a File from History Shrink My Repo Immediately?
No, and this is a common point of confusion. After you rewrite your project's history with a tool like git-filter-repo, the old, unwanted data objects are still lurking in your local repository. They’re just unreferenced or "orphaned."
To actually reclaim disk space on your local machine, you have to manually trigger Git's garbage collection process. This is what cleans out all the objects that are no longer part of any commit history.
The full process involves expiring the reflog and then running the garbage collector aggressively.
git reflog expire --expire=now --all git gc --prune=now --aggressive
After you force-push, your remote provider (like GitHub or GitLab) also needs to run its own garbage collection, so you might not see the size reduction on the remote instantly. In some cases, you may need to contact their support to speed things up. Writing a clear commit for these kinds of changes is also critical; see our guide on the Git commit message tool for best practices.
At PullNotifier, we believe in making development workflows smoother. Our tool integrates GitHub and Slack to deliver real-time, consolidated pull request updates, cutting through the noise so your team can focus on what matters. Get concise PR notifications in Slack and accelerate your code reviews with PullNotifier.