- Published on
A Developer's Guide to GitHub Pull Merge
- Authors

- Name
- Gabriel
- @gabriel__xyz
At its core, the github pull merge process is how you bring changes from one branch into another. Think of it as the final handshake after a collaborative code review, where a developer's proposed work gets officially integrated into the project's history. It’s a fundamental part of how modern development teams work together.
A Solid Mental Model of the Pull Merge Workflow
Before we get into the weeds with commands, let's build a clear picture of how code moves through a team project. Imagine the main branch as the official, stable version of your product—the single source of truth. To keep it clean and functional, you never work on it directly.
Instead, you create a separate, isolated branch to build a new feature or squash a bug. This keeps your in-progress code from breaking things for everyone else.
The entire workflow breaks down into a few key phases:
- Branching: You create an independent line of work for a specific task.
- Committing: You save your changes in small, logical chunks, creating a neat history of your progress.
- Pushing: You upload your branch and its commits to the remote repository on GitHub so your team can see it.
- Pull Request (PR): You open a formal request to merge your changes into the main branch, which kicks off the review process.
This infographic gives a great visual of how a feature branch splits off from the main branch and is later folded back in, keeping the project’s history clean and easy to follow.
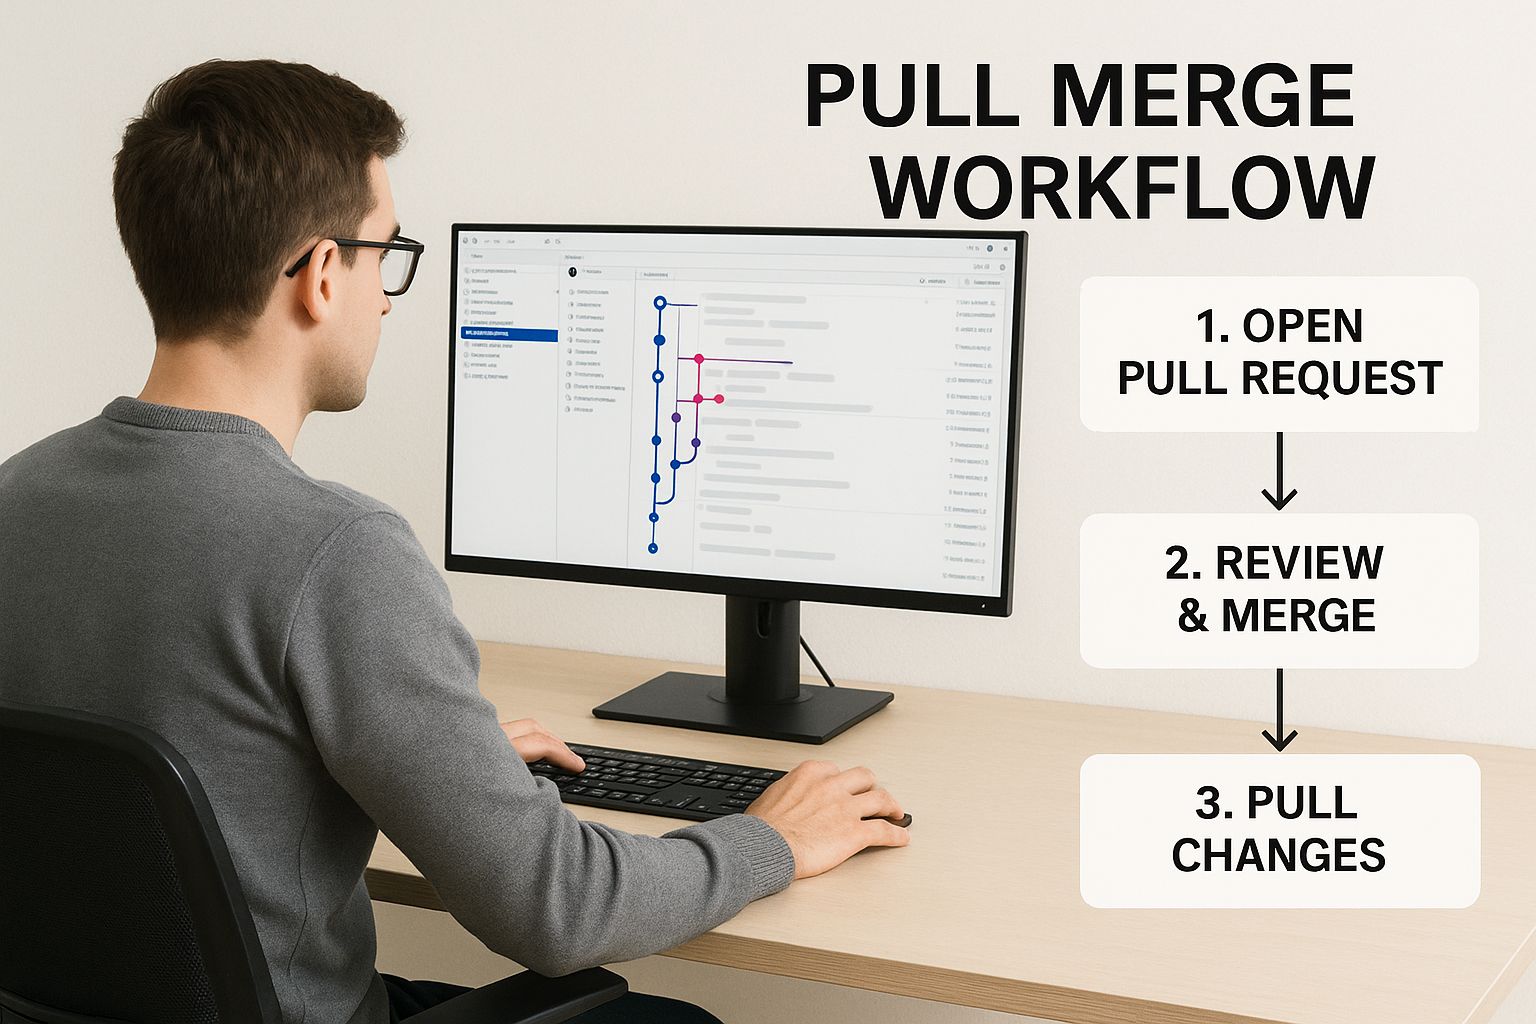
As you can see, this process prevents a messy, tangled history and makes it easy to trace where every single change came from.
The Heart of Collaboration: Pull Requests
The pull request is where the real collaboration happens. It's much more than just a request to merge code; it’s a space for discussion, automated checks, and making sure everything is up to snuff.
A well-crafted pull request tells a story. It explains the "why" behind your code, giving reviewers the context they need to provide meaningful feedback.
This review process is non-negotiable for healthy teams. With GitHub now home to over 100 million developers and 420 million repositories, the pull request has become the industry standard for proposing changes.
To keep this critical process running smoothly, it's a good idea to follow some established guidelines. We've actually put together a comprehensive guide on pull request best practices that's worth a read.
For a little extra help, many teams lean on automation to enforce quality. Here’s a quick peek at how GitHub Actions can run automated checks right inside a pull request, flagging issues before anyone even thinks about merging.
This screenshot shows a CI/CD pipeline running tests automatically—a crucial step that validates changes and gives everyone confidence in the merge. Once all the checks pass and your teammates give their approval, the code is ready to be merged, and the cycle is complete.
Key Git Actions at a Glance
Navigating the pull and merge workflow involves a few core Git commands. It's easy to get them mixed up, so here's a quick reference table to keep things straight.
| Command | What It Does | When to Use It |
|---|---|---|
git branch <branch-name> | Creates a new, local branch. | At the start of a new task, like fixing a bug or building a feature. |
git checkout <branch-name> | Switches your working directory to the specified branch. | Right after creating a new branch, or when switching between tasks. |
git add . | Stages all modified files for the next commit. | Before you commit, to tell Git which changes you want to include. |
git commit -m "Message" | Saves your staged changes with a descriptive message. | Frequently, after completing a small, logical piece of work. |
git push origin <branch-name> | Uploads your local branch and its commits to the remote repository. | When you're ready for your team to see your work and open a pull request. |
git pull origin main | Fetches and merges changes from the remote main branch into your current branch. | To sync your feature branch with the latest updates from the main codebase. |
This table isn't exhaustive, but it covers the commands you'll be using day in and day out. Getting comfortable with this sequence is the first step toward mastering the GitHub workflow.
From Local Branch to Merged Pull Request
Alright, let's move from theory to practice and walk through a full github pull merge workflow. This is the bread and butter of daily development work, and starting it the right way saves a ton of headaches down the line.
Before you even think about writing new code, you have to sync up. Your local main branch is almost certainly behind the remote version because your teammates have been busy merging their own work.
First things first, switch to your local main branch and pull the latest updates. This fetches and merges all the new commits from the team, ensuring you're building your feature on top of the most current codebase. It's a quick two-command habit that sets you up for a smoother, conflict-free process.
Branch, Code, and Push Your Work
With a freshly updated main branch, you're ready to spin up a new branch for your feature. This is your isolated workspace. A good branch name goes a long way—something descriptive like feat/add-user-authentication or fix/correct-api-typo is way more helpful than my-changes.
Once you've created and checked out your new branch, it's time to get to work. Make your changes, then stage and commit them with a clear message that explains what you did.
git checkout -b feat/update-user-profile- ...make your code changes...
git add .git commit -m "Feat: Add avatar upload to user profile"
After a commit (or a few), push your new branch up to the remote repository on GitHub. This makes your work visible to everyone else and is the necessary first step to opening a pull request. The git push -u origin feat/update-user-profile command is a great shortcut; it pushes the branch and sets it up to track the remote branch for any future pushes.
Crafting the PR and Making the Merge
Now, head over to the GitHub web UI. As soon as you push a new branch, GitHub is usually smart enough to show you a big, green button to create a pull request. This is where you package up your changes for review.
A solid pull request has a descriptive title and a body that explains the why behind your code. Don't be lazy here. Link to the relevant issue ticket, add screenshots for UI changes, and call out specific areas where you want feedback. Tagging one or two reviewers is standard practice to get eyes on your work.
A pull request isn't just about shipping code—it's a conversation. Be ready to respond to comments, push up fixes based on feedback, and keep the discussion moving until you get that approval.
Once your PR is approved, you’ve reached the final boss: the github pull merge button. GitHub gives you three main options here, and each one changes your project's history in a different way.
| Merge Option | How It Works | Best For |
|---|---|---|
| Create a merge commit | Keeps every single commit from your branch and adds a "merge commit" on top. Preserves the full, messy history. | Projects where a detailed audit trail of every single branch commit is a strict requirement. |
| Squash and merge | Combines all your branch commits into one clean commit on the main branch. This is the most popular option. | The vast majority of teams. It keeps the main branch history tidy, linear, and easy to follow. |
| Rebase and merge | Replays your commits one by one on top of main, creating a perfectly linear history without a merge commit. | Teams that are militant about a clean, linear history. It's powerful but can get complex if you're not careful. |
For most projects, Squash and merge is the sweet spot. It offers the best balance of a clean history and ease of use, turning what might have been a dozen "work-in-progress" commits into a single, focused update on the main branch.
How to Navigate Merge Conflicts
Sooner or later, every developer runs into them. No matter how clean your github pull merge process is, merge conflicts are just part of the deal when you're working on a team. They pop up when you and a teammate edit the same lines in the same file, and Git throws its hands up, unsure which version to keep.
The good news? Handling them can become a quick, painless routine.
Don't think of a conflict as an error. It's really just Git pausing the process to ask for your expert opinion. It’s not a failure; it's a request for a human to make a decision. The key is knowing what Git is showing you so you can give it the right answer.
Decoding Conflict Markers in Your Editor
When a merge conflict happens, Git will stop everything and mark up the messy files with some special symbols: <<<<<<<, =======, and >>>>>>>. They look a bit chaotic at first, but there's a simple logic to them.
This is where your code editor becomes your best friend. Modern editors like VS Code have built-in tools that make resolving conflicts way more visual and intuitive than fumbling around on the command line.
Here’s what you'll typically see when you open a conflicted file in VS Code.
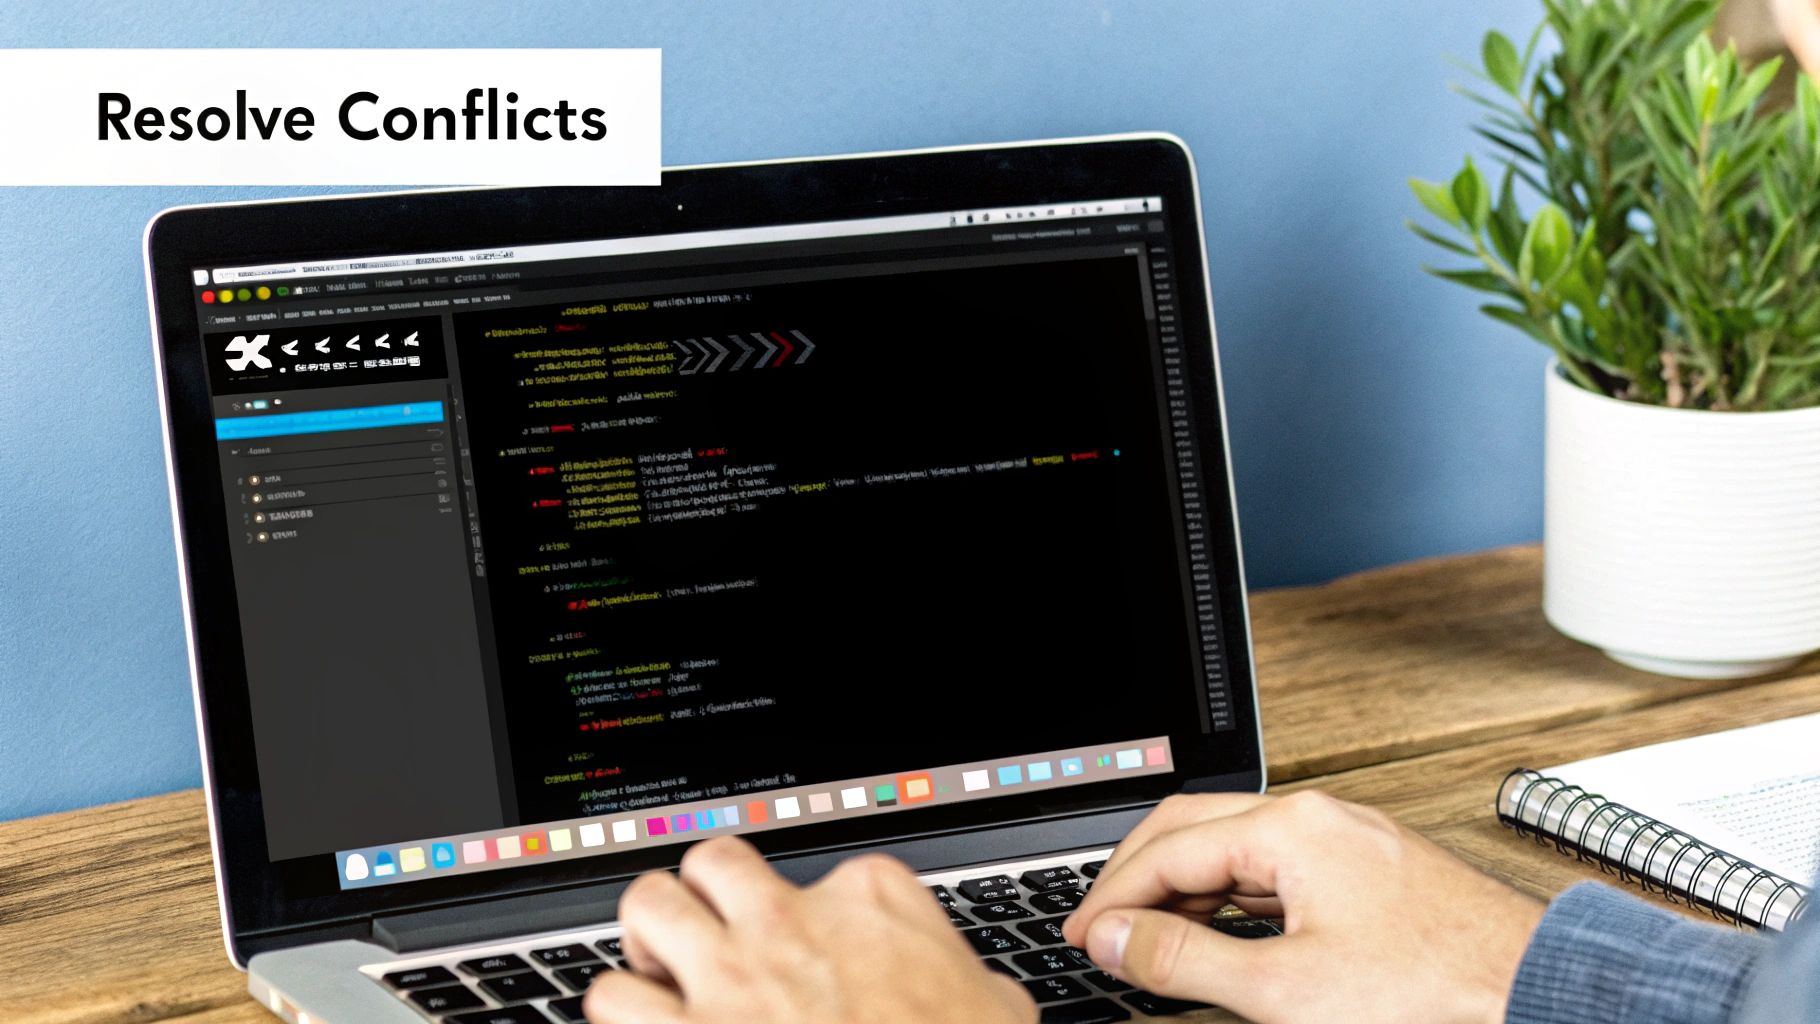
The editor highlights the problem areas and even gives you clickable actions like "Accept Current Change" or "Accept Incoming Change," which makes the whole process much clearer.
Let's break down what those markers mean:
<<<<<<< HEAD: This is the start of the conflicting code from your current branch.=======: This symbol is the divider. It separates your changes from the other person's.>>>>>>> [other-branch-name]: This marks the end of the code from the incoming branch you're trying to merge.
Your job is to clean up this block. You need to remove all the conflict markers and leave behind only the code you actually want to keep. Sometimes you'll pick one version, sometimes the other, and sometimes you'll manually edit it to combine the best of both.
A Practical Resolution Strategy
Fixing a conflict is a methodical process. Let's imagine you tried to merge main into your feature branch and, boom, a conflict appears. The first step is simple: don't panic. Just take a look.
Instead of blindly clicking a button, actually read the code. Figure out what your change was intended to do and what the incoming change was for. More often than not, the right solution isn't just one or the other—it's a careful edit that blends the logic from both. For instance, maybe you both added a new parameter to the same function, and you need to keep both of them.
The most common mistake I see developers make is panicking and just picking a version to make the scary red text go away. Take a breath. Understand the intent behind both changes before you act. If you're not sure, the fastest way to a solution is often just asking the person who wrote the other piece of code.
Once you've edited the file, removed all the <<<<<<<, =======, and >>>>>>> markers, and are happy with the result, finishing the merge is just two simple steps:
- Stage the resolved file: Run
git add <file-name>to tell Git you've sorted it out. - Commit the merge: Use
git commit. Git usually pre-populates a commit message for you, something like "Merge branch 'main' into your-feature-branch". You can just save it and close the editor.
And that's it. After the commit, the merge is officially complete, and your branch history is unified again. Now you can get back to your work or push your changes. By following these steps, you can turn a potential roadblock into a minor, manageable task in your github pull merge workflow.
Advanced Techniques for an Optimized Workflow
Once you’ve got the hang of the github pull merge process, you can start shifting your focus from just getting it done to getting it done well. There are a few powerful habits that seasoned developers use to speed things up, keep the project history clean, and generally make life easier for everyone on the team.
Picking up these techniques isn’t just about working faster. It's about being a better teammate by making your contributions and pull requests easier for others to review.
Craft a Clean History with Interactive Rebase
Before you even think about opening a pull request, take a second to look at your branch's commit history. Does it tell a clean, logical story? Or is it a chaotic mess of "fix typo," "wip," and "oops, forgot a file" commits? An interactive rebase (git rebase -i) is your best friend here.
This command pops open an editor with a list of all your commits, giving you the power to:
- Squash a bunch of tiny commits into a single, meaningful one.
- Reword vague commit messages to be crystal clear.
- Reorder commits to tell a more coherent story of how you built the feature.
A clean commit history is a gift to your reviewers. It presents a concise, easy-to-follow narrative of your changes, which seriously cuts down on their cognitive load. The result? Faster, more effective reviews.
Think about it: a messy history with ten "work-in-progress" commits is a nightmare to review. A single, well-written commit that says "Feat: Implement user profile avatar uploads" is a breath of fresh air.
Make Pull Requests Smaller and More Focused
The single biggest thing that slows down a review is the size of the pull request. It’s simple math: a PR with 500 lines of changes will always get reviewed faster and more carefully than one with 5,000.
Break down big features into smaller, self-contained chunks that can be reviewed and merged one by one. This isn't just about speed; it has some huge benefits:
- Faster Reviews: Small PRs are way less intimidating. A reviewer can knock one out in a single sitting over a cup of coffee.
- Reduced Conflict Risk: The faster a branch gets merged, the less time it has to drift away from the main branch. This means fewer gnarly merge conflicts.
- Easier Reverts: If a small change introduces a bug, it’s trivial to find and revert. Trying to untangle a bug from a massive, monolithic PR is a headache nobody wants.
This approach also fits perfectly with automation. You can take this a step further by setting up CI/CD pipelines with GitHub Actions to automatically run tests on every small PR you create.
Write Pull Requests That Review Themselves
Your pull request description is your best chance to give reviewers all the context they need. A great title and a well-written description can slash approval times because you’re answering questions before they even have to ask them.
A top-tier PR description should always cover these bases:
- The "Why": What problem are you solving? What feature are you adding? Always link back to the relevant ticket or issue.
- The "How": Give a quick, high-level summary of your approach. Did you add a new library? Refactor a major component? Let them know.
- Testing Instructions: How can a reviewer actually test your changes? Be specific. If they need certain user credentials or have to follow a specific flow, spell it out.
Automating other parts of the PR process, like getting it in front of the right people, is another huge time-saver. Our guide on how to automatically assign reviewers in GitHub walks you through setting that up. When you combine clear communication with smart automation, your whole github pull merge workflow starts to feel effortless.
Using PR Metrics to Improve Team Collaboration
An efficient github pull merge workflow goes way beyond just running the right commands. It’s really about team dynamics and communication. When pull requests stall or reviews drag on for days, the problem is rarely technical. It's almost always a symptom of a bottleneck in your process.
This is where PR metrics come in. They aren't for micromanaging people; they're for gathering data that can kickstart some genuinely productive conversations. By tracking the right indicators, you can stop guessing what's slowing you down and start knowing exactly where the friction is.
Key Metrics That Tell a Story
Certain numbers give you an immediate look into the health of your team's pull request lifecycle. If you focus on just a few core metrics, you can avoid data overload and zero in on specific areas that need a little help.
Here are the ones I’ve found most valuable:
- Time to First Review: How long does a PR sit there before a teammate even leaves the first comment? A long wait time here is a classic sign of a reviewer availability issue or a lack of clear ownership.
- Time to Merge: This is the PR's entire lifespan, from the moment it's opened to the second it's merged. If this number is consistently high, it could mean your PRs are too big, the requirements aren't clear, or the review process itself is just plain clunky.
- Review Cycles: How many rounds of back-and-forth feedback does a typical PR go through? A high number of cycles often suggests that the initial PRs are missing important context or aren't meeting quality standards from the get-go.
The goal of tracking metrics is never to call out individuals. It's to find patterns in the process itself. When a team sees that their average 'time to merge' is 72 hours, it becomes a shared problem to solve together.
Turning Data into Actionable Improvements
Gathering data is just step one. The real magic happens when you actually talk about it as a team. The best way to use these metrics is by running effective retrospective meetings where you can discuss the insights and decide on concrete actions. This is how you turn abstract numbers into real process changes.
For example, some tools can automatically pull detailed GitHub pull request stats, like the total PRs merged, wait time for first review, and how many review cycles it takes. The data almost always shows that engineers who create smaller, more focused PRs see much higher merge rates and faster turnaround times.
If your team’s metrics are showing large, slow-moving PRs, this data gives you a powerful argument for adopting a small-batch approach. You can get a much deeper look into the specific key metrics for faster code reviews in GitHub right here on our blog.
Common Questions About GitHub Pull Merges
Even the smoothest workflows run into tricky situations. When it comes to merging branches in GitHub, a few questions pop up time and time again.
Let's clear up some of the most common points of confusion. Getting these right will save you a ton of headaches down the road.
What Is the Difference Between Git Pull and Git Fetch?
This is easily one of the most frequent questions I hear. The simplest way to think about it is that git fetch is like a recon mission, while git pull is the full-on invasion.
When you run git fetch, you’re downloading all the latest changes from the remote repository, but—and this is the important part—it doesn’t touch your local working files. It just updates your local copy of the remote branch, giving you a chance to see exactly what’s changed before you decide to integrate it.
On the other hand, git pull is a two-for-one command. It runs a git fetch and then immediately follows it with a git merge. It grabs all the new code and tries to merge it directly into whatever branch you're currently on. This can be fine, but it can also lead to unexpected conflicts if you weren't ready for them.
I always recommend using
git fetchfirst. It gives you a moment to pause, assess the incoming changes, and decide how you want to handle them. It’s a small habit that gives you a massive amount of control and prevents nasty surprises.
Should I Use Merge, Squash, or Rebase?
The "right" answer here almost always depends on your team's policy for keeping the project history clean. Each method has its own trade-offs between detail and clarity.
Here’s a quick breakdown:
- Standard Merge: This approach preserves the entire history of a feature branch, creating a new "merge commit" on your main branch. It's super transparent, but it can also make your
git loglook like a tangled mess. - Squash and Merge: This is my personal favorite and a popular choice for many teams. It takes all the commits from your feature branch and squishes them into one single, neat commit on the main branch. You get a tidy history without losing the context of the feature.
- Rebase and Merge: Rebase essentially replays your feature commits on top of the latest version of the main branch. The result is a perfectly linear, easy-to-read history. It's powerful, but it can get complicated and risky if you’re not careful, especially on shared branches.
For most teams, squash and merge offers the best of both worlds. It keeps things simple and the history clean.
How Can I Undo a Merge in GitHub?
So, you’ve merged something you shouldn't have. It happens to the best of us. The safest way to fix this is with git revert.
Instead of trying to delete the merge from history (which can cause chaos for your teammates), git revert creates a new commit that simply undoes the changes from the original merge. It's a clean, forward-moving fix that keeps the project's history intact.
Whatever you do, avoid using git reset on a shared branch. Rewriting history that other people are working on is a recipe for disaster and will almost certainly lead to some very confused (and frustrated) collaborators.
Stop letting pull requests get stuck in review. PullNotifier integrates with Slack to send smart, real-time PR updates, cutting through the noise and keeping your team in sync. Start accelerating your code reviews today.