- Published on
A Practical Guide to Connecting Jira to GitHub
- Authors

- Name
- Gabriel
- @gabriel__xyz
Connecting Jira to GitHub isn't just a technical tweak; it's a strategic move that brings project management and code development into a single, unified space. By linking them, you create one source of truth for your entire team.
This integration puts status updates on autopilot and gives everyone complete visibility, tying every single commit and pull request directly to its project task. The outcome? Less grunt work and a workflow that's both efficient and transparent.
Why Connecting Jira to GitHub Transforms Your Workflow

Hooking up Jira and GitHub is way more than a simple convenience—it fundamentally overhauls how modern dev teams get work done. It closes the gap between planning in Jira and the hands-on coding in GitHub, tearing down the communication silos that kill momentum. You end up with a cohesive environment where every team member has the context they need, right where they're working.
For developers, the biggest win is killing context switching. Instead of breaking their flow to manually update a Jira ticket, they can trigger status changes straight from their commit messages. It's a small change with a massive impact on focus and productivity.
For managers, it delivers a real-time, transparent view of project progress. No more chasing down updates or trying to piece together information from ten different places. Every commit, branch, and pull request is automatically linked to a Jira issue, creating an accurate, up-to-the-minute status report.
The Before and After of a Typical Sprint
Think about a typical sprint without this integration. A developer wraps up a feature, pushes the code, then has to jump over to Jira, hunt down the right ticket, and manually drag it from "In Progress" to "In Review." This disconnect is a classic recipe for delays and outdated project boards.
Now, picture that same sprint with the integration. The developer simply pops the Jira issue key into their commit message. The moment they create a pull request, the Jira ticket automatically transitions to "In Review." Once the PR gets merged, the ticket moves to "Done." This kind of seamless process is at the heart of effective workflow automation that can boost efficiency today.
This connection is a strategic step towards modern development, allowing teams to unify project tracking with code management and supporting advanced concepts like implementing Agile DevOps for enterprises.
Tangible Benefits Beyond Convenience
The value of this connection goes far beyond saving a few clicks. It helps build a more collaborative and accountable culture.
*   **Enhanced Visibility:** Product owners and QA engineers can see the exact code changes tied to a feature or bug fix without ever leaving Jira.
*   **Improved Traceability:** Every line of code can be traced back to a specific requirement or user story—something that's invaluable for audits and quality control.
*   **Faster Feedback Loops:** With automated notifications, QA teams know the second a feature is ready for testing, shrinking the time between development and deployment.
In the fast-paced world of software development, some teams have reported up to 90% reductions in code review delays because of this automation. Modern dev teams that nail their GitHub-Jira integration eliminate manual status updates entirely, creating a self-updating system that keeps everyone on the same page.
Choosing the Right Integration Method
Before you connect Jira to GitHub, it’s worth taking a moment to figure out which path is right for you. The choice you make here will shape your team’s workflow, so it’s not a decision to take lightly. You’re essentially looking at two main routes: using the native 'GitHub for Jira' app or investing in a more powerful third-party solution from the Atlassian Marketplace.
What’s the best fit? It really boils down to what you need. Are you just looking for a simple way to trace which commit fixed which bug? Or do you need a deep, two-way sync that keeps Jira and GitHub perfectly in step with complex automation? Your answer will point you straight to the right tool.
Native Integration: The GitHub for Jira App
The official ‘GitHub for Jira’ app, which is a joint effort from Atlassian and GitHub, is where most teams start. It’s excellent for creating basic, one-way visibility from your code repositories directly into your project management tool.
Its main job is to link development work—like commits, branches, and pull requests—to specific Jira issues. A developer just needs to include a Jira issue key (like PROJ-123) in their commit message or branch name, and the app automatically pulls that activity into the development panel on the Jira ticket. Simple as that.
*   **Best for:** Teams who want a straightforward, free solution to see which code changes belong to which task.
*   **Key Feature:** It offers clean traceability, letting project managers and QA folks see all related code activity right inside Jira.
*   **Setup Complexity:** Generally pretty low. Since it's the official integration, the documentation is solid and the process is well-defined.
But that simplicity comes with some trade-offs. The native app isn't a true bidirectional sync. If you update something in Jira, it won’t automatically update a corresponding Issue in GitHub. It also falls short if you need to sync custom fields or manage complex workflow states between the two systems.
Third-Party Marketplace Apps
For teams that need more than just a window into their repos, the Atlassian Marketplace is your best friend. It’s packed with heavy-duty third-party apps designed for the kind of complex, two-way synchronization and advanced automation the native app just can't handle.
These tools can create and update items across both platforms automatically. Imagine a bug report created in Jira instantly generating a new Issue in a specific GitHub repository, complete with mapped fields for priority and assignees. Then, when a developer closes the GitHub Issue, the app seamlessly transitions the Jira ticket to 'Done.'
This level of integration shifts the connection from a passive information feed to an active, automated workflow. It keeps both systems as a single source of truth without anyone on the team having to do manual, repetitive updates.
Put it this way: the native app shows you what happened, while a third-party app makes things happen.
Comparing Your Options Side-by-Side
To make the right call, you need to look at the key differences in features, complexity, and of course, cost. This table should help clear things up and show you which path aligns best with your team's needs, whether you're a small startup or a massive enterprise.
Integration Method Comparison: Jira to GitHub
This table breaks down how the native app stacks up against the more feature-rich third-party options available on the Marketplace.
| Feature | Native 'GitHub for Jira' App | Third-Party Marketplace Apps |
|---|---|---|
| Synchronization | One-way (GitHub to Jira) | Bidirectional (two-way sync) |
| Automation | Limited to displaying linked activity | Advanced rules, triggers, and workflow automation |
| Custom Field Mapping | Not supported | Fully supported, allowing for complex data mapping |
| Setup Complexity | Low | Moderate to high, depending on customization |
| Cost | Free | Typically subscription-based (paid) |
| Use Case | Basic traceability and visibility | Complex, automated, cross-platform workflows |
| Platform Support | GitHub.com & Enterprise / Jira Cloud & Server | Varies by app, but often supports a wider range of platforms |
Ultimately, the choice comes down to your workflow's complexity and your security needs. If your developers live in GitHub and your project managers live in Jira, and you need them to feel like they're working in the same system, a third-party app is probably a worthwhile investment. But if all you need is a simple breadcrumb trail connecting commits to tasks for record-keeping, the native integration is a perfect, cost-effective place to start.
Setting Up the Native GitHub for Jira Integration
Alright, let's get our hands dirty. The most direct way to get your development work talking to your project management is by setting up the official 'GitHub for Jira' application. This native integration, built jointly by Atlassian and GitHub, is designed to be pretty straightforward. Its main job is to pull crucial development context right into your Jira issues where you need it most.
The whole process boils down to a few key steps. You'll start by finding and installing the app from the Atlassian Marketplace, then you'll need to authorize it within your GitHub organization. I'll walk you through each part, pointing out what you should see on your screen and explaining the slight differences between connecting to GitHub.com versus a self-hosted GitHub Enterprise Server.
This decision tree gives you a quick visual of the paths for cloud and server deployments.
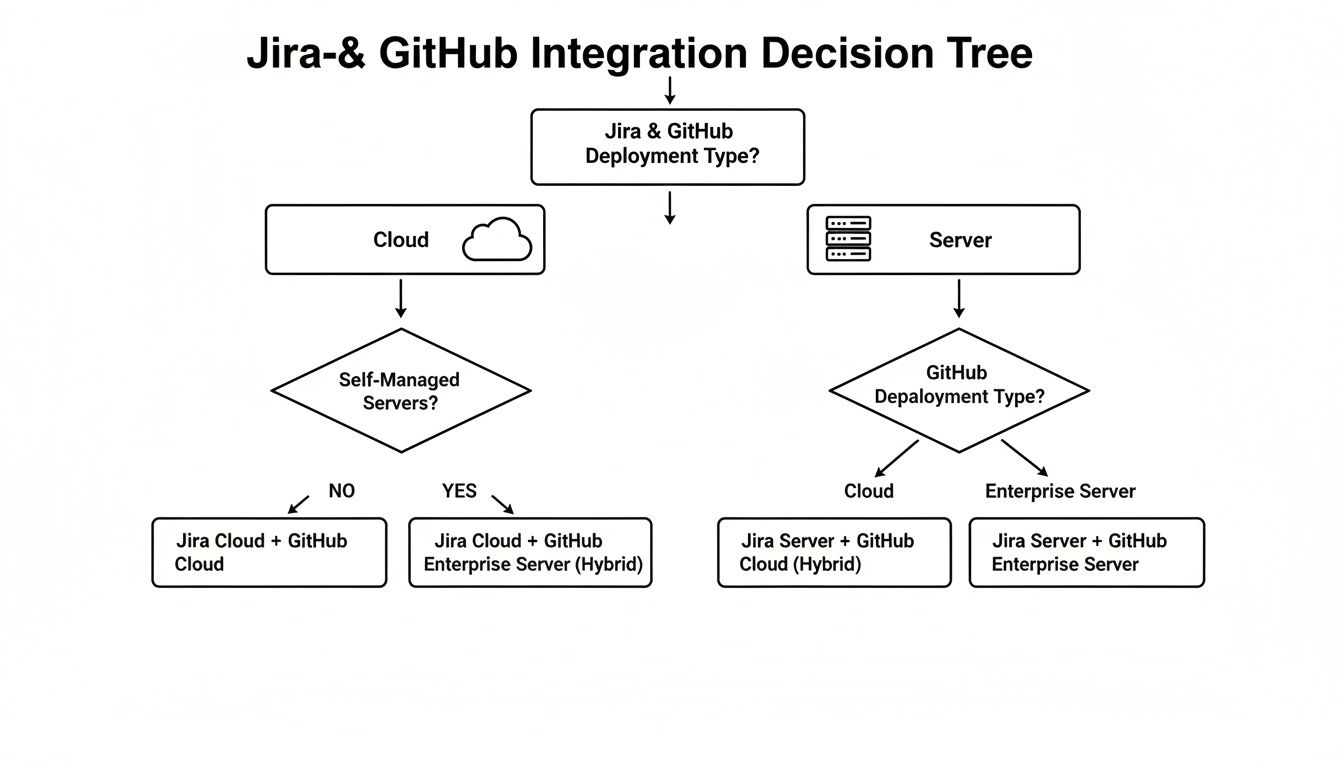
Think of this as your first fork in the road. The choice you make right at the start—whether your Jira is Cloud or self-managed Server—shapes the rest of the configuration journey.
Starting in the Atlassian Marketplace
Everything starts inside Jira. If you’re a Jira admin, head over to the Apps section in your settings and click on Find new apps. A quick search for "GitHub for Jira" should pop the official app right to the top. Make sure you grab the one developed by GitHub; it's the most current and officially supported version.
Once you find it, click "Get it now," and Atlassian will handle the installation in the background. It only takes a moment. From there, you'll hit Get started to jump right into the configuration page. This is where the real magic happens, as you establish the link between your Jira instance and your GitHub organization.
Authorizing the Connection to GitHub
With the app installed, Jira will prompt you to connect a GitHub organization. This is a critical step, and you'll need to have owner-level permissions in the GitHub org to grant the necessary access. You'll get redirected over to GitHub to authorize the "Jira" application.
This authorization screen is an important security checkpoint. GitHub will clearly list the permissions the app needs, which are mainly:
*   **Read access to code and metadata:** This lets the app fetch details about commits, branches, and pull requests.
*   **Read and write access to issues and pull requests:** This is needed to display rich PR information inside Jira.
*   **Webhook administration:** This allows the app to create webhooks in your repos to get real-time updates.
After you approve, you’ll be sent back to Jira with a confirmation that your GitHub organization is successfully connected. For many teams, especially those focused on tightening up their code review process, this is the perfect time to set up better notifications. If that's you, check out our guide on how to get GitHub PR notifications in under a minute.
The guiding principle here is least privilege. The app is built to only ask for the permissions it absolutely needs to show development activity in Jira, keeping your codebase secure.
Connecting to GitHub Enterprise Server
What if your team uses a self-hosted GitHub Enterprise Server? The process has one extra step. Instead of a simple web authorization, you'll need to create a new GitHub App inside your Enterprise Server instance first.
- In your GitHub Enterprise Server, go to your organization's settings and find Developer settings.
- Create a new GitHub App and give it a clear name, something like "Jira Integration."
- You'll need to grab the App ID and Client ID from this new app. You will also need to generate a Client secret and a private key.
- Jump back to the GitHub configuration screen in Jira and plug in these credentials to lock in the secure connection.
This manual setup gives you full control over the connection within your own network, which is a common requirement for enterprises with strict security and data policies.
Finalizing Repository Access
The very last step is deciding which repositories Jira can see. The integration doesn't just sync every single repo in your organization by default. Instead, you get granular control to choose either All repositories or Only select repositories.
As a best practice, especially for security and keeping things tidy, start by selecting only the active repositories tied to projects you're tracking in Jira. You can always add more later. This targeted approach ensures that only relevant development info shows up in your Jira tickets, keeping the development panel clean, focused, and actually useful.
Automating Your Workflow With Smart Commits

So, you've connected Jira and GitHub. You've essentially built a bridge between your code and your project board. Now it's time to send some intelligent traffic across it. This is where automation turns a simple informational link into a living, self-updating workflow that saves your team time and keeps everyone in sync.
The secret sauce here is smart commits. This feature lets developers update Jira issues—think transitioning statuses, dropping comments, or logging time—right from their Git commit messages. It’s a game-changer because it eliminates the constant context-switching just to give a status update, keeping developers in their terminal and focused on code.
The Anatomy of a Smart Commit
A smart commit message isn't complicated, but it does follow a specific syntax that the Jira integration is built to understand. The key is to always start with the Jira issue key, then add one or more commands prefixed with a hashtag.
The basic structure looks like this: ISSUE-KEY #command <optional-parameters>
Let’s say a developer just squashed a bug for ticket BUG-42. They could write a commit message that not only describes the fix but also moves the Jira ticket to the "Done" column.
git commit -m "BUG-42 #done Fixed the login validation issue."
With that one line, both the codebase and the project board are updated. It’s that simple. Mastering this syntax is the first step toward a more efficient workflow. If you want to dive deeper into crafting clean and effective messages, check out these Git commit message best practices for 2025.
Practical Examples You Can Use Today
Let's go beyond the basics. Here are a few real-world smart commit examples your team can start using right away. You can even combine commands to perform multiple actions in a single commit.
Transition an issue and add a comment:
git commit -m "PROJ-115 #in-progress #comment Starting work on the API endpoint."This moves ticketPROJ-115to "In Progress" and adds a quick note for the team.Log time spent on a task:
git commit -m "FEAT-98 #time 2h 30m #comment Refactored the user profile component."This logs 2 hours and 30 minutes of work against ticketFEAT-98and includes a helpful comment.Resolve an issue and add a final comment:
git commit -m "BUG-204 #resolve #comment The memory leak is patched. Ready for QA."This transitionsBUG-204to its "Resolved" state, signaling it's ready for the next phase.
The key is consistency. By establishing a team-wide convention for using smart commits, you ensure the Jira board becomes a reliable, real-time reflection of development progress without any extra administrative effort.
Beyond Commits With Jira Automation Rules
Smart commits are fantastic, but they're just one piece of the puzzle. The real power move is combining them with Jira's own automation engine. You can create rules that trigger actions in Jira based on what's happening over in GitHub.
Imagine a workflow where creating a pull request in GitHub automatically moves the linked Jira ticket to "In Review" and assigns it to the QA lead. When that PR gets merged, another rule could transition the ticket to "Done." This creates a completely hands-off system where the development lifecycle itself drives project status.
Here’s how you might set one up:
- Trigger: Pull request created in GitHub.
- Condition: Jira issue status is "In Progress."
- Action: Transition issue to "In Review" AND assign to the project's lead tester.
This kind of automation creates smooth handoffs between development and QA, cutting down the idle time where a feature is code-complete but hasn't been picked up for testing. To take it even further, look into leading CI/CD tools that integrate with GitHub to automate your builds, tests, and deployments.
By embracing both smart commits and Jira automation rules, you transform your integration from a simple data link into an intelligent system. You're building a workflow that reacts to real development events, freeing your team from manual updates so they can focus on what they do best: building great software.
Troubleshooting Common Integration Problems
Even the smoothest Jira and GitHub integration can hit a bump in the road. When things go sideways, it’s usually one of a few usual suspects: permissions, a simple configuration mismatch, or an honest user error. Knowing where to look can save you a ton of frustration and turn a showstopper into a five-minute fix.
This part of the guide is all about getting you unstuck. We'll walk through the most common headaches, from GitHub repos playing hide-and-seek to smart commits that just don't seem to land. Once you know the why, the how becomes a lot easier.
When GitHub Repositories Do Not Appear in Jira
It's a classic setup moment: you're ready to connect your repos in Jira, but the list is either empty or missing the one you actually need. Nine times out of ten, this is an authorization problem hiding in your GitHub organization settings.
The user who originally configured the integration needs to have owner-level permissions for the GitHub organization. If that user's access gets downgraded or they leave the team, the connection can silently break. The GitHub for Jira app also needs to be explicitly told which repositories it can see.
To get to the bottom of it, here’s what you should check:
*   **Application Access:** Go to your GitHub organization’s settings and find **Installed GitHub Apps**. Click on the Jira app and make sure it has access to the repositories you need to sync. If you see "No repositories accessible," you've found your culprit.
*   **Third-party App Restrictions:** Many organizations lock down third-party app access by default. An organization owner might need to manually approve the Jira app before it can do anything.
Why Smart Commits Are Not Updating Jira Tickets
This one is particularly frustrating. You push a commit with a perfectly crafted message like PROJ-123 #in-progress, but the Jira ticket just sits there, untouched. This usually boils down to one of two things: user identity or syntax.
First, the integration needs to know who is making the commit. It does this by matching the email address in your local Git config to a user's email address in Jira. If those emails don't match up, Jira has no way to verify the user has permission to change the ticket, so it ignores the command entirely.
The other common pitfall is a simple syntax error. The smart commit needs the full and correct Jira issue key. A typo in the key or the command (e.g., #dnoe instead of #done) will cause the whole thing to fail without warning.
Pro Tip: Remember that smart commits respect Jira permissions. If a developer can't manually move a ticket to "Done" in the Jira UI, they won't be able to do it with a smart commit either. Always check their project permissions first.
Resolving Permission Errors During Setup
Vague permission errors can pop up at almost any point in the setup process. While the messages can be cryptic, they almost always mean someone lacks the necessary administrative rights in either Jira or GitHub.
For a clean, error-free integration, the account used for setup must have administrator permissions in Jira and owner permissions in the GitHub organization. If you're hitting a wall, double-check that the account you're using holds these elevated roles.
Here’s a critical best practice: don't tie the integration to a personal employee account. Instead, create a dedicated service account in both Jira and GitHub with the right permissions. This prevents the connection from breaking if someone changes roles or leaves the company and also makes your audit logs much cleaner.
Adhering to Security Best Practices
Connecting two business-critical systems like Jira and GitHub means you have to think about security from the start. A poorly configured integration can accidentally expose sensitive project data or source code. Stick to these core principles to keep your setup locked down.
*   **Apply the Principle of Least Privilege:** When granting the Jira app access to your repositories, give it permission for **only the repositories** it absolutely needs. Resist the urge to select the "All repositories" option. This simple step dramatically limits your exposure if a security issue ever arises.
*   **Regularly Audit App Permissions:** Make it a habit to periodically review the permissions granted to the Jira app inside GitHub (and vice versa). Ensure the access levels are still appropriate for your workflow and that nothing has been left over-provisioned.
*   **Use a Service Account:** It's worth repeating. A dedicated service account is non-negotiable for enterprise setups. It isolates the integration's activity from individual users, which simplifies troubleshooting and strengthens your security posture.
By tackling these common issues head-on and building your integration on a secure foundation, you'll create a connection that’s not just powerful, but also resilient and safe.
Frequently Asked Questions About Jira and GitHub
Even with a perfect setup, questions are bound to pop up once your team starts using the integration every day. Think of this as your go-to reference for those common "how does this work?" moments that are key to smoothing out your workflow.
Can You Connect One Jira Project to Multiple GitHub Repositories?
Absolutely. In fact, it's one of the most common ways to use the integration.
The native "GitHub for Jira" app is designed to connect a single Jira instance to an entire GitHub organization. When you’re finalizing the setup, you get to pick and choose exactly which repositories you want to sync. This is perfect for teams that want to map development work from several related microservices or front-end/back-end repos back to one unified Jira project board.
What Is the Difference Between Jira and GitHub Issues?
While both track tasks, they’re built for different people and different goals. The easiest way to think about it is the difference between a project's master blueprint and a builder's daily to-do list.
*   **Jira** is the blueprint. It’s a full-blown project management tool made for planning sprints, building roadmaps, and giving managers a high-level view of progress across the entire organization.

*   **GitHub Issues** is the builder's list. It's a lightweight, developer-focused tracker living right inside the code repository. It's meant for tracking bugs, feature requests, and technical tasks that stay close to the code.
The integration simply pulls the builder's list (GitHub) into the master blueprint (Jira) so everyone has the full picture.
How Does the Integration Handle Permissions?
The connection respects the permissions you've already set in both Jira and GitHub, which is a critical security feature. It ensures no one gets access to information they shouldn't have.
For instance, if a developer doesn’t have the rights to view a specific Jira ticket, they won't see any of its details—even if it's linked in a pull request they can see in GitHub. The same logic applies in reverse. If they can't access a repo in GitHub, they won't see its associated development data in Jira.
Should I Sync Custom Fields Between Jira and GitHub?
With the native app, you can't sync custom fields—that’s one of the main reasons teams turn to more powerful third-party marketplace apps.
If you do go with a more advanced tool, be strategic. Don't just sync everything. A good rule of thumb is to only sync custom fields that add real value for both developers in GitHub and project managers in Jira.
*   **Good fields to sync:** Things like **Priority levels**, customer impact scores, or target deployment dates.
*   **Fields to leave alone:** Internal planning data or super technical fields that would just add noise for the non-devs in Jira.
Can This Integration Work with GitHub Enterprise Server?
Yes, it can. The native GitHub for Jira app supports both GitHub.com (Cloud) and self-hosted GitHub Enterprise Server instances.
The setup for Enterprise Server has a few extra steps. You'll need to create a new GitHub App inside your server instance first, then use its credentials to make the connection. This keeps the integration locked down within your own network, a must-have for larger companies with strict data governance policies. This flexibility makes connecting Jira to GitHub a solid option for just about any team, regardless of size or security needs.
Are noisy GitHub notifications slowing your team down? PullNotifier delivers concise, real-time pull request updates directly to Slack, cutting through the clutter so your developers can focus. Over 10,000 engineers use it to streamline code reviews and ship faster. Get started for free on pullnotifier.com.