- Published on
Create a Patch: Learn How to create a patch in Git
- Authors

- Name
- Gabriel
- @gabriel__xyz
Creating a patch means generating a file that captures your code changes. It’s a universal format for sharing work, especially when a typical pull request isn't an option. You'll typically use Git commands like git diff or git format-patch to create a .patch file that anyone can apply to their own codebase.
Why Creating a Patch Still Matters in Development
In a world dominated by pull requests on platforms like GitHub, you might wonder if learning to create a patch is still relevant. The answer is a resounding yes. Understanding the fundamentals of patching is a developer superpower, born from the early days of open-source where changes were shared over simple mailing lists.
This classic workflow is far from obsolete. Knowing how to create and apply patches is invaluable in several modern scenarios:
*   **Offline Collaboration:** You can bundle up your changes and share them with a colleague without needing a constant internet connection or access to a central server.
*   **Restricted Access:** It's the perfect way to contribute code to a project when you don't have direct repository access, ideal for one-off contributions or in high-security environments.
*   **System Agnostic:** Patches are universal. They let you share changes between different version control systems or with collaborators who aren’t even using Git.
The Foundation of Modern Workflows
The truth is, patching underpins the very pull requests you use every day. A pull request is essentially a user-friendly, feature-rich wrapper around a series of patches. The core concept—"here are my changes, please integrate them"—is exactly the same.
By mastering commands like git diff and git format-patch, you gain a much deeper appreciation for how Git works under the hood. If you need a refresher on the basics, our beginner's guide to getting started with Git is a great place to start.
Creating a patch is more than a technical skill; it's a form of clear, direct communication between developers. It strips away the UI and focuses purely on the code, forcing clarity and precision.
This skill is even more relevant today, given the trend toward small, focused changes. An analysis of over 10,000 public pull requests revealed that the median PR contained just one commit and three changed files. This underscores that most work happens in small, manageable chunks. Understanding how to package these small changes as patches gives you ultimate flexibility in how you share and manage your work.
Alright, let’s get into the nitty-gritty. Theory is one thing, but knowing the exact commands to whip up a patch in different situations is what really makes this skill useful. We'll walk through three of the most common, real-world scenarios you’ll probably run into every day.
Whether you're dealing with a bunch of uncommitted edits, a single polished commit, or a whole series of updates, there's a Git command perfectly suited for the job. Getting these down will give you the flexibility to share your work, no matter the context.
Capturing Uncommitted Changes
This is probably the one you'll use most often. You've been hammering away on a fix, you've got changes scattered across your working directory and staging area, but you're not quite ready to commit. Maybe you just want a quick "does this look right?" from a colleague, or you need to shuttle your work over to another machine without making a formal commit.
For this, git diff is your best friend. It’s designed to show you what’s different, but lucky for us, its output is in the universal patch format.
To create a patch from all your current uncommitted changes (both staged and unstaged), just run this:
git diff HEAD > my_changes.patch
This command compares your entire working directory against the last commit (HEAD) and pipes the output into a new file called my_changes.patch. Using HEAD as the reference point ensures you capture everything that’s changed since the last saved state of the project. The result is a clean, shareable summary of your work-in-progress.
Isolating a Single Commit
Picture this: you've already committed a critical bug fix, but it's buried in a larger feature branch. A developer on another team needs just that one fix and doesn't want to pull in the rest of your branch's changes. This is where git format-patch really shines. It's built specifically to turn commits into portable patch files.
Unlike git diff, git format-patch is smart enough to include crucial commit metadata—like the author, date, and the full commit message. This context is gold for the person on the other end who has to apply it.
To generate a patch for your most recent commit, use this command:
git format-patch -1 HEAD
The -1 tells Git you only want one commit, and HEAD specifies it should be the latest one. Git will automatically create a neatly named file for you, something like 0001-commit-summary.patch. The numbering is a nice touch that helps keep things in order if you're creating a series of patches.
Pro Tip: Need a patch for a commit that's further back in your history? No problem. Just swap
HEADwith that commit's hash. For example,git format-patch -1 <commit-hash>will target that specific change.
Exporting Multiple Commits
Sometimes, a single commit just won't cut it. You might need to share an entire sequence of changes. For instance, maybe you've built a new feature on a branch with several logical commits, and you need to send it to a project maintainer who doesn't use GitHub and still works off a mailing list.
Once again, git format-patch is the tool for the job. Instead of targeting a single commit, you just give it a range. This is a powerful way to create a patch series that can be applied in the correct order.
Let's say your feature is three commits ahead of the main branch. To export just those three commits, you'd run:
git format-patch main
This command is clever—it finds all the commits in your current branch that aren't in main and spits out a numbered .patch file for each one. The recipient can then apply them one by one to cleanly integrate your entire feature. It's the modern take on the classic "patches and tarballs" workflow that built so much of the open-source world.
How to Apply Patches and Integrate Changes
Alright, you've created a patch and sent it off. Now what? The person on the receiving end needs to actually apply those changes to their codebase. A patch file is just a set of instructions until it's properly integrated.
Git gives us two main tools for this job: git apply and git am. They might sound similar, but they're built for very different scenarios. Knowing which one to grab is key to keeping your workflow smooth and your repository history clean. The choice really boils down to whether you're just testing the raw code changes or trying to preserve the original commit history.
This flowchart breaks down the decision-making process for creating the patch, which directly influences how it should be applied.
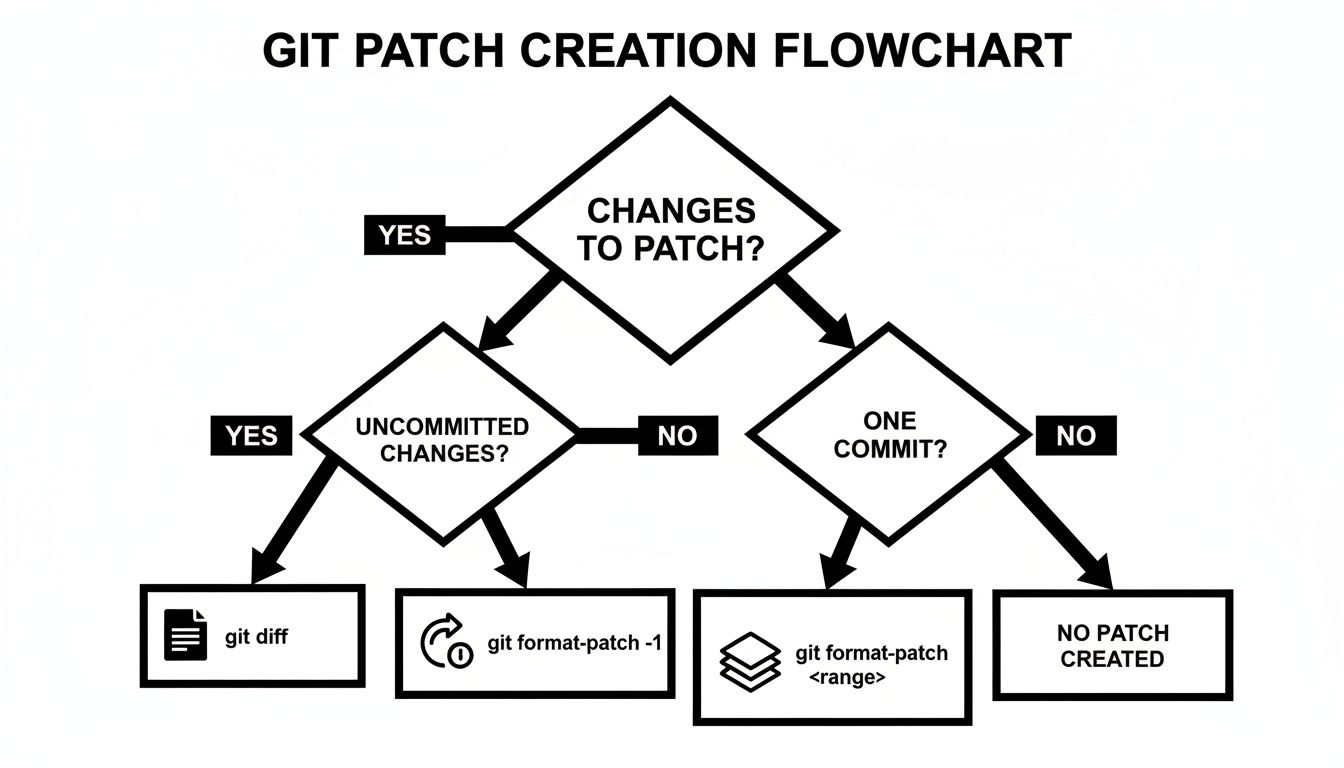
As you can see, the state of your changes—whether they're uncommitted, a single commit, or spread across multiple commits—points you to the right Git command for the job.
Choosing Between Git Apply and Git Am
Deciding between git apply and git am is a common point of confusion. Think of git apply as a way to slap the code changes onto your working directory for a quick test drive. On the other hand, git am is the more formal approach, designed to perfectly recreate commits from a patch file, complete with the original author and message.
Here's a table to help you decide which tool fits your needs.
| Feature | git apply | git am |
|---|---|---|
| Purpose | Applies a diff to the working directory without creating a commit. | Applies a patch and creates a new commit, preserving the original commit metadata. |
| Input Format | Works with standard diffs, including those from git diff. | Designed for mailbox-formatted patches created with git format-patch. |
| Commit History | Does not affect commit history. Changes are staged and committed manually. | Recreates the original commit, including author, date, and message. |
| Best For | Testing changes, applying simple patches, or integrating uncommitted work. | Applying a series of commits, preserving attribution, or working with email-based workflows. |
| Conflict Handling | Can apply clean hunks and leave rejects (.rej files) with --reject. | Offers a --3way merge option to resolve conflicts automatically. |
| Typical Workflow | apply -> test -> add -> commit | am -> review history |
In short, if you just need the code, use git apply. If you need the code and the history that comes with it, git am is your go-to.
Using Git Apply for Quick Tests
I like to think of git apply as the "try before you buy" option. It takes a patch file and simply applies the changes to your working files. No commit is created, which is perfect for a quick preview or to see if the patch even works with your current codebase.
To use it, just run this command:
git apply path/to/patch-file.patch
If it succeeds, your files are now modified just as if you'd typed the changes in yourself. From there, you can run your test suite, review the diff, and then stage and commit everything whenever you're ready. It gives you total control over the final commit message and structure.
Using Git Am to Preserve History
In contrast, git am (which stands for "apply from mailbox") is a much more powerful tool. It's specifically designed to handle patches generated by git format-patch, which are packed with all the original commit metadata—the author, date, commit message, the whole deal.
When you use git am, you're not just applying code changes. You're completely recreating the original commit in your local repository. This is crucial for maintaining a clean and accurate project history because it gives proper credit to the original author.
To apply a patch this way, you'll want to pipe the file into the command:
git am < path/to/0001-commit-message.patch
This is the standard approach for any workflow that involves mailing lists or sharing a series of commits that need to be applied in a specific order.
Key Takeaway: Use
git applyto test changes from a simple diff. Usegit amto apply fully-formed commits from patches created withgit format-patch, preserving authorship and history.
Troubleshooting Common Patch Failures
Of course, things don't always go smoothly. Patches can fail for a few common reasons, usually related to whitespace issues or conflicts with your local changes. Luckily, Git has some flags to help you out.
*   **Whitespace Errors:** If a patch fails because of trailing whitespace or other minor formatting issues, you can tell Git to be a bit more forgiving. Just add the `--ignore-whitespace` flag: `git apply --ignore-whitespace path/to/patch.patch`.
*   **Conflicts:** This happens when a patch tries to modify lines that you've also changed locally. The `--reject` flag is a real lifesaver here. It will apply all the "clean" parts of the patch and create `.rej` files for the conflicting sections. You can then go in and resolve those conflicts by hand.
For trickier situations, the --3way option with git am can attempt a three-way merge, which often resolves simple conflicts automatically. If you're really stuck, our guide on Git conflict resolution provides deeper strategies to get you moving again.
Adapting Patches for Pull Requests and AI Reviewers
In modern development, the patch is still very much alive—it just often wears the disguise of a pull request. While we’ve covered creating patch files for direct sharing, the same logic applies when you're preparing changes for a collaborative PR workflow. A clean, focused patch translates directly into a clean, focused pull request.
For instance, you might use git format-patch to bundle a series of related commits into patches for a local review before you ever push your branch. This is a great way to check for consistency and ensure the narrative of your changes makes sense. Understanding this connection is critical, especially as you explore the complete GitHub pull request workflow.
Preparing Patches for Modern PRs
Manually transferring changes between forks is a classic use case for patches that still holds a lot of value today. Imagine a collaborator's repository is private, or you just don't have push access. They can send you a patch, and you can apply it to your branch before opening a unified pull request. This approach keeps the final PR clean and consolidates all the related work.
The reverse is also true. Let's say you need to contribute a small fix from a large, ongoing feature branch. Creating a patch for that single commit is the cleanest way to isolate the change. You can then apply it to a new, dedicated branch and open a PR just for that fix, avoiding all the noise from your other unrelated work.
The Rise of AI in Code Review
The code review landscape is changing fast, largely thanks to the introduction of AI. These automated systems are essentially sophisticated patch generators, suggesting targeted code modifications directly within pull requests. This isn't some far-off future concept; it's happening right now.
The growth of AI in this space has been explosive. Data shows that 1 in 7 PRs now involve AI agents, a massive leap from just 1.1% in February 2024 to a projected 14.9% by November 2025.
This shift means developers are now getting feedback—and, in effect, patch suggestions—from both human teammates and automated agents. While this can speed up reviews, it also creates a big new challenge: notification overload.
Managing AI and Human Feedback
When every AI suggestion, human comment, and status update fires off a separate notification, it becomes nearly impossible to track what actually needs your attention. This is where tools designed for modern workflows become indispensable.
A service like PullNotifier, for example, tackles this problem head-on by intelligently consolidating all PR-related updates into a single, coherent Slack thread. Instead of getting bombarded by alerts from both your lead developer and an AI bot, you get one streamlined summary. This helps your team:
*   **Reduce noise** by filtering out redundant or low-priority notifications.
*   **Stay focused** on the most critical feedback, whether it's from a human or an AI.
*   **Accelerate review cycles** by providing clear, actionable updates without the chaos.
To improve your development process even further, especially for tasks like adapting code and preparing it for review, it's worth exploring the capabilities of AI coding assistants. By integrating these tools, you can better manage both the creation of your patches and the automated feedback you receive, leading to a much more efficient and productive workflow.
Best Practices for a Seamless Patch Workflow

A great patch is more than just code. Think of it as a clear, concise piece of communication that respects your collaborator's time. Following a few key principles can mean the difference between a patch that gets merged instantly and one that just sits in a queue.
The golden rule? Keep your patches small and focused. Each patch should tackle one single, logical concern—a concept often called atomicity. A patch that fixes a bug, refactors a function, and adds a new feature all at once is a reviewer's nightmare.
Breaking down your work this way makes it dramatically easier for someone else to understand, test, and approve.
Write a Compelling Commit Message
Your commit message is the cover letter for your patch. It’s your chance to explain the crucial "why" behind your changes, something the code itself can’t always do. A well-written message sets the stage for the reviewer and can seriously speed up the whole process.
An effective commit message should have a few key parts:
*   **A concise summary line:** A short, imperative statement works best (e.g., "Fix user login validation bug").
*   **A detailed body (optional):** Here, you can explain the problem, how your patch solves it, and any side effects or trade-offs involved.
*   **A reference to an issue tracker:** If you’re working off a ticket, linking to it (e.g., "Fixes #123") provides vital context.
This level of detail is a lifeline for future developers—including your future self—who need to understand the history of a piece of code.
Provide Clear Context and Stay Updated
Don't just fire off a patch file into the void and hope for the best. Always provide context. Explain what the patch does, why it’s needed, and—most importantly—how to test it. A simple set of steps to reproduce the bug or verify the new feature saves your reviewer a huge amount of time.
It's also crucial to keep your local branch up-to-date with the main project branch before you create a patch. A quick rebase or merge can prevent a world of headaches and minimize the chance of conflicts when the patch is applied. Good patch management starts with a clean baseline.
The scale of modern development, with platforms like GitHub supporting over 150 million developers, makes robust workflows essential. But relying only on tooling can be a gamble. Incidents where review tools fail underscore the need for solid, human-centric best practices to keep things running smoothly.
Frequently Asked Questions About Git Patches
Even when you've got the basics down, you'll eventually hit a weird edge case or a tricky situation that makes you scratch your head. Let's tackle some of the most common questions developers run into when working with patches.
How Do I Create a Patch for a Binary File?
This one comes up a lot, especially with assets like images or compiled files. You can technically create a patch for a binary file using git diff --binary > my_binary.patch, but the result isn't exactly useful. The patch file won't be human-readable; it's basically just a set of instructions to swap the old file with the new one.
Because these patches can get massive and don't show incremental changes, they're not very efficient. If you need to share binary changes, you're usually better off with one of these options:
*   Use `git bundle` to package the Git objects directly.
*   Just share the new file itself and skip the patch altogether.
Patches really shine with text-based changes, where seeing line-by-line differences actually means something.
What Is the Difference Between a Patch and a Diff?
This is a classic point of confusion. A diff is just the raw output showing the differences between two chunks of code. Think of it as a report for human eyes—something you'd look at to understand what changed.
A patch, on the other hand, is a diff wrapped in a specific format—usually the unified diff format—that includes crucial metadata.
A patch is more than just a diff; it’s a machine-readable set of instructions. While a diff shows you the change, a patch is built to be automatically applied by tools like
git applyorpatch. It's actionable.
Plus, when you use git format-patch, you get extra goodies like the commit message and author info baked right in, which git diff leaves out entirely.
Can I Turn a Pull Request into a Patch File?
Absolutely, and it’s an incredibly handy trick for offline work or for testing changes from a repo you don't have write access to. On platforms like GitHub, you can grab a patch version of any pull request just by adding .patch to the end of its URL.
For instance, if a pull request lives at https://github.com/owner/repo/pull/123, you can download its patch file from https://github.com/owner/repo/pull/123.patch.
This file contains all the commits from that PR, perfectly formatted and ready for you to apply locally with git am. It’s a clean and simple way to bridge the world of modern pull requests with the classic, flexible power of patches.
Tired of missing critical pull request updates in the notification chaos? PullNotifier integrates GitHub with Slack to deliver consolidated, real-time PR updates directly into a single thread, cutting through the noise so you can focus on what matters. Streamline your code reviews and accelerate your team's development cycle by signing up at https://pullnotifier.com.