- Published on
Git Create Remote Repository A Developer's Practical Guide
- Authors

- Name
- Gabriel
- @gabriel__xyz
To get your local project onto a hosting service like GitHub or GitLab, you'll first create an empty repository on their platform. After that, you'll connect it to your local project using the git remote add command. This two-step process is the key to sharing, collaborating on, and backing up your code.
Why Creating Remote Repositories Is A Core Developer Skill

Creating a remote repository is more than just a box-ticking exercise; it's the launchpad for almost every modern software project. It's the central hub where your team collaborates, your code history is safely stored, and all your automated workflows kick off. This simple action is where your code's real journey begins, whether you're a solo dev backing up a side project or part of a huge team building an enterprise app.
The Center of Modern Workflows
Knowing how to git create remote repository is a non-negotiable skill because it's what makes collaborative development possible. Once a remote is up, your teammates can clone the project, push their changes, and review each other's work through pull requests. This entire workflow is the backbone of modern Agile and DevOps practices, enabling everything from continuous integration to automated deployments.
The sheer scale of its adoption tells the story. In 2022 alone, GitHub saw the creation of 100 million new repositories. That staggering number reflects the daily reality for over 95% of developers who rely on Git to get their work done.
A remote repository acts as the "single source of truth" for a project. It ensures every team member is working from the same baseline, preventing the confusion and conflicts that arise from having disparate local versions of code.
More Than Just Code Storage
A remote repository gives you a lot more than just a place to store files. It's the gateway to a whole suite of powerful platform features that can seriously speed up development and boost your code quality.
Here’s what else you get:
- Project Management: Tie issues, milestones, and project boards directly to your codebase, making it much easier to track tasks and see progress.
- Automation: Platforms like GitHub Actions or GitLab CI/CD use your repository as a trigger for automated builds, tests, and deployments.
- Security: Most hosting platforms come with built-in tools for secret scanning and dependency analysis, helping you catch vulnerabilities early.
Mastering Git is a cornerstone for nearly every role in software and operations today. For anyone aiming for a career in cloud DevOps, getting this right is essential for managing infrastructure as code and building solid CI/CD pipelines. If that's your path, resources like the AWS Certified DevOps Engineer Professional Study Guide can be a massive help.
If you're just starting out, the best thing you can do is get comfortable with the fundamentals. Our guide on how to https://blog.pullnotifier.com/blog/get-started-with-git-your-first-steps-to-version-control will walk you through the basics and build a solid foundation. From there, you'll be ready to tackle the specific commands needed to master remote repositories.
Creating Your Remote Repository With The UI And CLI

So, you need to git create remote repository. You’ve got two main ways to go about it: either using the visual, point-and-click interface on a platform like GitHub or GitLab, or by firing up your terminal and using a command-line tool.
Honestly, neither way is "better"—it all comes down to what works for you.
The web UI is a great starting point, especially if you’re new to Git or just appreciate seeing all your options laid out visually. It walks you through everything step-by-step. On the other hand, the CLI is fast, powerful, and scriptable, making it a favorite for developers who live in the terminal and want to automate their workflows.
Let’s look at how to do it both ways.
Using The Web Interface On GitHub
The most direct path to creating a remote repository is through the website of your Git hosting provider. The process on GitHub is super smooth and even gives you a few handy options to get your project started right.
First, just head over to the new repository page.
This screen is your command center for setting up the new repo. You'll give it a name, decide if it should be public or private, and—most importantly—choose how to initialize it.
- Add a README file: I almost always recommend this. It gives you an immediate place to describe the project, write down setup instructions, or explain how others can contribute.
- Add .gitignore: This is a must-have. A
.gitignorefile tells Git which files and folders to ignore, likenode_modulesor.envfiles. GitHub even offers templates for popular languages and frameworks like Node, Python, and Ruby. It's a huge time-saver. - Choose a license: If your project is open source, adding a license from the get-go clarifies how others can use, modify, and share your work. It's a simple step that prevents a lot of headaches later.
Initializing your repo with these files is a solid best practice because you can clone it to your local machine right away. But, if you already have a project on your computer that you want to push up, you'll need to create a completely empty remote repository. Just leave all those checkboxes unchecked.
Pro Tip: When you name your repository, stick with lowercase letters and use hyphens (
-) instead of spaces. It creates much cleaner URLs and helps you avoid weird issues with command-line tools that don't always play nice with spaces.
Creating A Repository With The GitHub CLI
For those of us who prefer to stay in the terminal, the GitHub CLI (gh) is a fantastic alternative to the web UI. Once you have it installed and configured, you can manage your repositories without ever leaving the command line.
The command you'll use is gh repo create.
This single command packs a lot of power. For example, let's say you want to create a new public repository and immediately push your existing local code to it. Just cd into your project directory and run this:
gh repo create my-new-project --public --source=. --push
This one line does a ton of work for you. It creates a new public repo called my-new-project on your GitHub account, sets it as the origin remote for your local project, and handles the initial push. It's an incredibly efficient way to get a project off the ground.
Of course, the costs associated with private repositories are always a consideration for teams and businesses. You can explore the details of GitHub's pricing plans to see what fits your needs. But for speed and automation, the CLI is tough to beat.
Alright, you've got a local project humming along, and you've just set up a shiny new remote repository on a platform like GitHub or GitLab. Now it's time to connect the two. This is the crucial step that builds the bridge between your machine and the cloud, letting you start pushing, pulling, and collaborating on your code.
The whole process boils down to two key commands. First, you'll tell your local repository where its remote counterpart lives. After that, you'll do the initial push to upload your code and create a "tracking" relationship, which is a fancy way of saying it'll make all your future pushes a lot easier.
Adding Your First Remote With 'origin'
To link your local project to the remote repository, you’ll use the git remote add command. Think of this as giving your local Git a phone number for the remote server. The command needs two things: a nickname for the remote and the remote's URL.
By a long-standing convention, the main remote repository is almost always named origin.
In your terminal, navigate to your local project's directory and run this:
git remote add origin <your-remote-url>
Just swap out <your-remote-url> with the actual URL you copied from your Git hosting service. There's nothing magical about the name "origin"—you could technically name it my-awesome-repo or main-hub—but sticking with origin is a rock-solid best practice. It helps anyone who joins your project instantly know which remote is the primary one, avoiding a lot of confusion down the road.
Making The Initial Push And Setting The Upstream
So, you've added the remote. Your local repo now knows where origin is, but origin is still an empty shell; it doesn't have any of your code yet. The next step is to push your main branch (usually named main or master in older projects) up to the remote and tell Git to keep an eye on it.
Here’s the command you'll use:
git push -u origin main
This command is doing a bit more than just flinging files over the internet. Let's break it down:
git push: The basic command to send your committed changes to a remote.origin: This tells Git which remote you're pushing to—the nickname we just set up.main: This specifies which local branch you want to push.-u(or its longer form,--set-upstream): This is the secret sauce for the very first push. It tells Git to create a tracking relationship between your localmainbranch and themainbranch onorigin.
Why bother with the
-uflag? Because it makes your life easier. By setting the upstream this one time, you're simplifying every future push. From now on, you can just run a plaingit pushfrom yourmainbranch, and Git will automatically know you want to send your changes toorigin/main. No need to specify the remote and branch every single time.
The 'git clone' Shortcut
What if you're starting from the other direction? Sometimes, you might create a repository on GitHub first, maybe with a README file or a license already in it. In that case, your workflow gets even simpler.
Instead of initializing a local project and then linking it, you'll just clone the existing remote repository directly to your machine.
git clone <your-remote-url>
When you use git clone, Git does all the heavy lifting for you. It doesn't just download the project files; it also automatically sets up the remote connection and names it origin by default. You get to skip the git remote add step entirely because the connection is established right from the get-go.
Choosing Your Authentication Method: HTTPS Vs SSH
When you need to connect your local project to a remote repository on GitHub or GitLab, you have to think about security. This isn't just an option—it's a core part of how Git works. The two main ways to handle this are with HTTPS and SSH. The one you pick will shape your day-to-day workflow, from cloning a repo to pushing up your latest changes.
HTTPS often feels easier to get started with, especially if you're working behind a company firewall. It uses the same standard port as all other web traffic, so it usually just works.
On the other hand, SSH gives you a much smoother, password-free experience once you've set it up. It’s a favorite among seasoned developers for a reason: after the initial configuration, you rarely have to think about it again.
The Modern Way: HTTPS With Personal Access Tokens
It wasn't that long ago that you could just use your GitHub or GitLab password to authenticate over HTTPS. For good security reasons, that's no longer the case. The modern standard is the Personal Access Token (PAT).
A PAT is basically a limited-use password you generate directly on your hosting platform. You can create different tokens with specific permissions. For example, you might make one token that only has read-only access for a build script, and another with full read/write permissions for your main development machine. This kind of granular control is a massive security win.
Think of a Personal Access Token as a key card for a hotel room. It only grants you access to your specific room (the repositories you've authorized) for a set period, unlike a master key (your old password) that could open every door. This significantly reduces the risk if a key is lost or stolen.
Generating a PAT is pretty simple. Just head over to your account settings on GitHub or GitLab, give the token a descriptive name, set an expiration date, and choose the permissions (or "scopes") it needs. Once it's generated, copy the token and use it in place of your password whenever Git asks for your credentials.
The Power Of SSH Key Pairs
The other main authentication method is an SSH key pair. This approach involves creating a public and a private key right on your local machine. The private key never leaves your computer, while you upload the public key to your GitHub or GitLab account.
When you run a Git command like git push over SSH, your computer and the remote server perform a quick cryptographic handshake to prove you are who you say you are.
Here’s the typical workflow:
- Generate Your Keys: Pop open your terminal and run the
ssh-keygencommand. It’s a standard utility that comes with Linux, macOS, and modern versions of Windows. - Add to Your Account: Copy the contents of your public key file (it usually ends in
.pub, likeid_rsa.pub) and paste it into the "SSH and GPG keys" section of your account settings. - Configure and Connect: With your public key added, you can now use the SSH URL for your repositories (it'll look something like
git@github.com:user/repo.git). Your system will automatically use your private key to authenticate, so you won't have to type in a username or token every single time.
This decision tree helps visualize where you are in the process—whether you're cloning an existing remote project or connecting one you started locally.
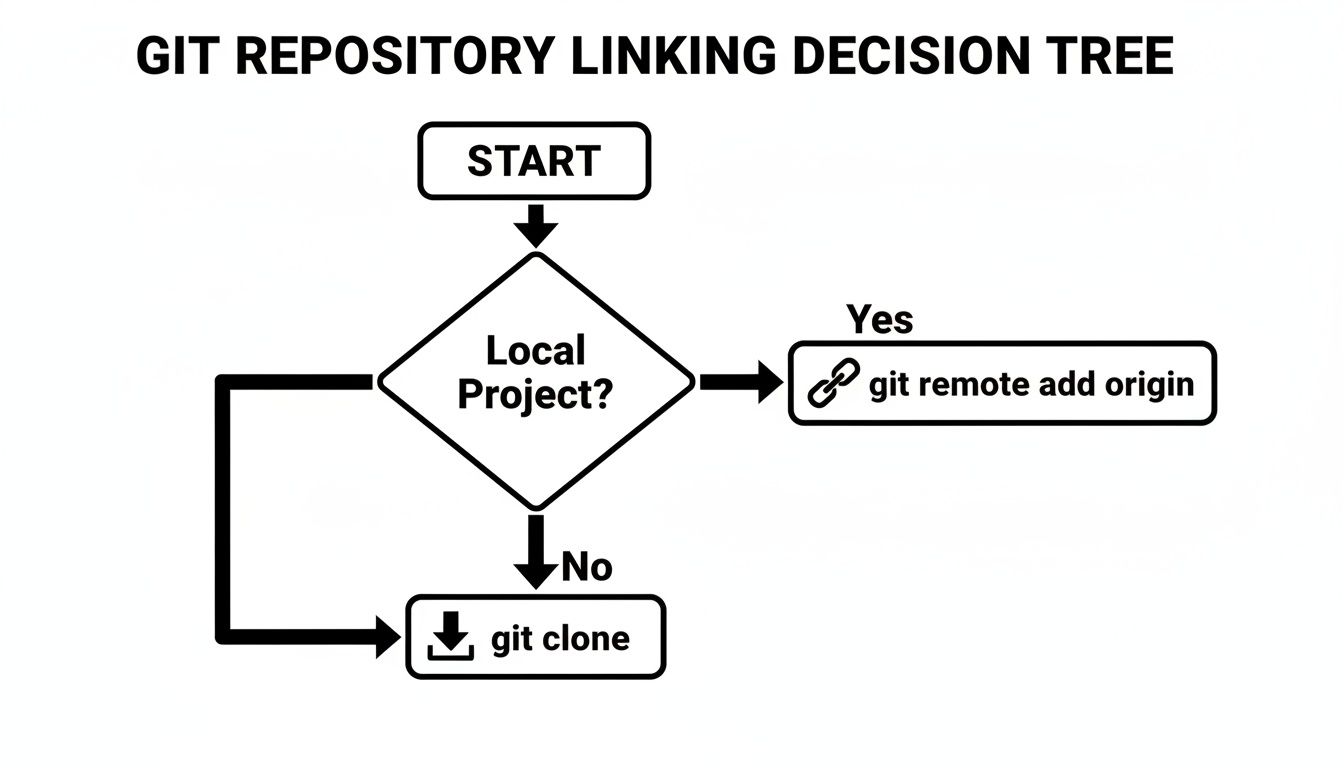
As the diagram shows, there are really only two starting points: if the project already exists on a server, you git clone it. If you started the project on your own machine, you use git remote add to link it up.
HTTPS vs SSH Authentication Methods
So, which method should you choose? It really comes down to your workflow and what you find most convenient. Here’s a quick comparison to help you decide.
| Attribute | HTTPS (Personal Access Token) | SSH (Key Pair) |
|---|---|---|
| Setup | Easier for beginners. No key generation needed. | Requires generating and adding an SSH key to your account. |
| Daily Use | May require entering the token or using a credential helper. | Seamless and password-free after initial setup. |
| Security | Good. Tokens can be scoped with specific permissions and expiration dates. | Excellent. Authentication uses strong public-key cryptography. |
| Firewalls | Generally works without issues, as it uses the standard HTTPS port (443). | Can sometimes be blocked by strict corporate firewalls. |
| Best For | Quick setups, one-off tasks, and environments with strict firewall rules. | Regular, daily development on a trusted machine. |
Ultimately, many developers end up using both. HTTPS with a PAT is great for CI/CD pipelines or scripts, while SSH is perfect for your primary development machine. There's no single "right" answer, only what works best for you.
Managing Advanced Remote Repository Scenarios
As a project grows, your needs often get more complex. A single origin remote might work at first, but it quickly falls short when you're contributing to open-source projects or deploying your app to multiple cloud environments. This is where mastering multiple remotes really pays off.
Picture this: you've forked a popular open-source library to fix a bug. Your fork is your origin, but you also need to pull in updates from the original project. To handle this, you can add the original repository as a second remote, which is conventionally named upstream.
Add the original repository as a new remote named 'upstream'
git remote add upstream https://github.com/original-project/repo.git
Now, if you run git remote -v, you'll see both origin (your fork) and upstream (the original project). This setup is incredibly useful because it lets you fetch changes from the original project with git fetch upstream and merge them into your local branches, keeping your fork perfectly up to date.
Juggling Multiple Project Remotes
This pattern isn't just for open-source contributions. A common real-world scenario is deploying a single project to different hosting services. For example, your main origin remote might be on GitHub, but you could have another remote for deploying to a platform like Heroku or Vercel.
origin: Your main repository on GitHub for team collaboration.heroku: A remote pointing to your Heroku app for deployments.vercel: A remote for deploying a frontend to Vercel.
Adding a new remote is simple. To add a deployment target for Heroku, you'd typically use a command provided by the Heroku CLI, which is just a convenient wrapper around a git remote add command. Renaming a remote is just as easy with git remote rename old-name new-name.
My personal rule of thumb is to name remotes based on their purpose or owner. Using names like
upstream,heroku, or even a colleague's name (johns-fork) makes yourgit remote -voutput instantly understandable.
Speeding Up Setup With Repository Templates
For teams managing dozens of services, creating a new git create remote repository from scratch for each one is tedious and a recipe for inconsistency. GitHub's repository templates are a fantastic solution to this, letting you standardize how new projects get started.
You can create a template repository complete with boilerplate code, CI/CD configuration files, a standard directory structure, and even issue templates. When someone on your team needs to spin up a new microservice, they can generate a new repository from that template, ensuring consistency from day one.
This practice is especially powerful in larger organizations and is a key feature you can explore when using systems like GitHub Enterprise. You can learn more about managing large-scale setups in our guide to GitHub Enterprise Server explained.
Common Questions About Creating Remote Repositories
Even with a solid process, it’s easy to get tripped up by confusing error messages or unexpected behavior. Let's walk through some of the most frequent questions and sticking points developers run into when they git create remote repository and connect it to a local project.
Think of this as your quick-fix guide for common hurdles.
What Does 'fatal remote origin already exists' Mean?
This is probably the most common error you'll see when connecting repositories. It's Git’s way of telling you that you're trying to add a remote named origin to a project that already has one.
This usually happens if you originally cloned the repository. The git clone command automatically sets up origin for you, so trying to add it again will throw this error.
You can quickly check your existing remotes by running git remote -v. If you see origin listed, you have two main options:
- Update the URL: If the existing remote points to the wrong place, you can simply change its URL.
git remote set-url origin NEW_URL - Add a new remote: If you actually wanted to add a second remote—like a fork you’re contributing to—just give it a different name. It's common practice to use
upstreamfor the original repository.git remote add upstream OTHER_URL
Should I Use The Main Or Master Branch?
The short answer: use main. It’s the current industry standard and the default for new repositories on platforms like GitHub.
Back in 2020, the Git community and major hosting platforms began moving away from master to promote more inclusive language. As a result, any new repository you create today will almost certainly use main by default.
If you have an older local project that still uses master, it’s a good idea to rename it before your initial push. It's just one command: git branch -m master main. This little bit of housekeeping keeps your project aligned with modern conventions.
A frequent point of confusion is whether you can push code to a remote repository without creating it first. The answer is a firm no. The
git pushcommand needs a destination, so you must create an empty repository on a service like GitHub or GitLab before you can send your local code to it.
How Do I Link An Existing Local Project To A New Remote?
This is a super common scenario. You’ve been working on a project locally for a while, and now you want to back it up online and start collaborating.
The trick is to start by creating a completely empty repository on your hosting service (like GitHub or GitLab). When going through the UI, make sure you do not initialize it with a README, license, or .gitignore file. If you do, you'll run into merge conflicts on your first push.
Once you have the empty remote's URL, pop open your terminal in the local project's directory and run these two commands:
- Connect your local repo to the new remote:
git remote add origin <your_remote_url> - Push your main branch and set it to track the remote branch:
git push -u origin main
That -u flag is important. It creates a tracking relationship between your local main branch and origin/main. From now on, you can just run git push without any extra arguments.
Ready to stop chasing down pull request updates and get back to coding? PullNotifier integrates directly with your Slack channels to deliver clear, real-time PR notifications, cutting through the noise and accelerating your team's review process. Over 10,000 engineers use it to ship faster. Get started for free at https://pullnotifier.com.