- Published on
How to Commit to GitHub A Developer's Practical Guide
- Authors

- Name
- Gabriel
- @gabriel__xyz
Committing code to GitHub is the fundamental action that saves a snapshot of your project's progress. At its core, the process is pretty straightforward: you stage your changes with git add, lock them in with a descriptive message using git commit, and finally, you upload them to the remote repository with git push.
You can get this done in a few different ways—through the command line, with GitHub Desktop, or right on the GitHub website.
Why Your First GitHub Commit Matters
Jumping into GitHub for the first time can feel like a big leap, but your first commit is the simple, foundational move that kicks everything off. Before we get into the nitty-gritty of commands, it’s worth understanding why automated version control systems are so essential in the first place.
Think of a commit as a permanent, labeled snapshot of your project at a specific point in time. It’s how you save your work, track every change, and, most importantly, collaborate with other developers.

This guide will walk you through the three most common ways to get your code saved and pushed up to GitHub.
*   **Command-Line Interface (CLI):** This is the go-to for most professional developers. It gives you maximum control and flexibility, though it has the steepest learning curve.
*   **GitHub Desktop:** A slick, user-friendly app with a visual interface. It’s perfect if you prefer clicking buttons over typing commands.
*   **GitHub Website (UI):** Super convenient for making small, quick edits directly in your browser without needing to clone a repository to your local machine.
Let's compare these methods to help you figure out which one is the best fit for you right now.
Three Ways to Make a GitHub Commit Compared
Choosing the right tool for committing often comes down to the task at hand and your comfort level. This table breaks down the three primary methods, giving you a quick overview of where each one shines.
| Method | Best For | Learning Curve | Key Command/Action |
|---|---|---|---|
| CLI (Command Line) | Professional developers, complex workflows, automation | High | git commit -m "Your message" |
| GitHub Desktop | Beginners, visual learners, managing changes visually | Low | "Commit to main" button |
| GitHub Website UI | Quick edits, small changes, non-code files | Very Low | "Commit changes" button |
Whether you're a seasoned pro or just starting, knowing when to use each tool can make your workflow a lot smoother. The CLI offers unmatched power, GitHub Desktop provides a friendly visual layer, and the web UI is perfect for those quick, on-the-fly fixes.
The Foundation of Modern Development
Getting a handle on this core skill has never been more critical. By 2026, GitHub is projected to host over 180 million developers worldwide—a massive jump from 100 million just a couple of years ago. This explosive growth highlights just how central GitHub has become. With over 630 million repositories now on the platform, mastering the basic commit workflow is an essential skill for any developer.
A commit is more than just a save point; it's a story. Each commit message builds the narrative of your project, explaining not just what changed, but why. This practice is what separates a confusing codebase from a maintainable one.
Ultimately, understanding the commit process is your first step toward effective collaboration and building a clean, professional project history. If you're new to the underlying technology, our guide on getting started with Git for beginners is a great place to build your foundation.
Mastering the Professional CLI Workflow
For most developers, the command-line interface (CLI) is where the real work with Git happens. Sure, graphical tools have their place, but the CLI gives you unmatched speed, precision, and raw control over your project’s history. This is your hands-on guide to the daily workflow pros use, starting from the ground up.
Whether you're kicking off a brand-new project or jumping into an existing one, it all begins in your terminal. For a new idea, you'll want to initialize a local Git repository. If you're joining a team, you'll clone their repository from GitHub.
*   **To initialize a new project:** Navigate to your project folder and run `git init`. This simple command creates a hidden `.git` directory where Git stores all its tracking information.
*   **To clone an existing project:** Use the command `git clone <repository-url>`. This downloads the entire project and its history right to your machine.
Once your repository is ready, the core of your work will revolve around making changes and saving them as commits.
The Core Commit Cycle
The fundamental CLI workflow is a three-step dance you'll repeat countless times. It involves staging your changes, committing them with a clear message, and pushing them up to your remote repository on GitHub. This cycle is what keeps your work saved methodically and your project history clean.
First, you have to tell Git exactly which changes you want to save. This is called staging. You can stage all modified files at once with git add ., but it’s often better to be more selective by staging a single file with git add <filename>. Think of staging like putting items into a shopping cart; you're just getting them ready for checkout.
Next, you create the actual commit. The command git commit -m "Your descriptive message" takes everything in your staging area and saves it as a snapshot in your local repository's history. That -m flag lets you write your commit message directly in the terminal, which is perfect for quick, straightforward changes.
Example of staging and committing a specific file
git add src/components/Header.js git commit -m "feat: Add responsive navigation to header"
Pro Tip: If you run
git commitwithout the-mflag, Git will open your default text editor (like Vim or Nano). This is the best way to write a more detailed, multi-line commit message, which is fantastic practice for more complex changes.
Finally, you share your local commits with the world by running git push. This command uploads your committed changes to the corresponding branch on GitHub, making them visible to the rest of your team.
Working with Branches
Committing directly to the main branch is a huge no-no in most professional environments. Instead, you'll want to work on features or fixes in separate branches to keep the main codebase stable and clean. Creating a new branch is simple and absolutely essential for a healthy workflow.
To create and immediately switch to a new branch, use the git checkout -b <branch-name> command. It’s a good habit to use a clear naming convention with prefixes like feature/ or fix/. For example: git checkout -b feature/user-authentication.
Once you're on your new branch, you can freely use the add, commit, and push cycle without worrying about messing up main. The very first time you push a new branch, Git will give you a helpful command to set the upstream tracking branch.
First push of a new branch
git push --set-upstream origin feature/user-authentication
This command simply tells Git to link your local feature/user-authentication branch with a branch of the same name on the remote repository (which is typically named origin). After this one-time setup, all future pushes only require a simple git push. This isolated workflow is the foundation of collaborative development and is key to preventing accidental breakage of the main application.
Writing Commit Messages That Actually Help
Let's be honest, a commit message is more than just a note to yourself. It's a breadcrumb trail for your future self and your entire team. We’ve all seen project histories littered with vague messages like "updates" or "bug fix", and they’re completely useless. They force developers to dig through code to figure out what actually happened, wasting valuable time.
Getting past these bad habits means treating commit messages like the documentation they are. The goal is to explain the 'why' behind a change, not just the 'what'. The code itself shows what changed; your message should explain the reasoning, the context, and the intended outcome.
The standard command-line workflow is a simple three-step process: you add your files, commit them with a message, and then push them to the remote repository.
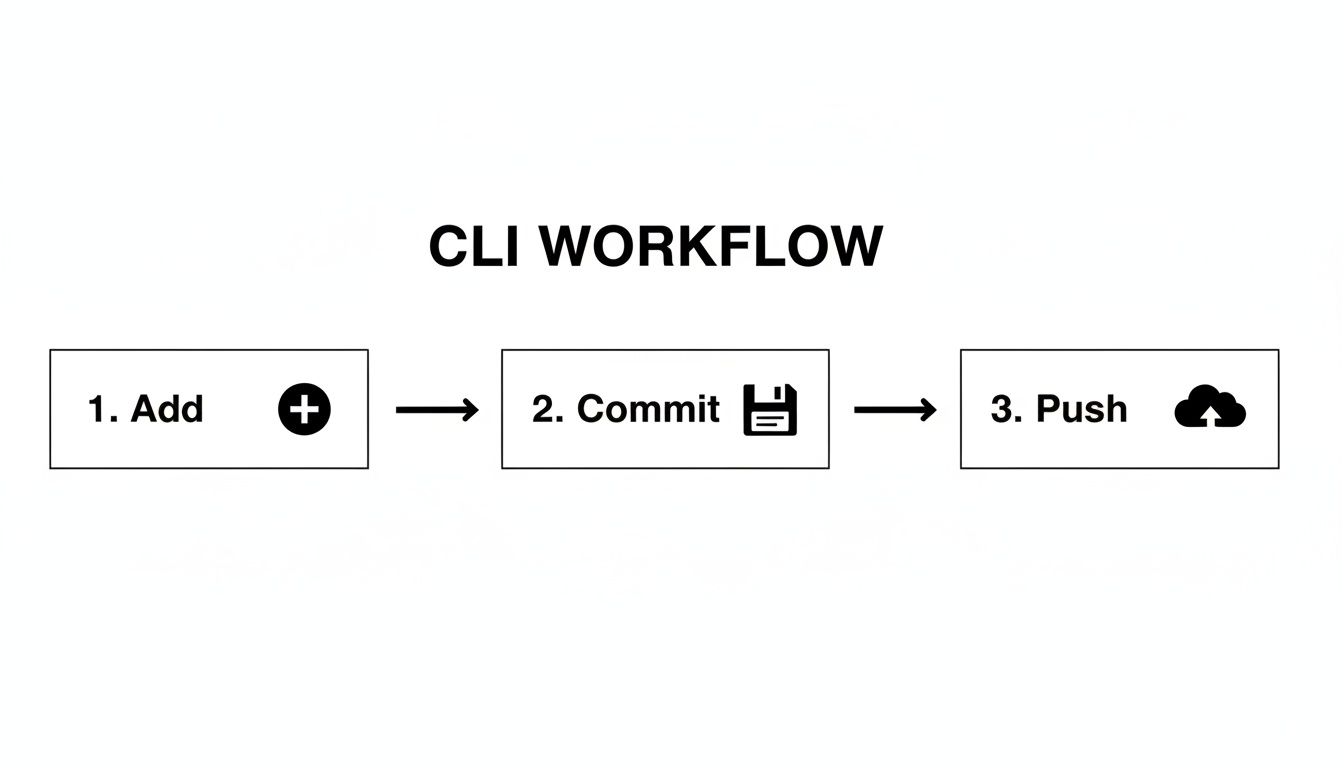
That commit step is where you create a permanent, meaningful record of your work right before you share it. It’s your one chance to get the story straight.
Adopting a Clear Structure
To bring some sanity and consistency to your project's history, it's worth adopting a specification like Conventional Commits. This standard is incredibly popular because it uses simple prefixes to categorize every single commit, making the history instantly scannable and even enabling automated changelog generation.
Here are a few of the most common prefixes you'll see:
*   **`feat:`** for when you add a brand new feature.
*   **`fix:`** for a bug fix that patches up incorrect behavior.
*   **`docs:`** when your changes are purely for documentation.
*   **`refactor:`** for a code change that doesn't fix a bug or add a feature.
*   **`perf:`** for a change that improves performance.
This structured approach is surprisingly powerful. It feeds directly into tools like GitHub's repository graphs and stats APIs, which can track weekly additions and deletions to help teams visualize a project's velocity.
A great commit message follows the 50/72 rule: a subject line of no more than 50 characters, a blank line, and then a detailed body wrapped at 72 characters per line. This isn't just an old-school suggestion; it ensures your messages look good and read well across all Git tools.
Securing Your Work with Signed Commits
Beyond clarity, it’s also important to verify the authenticity of your work, especially on professional or major open-source projects. Signing your commits with a GPG key is a security best practice that attaches a unique cryptographic signature to your work.
This signature proves two things: the commit came from you, and it hasn't been tampered with since you made it. On GitHub, signed commits get a nice "Verified" badge, adding a layer of trust and integrity to every contribution you make. Building this habit early is a great move.
For a deeper dive into crafting the perfect message, check out our guide covering 8 Git commit message best practices for 2025.
Using Visual Tools Like GitHub Desktop and the Web UI
Look, the command line isn't for everyone, and that’s okay. Plenty of developers prefer a more visual way to manage their work, and for them, visual tools are often faster and more intuitive. GitHub offers a couple of great graphical options that make the whole commit process incredibly straightforward: the GitHub Desktop app and the website's built-in editor.
These tools are fantastic because they lower the barrier to entry—no need to memorize a bunch of commands. They give you a clear, visual map of what’s happening in your repository, which is a lifesaver when you're just learning the ropes or trying to untangle a complex set of changes.
Committing with GitHub Desktop
GitHub Desktop is a clean, standalone application that brings a slick visual interface to your Git workflow. After you clone a repository, the app just sits in the background, automatically keeping track of every change you make to your local files. This is where it really clicks for beginners and visual thinkers.
The app gives you a "Changes" tab that lists every file you've modified. From there, it's simple:
*   **See your changes visually:** Click any file to see a color-coded "diff" that shows you exactly which lines were added (**green**) or removed (**red**).
*   **Stage changes selectively:** Just use the checkboxes next to each file to pick what you want to include in your next commit. It’s the visual version of `git add`.
*   **Write solid commit messages:** There's a dedicated box for a summary and description, which naturally nudges you toward good documentation habits.
Here’s a peek at the main interface. You can see the list of changed files on the left and a live diff of the selected file on the right.
This layout makes it dead simple to group related changes into a single, clean commit. When you're ready, you just push it to the remote repository with one click.
Making Quick Edits with the GitHub Web UI
Sometimes you just need to fix a quick typo or tweak a single line in a config file. Cloning an entire repository for a two-character change feels like a massive overkill. This is the perfect job for the GitHub website itself. It's easily the fastest way to make a minor edit without ever touching your local machine.
Just navigate to any file in a repository on GitHub.com, and you’ll see a little pencil icon to edit it. Clicking that opens a basic in-browser text editor where you can make changes directly.
Once you save your changes, GitHub’s web UI pops up a "Commit changes" dialog. This slick process rolls staging, committing, and pushing into one simple action, which is perfect for non-developers or anyone making a quick documentation fix.
For example, fixing a broken link in a README.md or updating a sentence in the project's contribution guidelines are tasks that are perfectly suited for the web UI. You can commit straight to the main branch or create a new one and kick off a pull request, all from inside your browser. This makes contributing to projects easier than ever.
Turning Commits Into Collaborative Action
Pushing your commits is a great personal milestone, but it's only half the story. Software development is a team sport, and your commits are really just the building blocks for the main event: collaborative action. Once your branch is safe on GitHub, the next logical step is to propose merging your work into the main codebase by opening a Pull Request (PR).
Think of a PR as a formal request that bundles all the commits from your branch. It becomes the central hub for discussion, code review, and automated checks before your work gets the green light. This is exactly where your carefully crafted commit messages pay off—they give reviewers a clear, step-by-step story of your thought process.
From Commit to Conversation
When you open a PR, you're doing more than just submitting code; you're kicking off a conversation. You’ll write a PR description summarizing the high-level goal of your changes, providing context that isolated commit messages can't. This is your chance to explain your strategy, link out to project management tickets, or drop in screenshots of UI changes.
From there, you’ll tag your teammates for a review. They’ll get notified and can jump in to view your code, comment on specific lines, and suggest improvements. This feedback loop is absolutely essential for keeping code quality high and sharing knowledge across the team. To dive deeper into this crucial stage, check out our in-depth guide to the GitHub Pull Request workflow.
This whole process—pushing commits, opening a PR, requesting reviews, and eventually merging—can generate a ton of notifications. By default, this usually means a flood of emails that quickly turn into noise, leading to review delays and a lot of context switching. It's a huge bottleneck in many development cycles.
Streamlining Collaboration with Smart Integrations
To fight this notification fatigue, modern teams use tools that plug directly into their daily workflows. Instead of relying on email, they bring GitHub updates into communication hubs like Slack. This is where a tool like PullNotifier can make a massive difference, transforming a noisy process into a streamlined one.
Imagine this improved flow:
*   You push your final commit for a new feature.
*   You open a PR on GitHub.
*   **PullNotifier** instantly sends a targeted, real-time alert to a dedicated Slack channel.
*   It automatically tags the correct reviewers, making sure the right people see it immediately.
This simple change dramatically cuts down on friction. The PR doesn’t get lost in an inbox; it becomes an active, tracked item in your team’s main communication channel, where everyone can see its progress.
This integrated approach is especially critical for globally distributed teams. In fact, a whopping 83% of the top 10,000 repositories are maintained by developers outside the US, showing just how much global commits fuel innovation. Smart tools bridge time zones and communication gaps, making collaboration feel seamless. You can find more details in these fascinating GitHub statistics.
By turning commit-triggered PRs into focused Slack conversations, teams can speed up their feedback loops and, ultimately, ship code faster.
Common Questions About GitHub Commits
As you get into the rhythm of committing your work, a few questions always seem to pop up. Don't worry, running into confusing scenarios is just part of the learning curve. Let's tackle some of the most common hurdles developers face.
What Is The Difference Between Git Add and Git Commit?
This is the classic one-two punch for saving your work in Git, and they each do something very different.
Think of git add as preparing a file for its snapshot. It moves your changes from your working folder into what’s called the "staging area"—basically a waiting room for your next commit. This is great because it lets you be super selective about what goes into the snapshot.
Once you’ve staged all the right pieces, git commit takes everything in that staging area and saves it as a permanent, described snapshot in your project’s history. So, you add items to your cart, then you commit to the purchase.
How Do I Fix a Mistake In My Last Commit Message?
We’ve all been there. You hit enter and immediately spot a typo in your commit message. Thankfully, it's an easy fix if you haven't pushed it yet.
Just use this command: git commit --amend.
This will reopen the editor for your most recent commit message so you can clean it up. What's even better is if you also forgot to include a file, you can git add that file first, then run the amend command to sneak it into the very same commit.
Important: Be really careful using
--amendon commits you've already pushed to a shared branch. It rewrites history, which can create a real mess for collaborators who might have already pulled down the original commit.
What Does a Rejected Error Mean When I Push?
Seeing a [rejected] error when you git push can be jarring, but it's usually nothing to panic about. It simply means the remote branch on GitHub has changes that your local branch doesn't. This is a common occurrence when a teammate has pushed their own updates while you were busy working.
To fix this, you just need to sync up their changes with yours.
- First, pull the remote changes: Run
git pull origin <branch-name>. - This fetches and merges: It grabs the latest updates from the remote and merges them into your local branch.
- Resolve any conflicts: If your changes and their changes overlap, Git will ask you to resolve the conflicts.
- Push again: Once everything is merged and conflicts are fixed, you can push your changes successfully.
Can I Undo A Commit?
Absolutely. Git gives you a few different tools for this, depending on what you’re trying to accomplish.
If you want to undo the last commit but keep all the changed files in your working directory (so you can re-commit them differently), git reset --soft HEAD~1 is your best friend.
If you need to completely blow away the last commit and all of its changes for good, use git reset --hard HEAD~1. Just be careful with this one—it’s destructive!
For commits that are already public on a shared branch, the safest way to "undo" them is to create a new commit that reverses the changes. You can do this with git revert <commit-hash>.
At PullNotifier, we turn these collaborative workflows into seamless conversations. Instead of getting lost in a sea of email notifications, our tool delivers real-time pull request updates directly into your Slack channels, ensuring your team's commit-to-merge cycle is faster and more visible. Learn more at https://pullnotifier.com.