- Published on
How to Merge GitHub Branches: A Developer's Guide
- Authors

- Name
- Gabriel
- @gabriel__xyz
Merging branches in GitHub is how you bring changes from one line of development into another—typically from a feature branch into your main branch. This isn't just a technical step; it's the moment your hard work officially becomes part of the project.
You'll usually handle this with a pull request through the GitHub web interface, which creates a merge commit. For those who prefer the command line, local Git commands offer a bit more granular control.
Why Merging Is Your Most Important Git Skill
Before we get into the nitty-gritty of commands, let's talk about why mastering the merge is so vital for any developer. A well-executed merge strategy is the backbone of a healthy codebase. It keeps things stable, clean, and easy for everyone on your team to follow.
Think of it as the final step in integrating different streams of work into a single, unified branch. Good preparation is key here. Before you even think about merging, make sure your branches are up-to-date with the remote repository. Following best practices, like keeping your working branch fresh and running tests, is the best way to dodge merge conflicts and prevent new changes from breaking things.
Understanding the Different Merge Methods
Not all merges are created equal. The method you choose directly impacts your repository's commit history, which is a big deal for everything from code audits to hunting down that one elusive bug. Knowing the difference is what separates the pros from the amateurs.
Here are the main options you'll encounter:
- Merge Commit: This is the default in GitHub. It joins two branches by creating a brand-new "merge commit" that links their histories. This approach preserves every single commit from your feature branch, giving you a detailed, though sometimes messy, audit trail.
- Squash and Merge: This method takes all the commits from your feature branch and squishes them into one clean, single commit on the target branch. It's fantastic for keeping your
mainbranch history linear and easy to read, but you do lose the granular history of the feature branch itself. - Fast-Forward Merge: This is the cleanest merge of all, but it only works in a specific scenario: when the target branch hasn't had any new commits since you created your feature branch. Instead of making a merge commit, Git just moves the target branch's pointer forward to the latest commit.
Choosing the right merge strategy is a balancing act between historical detail and readability. A merge commit tells the full, unabridged story, while a squash and merge gives you the clean summary. Neither is always better; it all comes down to what your team's workflow and documentation needs are.
Sticking to established pull request best practices can make this decision a whole lot easier for your team.
Comparing the Top Merge Approaches
To help you decide which method to use, it's helpful to see them side-by-side. Each serves a distinct purpose, and knowing when to use which one is a hallmark of an experienced developer.
GitHub Merge Types Compared
This table breaks down the three main merge methods, highlighting how each one affects your commit history and where they fit best in a typical workflow.
| Merge Method | Commit History Impact | Best For |
|---|---|---|
| Merge Commit | Preserves all commits from the source branch, adding a merge commit to the target branch. Creates a non-linear, graph-like history. | Retaining a detailed history of feature development and collaborative work on shared branches. |
| Squash and Merge | Condenses all source branch commits into a single commit on the target branch. Creates a clean, linear history. | Keeping the main branch history tidy and easy to read, especially when merging small features or bug fixes with many intermediate commits. |
| Fast-Forward Merge | Moves the target branch pointer to the latest commit of the source branch without a new commit. The history remains linear. | Simple, linear workflows where the target branch has not received new commits since the feature branch was created. |
Ultimately, understanding these options gives you the flexibility to maintain a commit history that is both informative and easy to navigate, no matter how complex your project gets.
Merging Branches with the GitHub Web Interface
For most developers, the GitHub web interface is the daily driver for managing merges, and for good reason. It's built around pull requests, creating a visual, collaborative space that’s packed with feedback loops. Even if you're a command-line wizard, the UI is an excellent way to handle merges.
The whole process usually kicks off after you've pushed a feature branch up to your remote repository. Once your branch is live on GitHub, you can start the merge by creating a pull request, which is basically a formal proposal to integrate your work into another branch, like main.
Creating a New Pull Request
First, head over to the main page of your repository on GitHub. More often than not, you'll see a convenient banner prompting you to create a pull request for the branch you just pushed. If it's not there, no worries—just click the "Pull requests" tab and hit the "New pull request" button.
You'll then be asked to select the base branch (where you want to merge into) and the compare branch (the branch with your new changes). GitHub instantly shows a diff of the changes, giving you a chance to give everything a final once-over before moving forward.
This workflow is the foundation for almost all collaboration on GitHub. The diagram below shows the basic setup that leads into the pull request process.
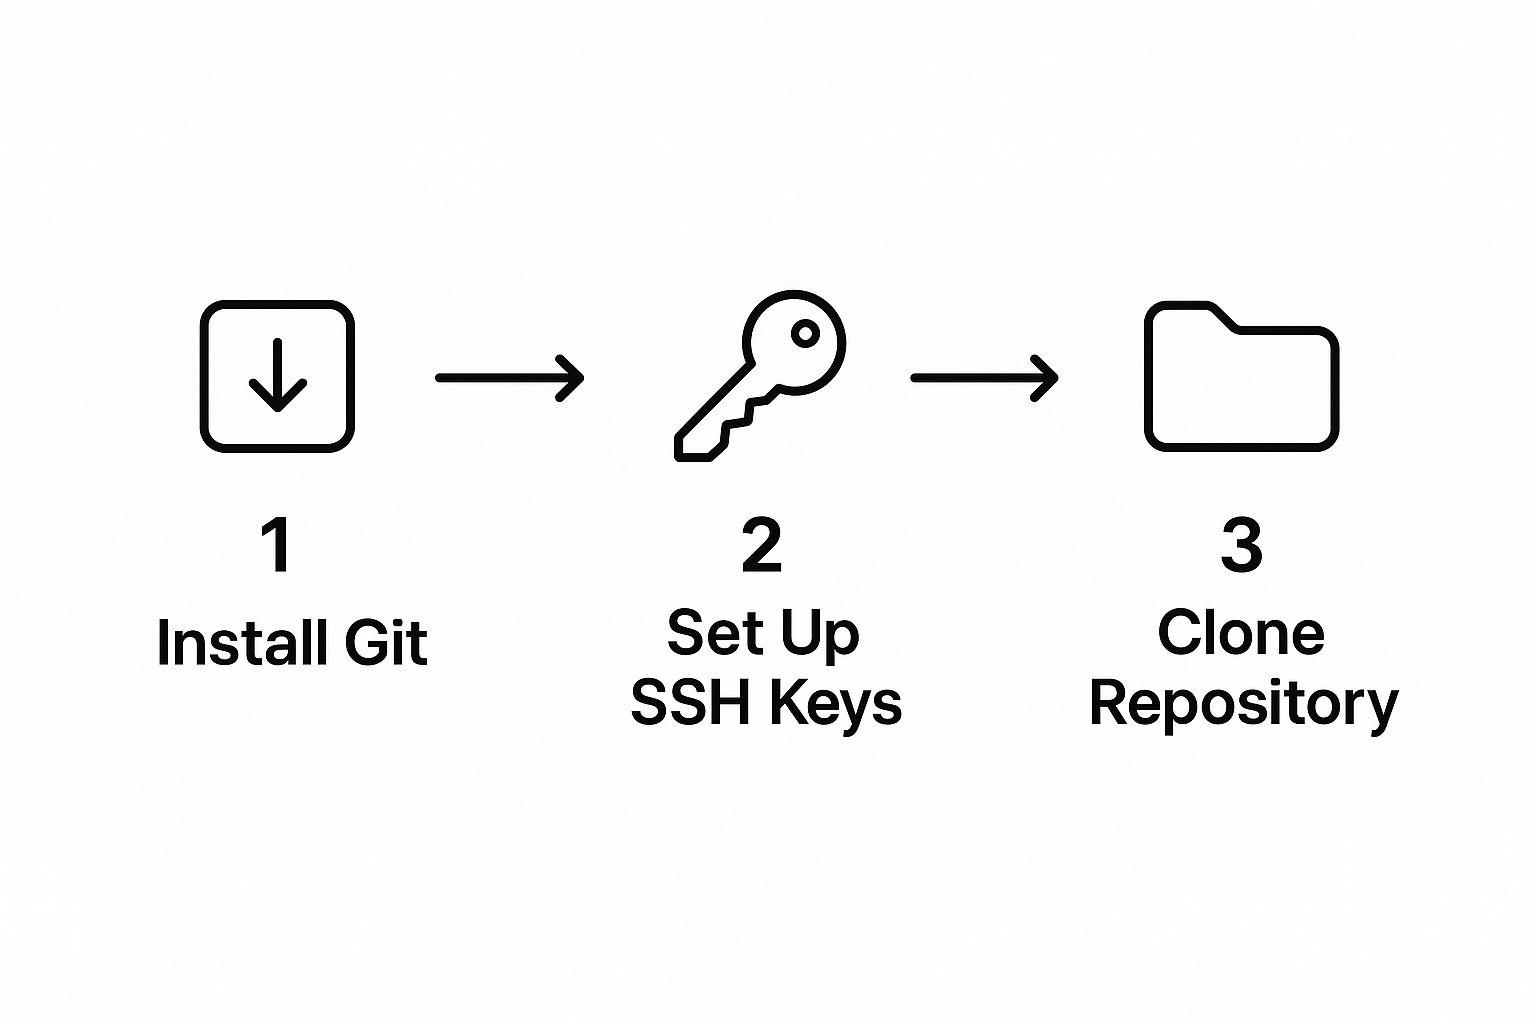
As you can see, a solid local Git setup is the starting point. From there, you push your work and open it up for collaboration through a pull request.
Next, you need to give your pull request a clear, descriptive title and a solid description. Explain what the changes accomplish and why they're necessary. This context is absolutely critical for your teammates who will be reviewing your code.
The Code Review and Approval Process
Once the pull request is open, the real collaboration begins. You can request reviews from specific teammates, who can then browse the "Files changed" tab and leave comments directly on individual lines of code. This is where the magic happens, turning code review into a productive conversation.
Most modern projects also have automated checks running in the background, often called Continuous Integration (CI) pipelines. These automated bouncers might:
- Run your test suite to make sure you didn't accidentally break something.
- Scan your code for style violations to keep everything consistent.
- Attempt to build the application to confirm it still compiles.
These checks show up at the bottom of the pull request, giving you a satisfying green checkmark for a pass or a dreaded red X for a failure. Many repositories use branch protection rules that block merging until all the required checks pass and you have at least one approval from a reviewer.
The review process isn't just about gatekeeping; it’s a cornerstone of code quality. It catches bugs before they ship, spreads knowledge across the team, and makes sure every change is up to the project's standards.
Completing the Merge
After your pull request gets the green light—approvals are in, and all CI checks have passed—the "Merge pull request" button will finally light up. When you click it, GitHub presents a few different ways to get your code into the base branch:
- Create a merge commit: This is the default. It preserves the entire commit history of your feature branch, which is great for traceability.
- Squash and merge: This option tidies things up by combining all of your branch's commits into a single, clean commit on the base branch.
- Rebase and merge: This replays your branch's commits on top of the base branch's history, creating a linear timeline without a formal merge commit.
Choose your method, confirm the merge, and you're done! GitHub handles the rest, integrating the changes from your feature branch into the target branch. It's also a common and highly recommended practice to delete the feature branch after a successful merge. This keeps your repository clean and easy to navigate.
Working Locally with the CLI and GitHub Desktop
While the GitHub web interface is great for collaborative pull requests, a lot of developers—myself included—prefer the speed and control of working locally. When you’re deep in the zone, switching out of your coding environment just to merge a branch can feel like a real momentum killer. The command line and the GitHub Desktop app are powerful alternatives that let you handle merges right from your machine.
Both tools give you much more granular control over your repository's history. This is a big deal for certain operations, like fast-forward merges, which are often the go-to for maintaining a clean, linear history.
A fast-forward merge is a simple yet powerful operation where Git just moves the branch pointer forward instead of creating a new merge commit. This keeps the history tidy and preserves the original commit hashes.
As of early 2025, GitHub’s web UI still doesn’t support fast-forward merges through the GUI. You’ll have to drop into the command line for that. For a deeper dive into how this helps maintain historical integrity, git-merge.com has some great resources.
Merging with the GitHub CLI
The command-line interface (CLI) is the classic, most powerful way to manage a Git repository. It might look a bit intimidating if you're not used to it, but the core workflow for merging is actually pretty straightforward once you’ve done it a few times.
First things first, you need to sync up your local repository. This pulls down the latest changes from your team and is a critical step to avoid accidentally overwriting someone's work or creating a mess of merge conflicts.
git fetch origin
This command downloads all the latest data from the remote but doesn't actually change any of your working files. Think of it as looking at the new commits without touching them.
Next, you need to switch to the branch you want to merge into. This is usually your main or develop branch.
git checkout main
Now, let's make sure this local branch is completely up-to-date with what’s on the remote. The git pull command is perfect for this—it fetches the latest changes and merges them into your current branch all in one go.
git pull origin main
With your main branch synced and ready, you can finally perform the merge. Just run the git merge command and tell it which feature branch you want to bring in.
git merge feature-branch-name
If everything goes smoothly, the final step is to push the updated main branch back to the remote repository. This makes the newly integrated feature available to the rest of your team.
git push origin main
And that’s it! You've successfully merged a branch from the command line.
A Visual Approach with GitHub Desktop
If you're more of a visual person but still want the benefits of working locally, GitHub Desktop is the perfect middle ground. It wraps the entire merging process in a clean graphical interface, making it more intuitive and less prone to typos.
The app really shines when it comes to keeping your branches in sync. Instead of running a sequence of commands, you can fetch and pull updates with a single click of the "Fetch origin" button.
Here’s a look at the main interface, which gives you a clear snapshot of your current branch and repository status.
This view alone is a great starting point for any merge, as it provides an at-a-glance summary of your local changes and remote status.
Merging two branches is just a few clicks away:
- Switch to the Target Branch: First, use the "Current Branch" dropdown to select the branch you want to merge your changes into (like
main). - Start the Merge: In the top menu, navigate to
Branch>Merge into current branch. - Pick Your Source Branch: A dialog box will pop up. From here, just choose the branch containing your new feature and click "Merge."
GitHub Desktop handles the merge behind the scenes and then prompts you to push the updated branch to the remote repository. This visual workflow makes it incredibly easy to see exactly how your branches are being combined, taking a lot of the guesswork out of the process.
How to Navigate and Resolve Merge Conflicts
It’s going to happen. Sooner or later, every developer stares down a merge conflict. They feel a bit intimidating at first, but they're a totally normal—and even healthy—part of working on a team. A conflict is just Git’s way of saying it can't automatically figure out which changes to keep and needs a human to make the final call.
This usually pops up when two people edit the exact same lines in the same file on different branches. When you go to merge, Git sees two competing histories for that chunk of code and hits the brakes, asking you to step in and decide what the final version should look like.
Think of it like two authors trying to write different sentences on the same line of a document. The system can’t just guess which one is right, so it flags the line for review. Getting comfortable with this process is a core skill for anyone learning how to merge GitHub branches.
Understanding Conflict Markers
When a conflict happens, Git helpfully modifies the file to show you exactly where the problem is. It injects a few visual cues called conflict markers that highlight the competing changes. Learning to read these is your first step to a stress-free fix.
You’ll see three distinct markers in your code:
<<<<<<< HEAD: This marks the start of the conflicting code from your current branch (the one you’re merging into).=======: This line separates the two conflicting versions. Everything above it is from your branch; everything below is from the incoming branch.>>>>>>> branch-name: This marks the end of the conflicting code from the other branch (the one you’re merging from).
Your job is to get in there, edit this block, remove all the conflict markers, and leave only the code you want to keep.
Resolving Conflicts in the GitHub UI
For simpler conflicts, the GitHub web interface has a fantastic built-in tool right inside the pull request. If GitHub spots a conflict, it grays out the "Merge pull request" button and gives you a "Resolve conflicts" button instead.
Clicking this brings up a simple editor showing the file with the conflict. You'll see the changes from each branch clearly marked. From there, you just manually edit the file to create the final version you want—whether that means keeping one version, the other, or a mix of both.
A common rookie mistake is to only fix part of a conflict. Always make sure you've removed all three conflict markers (
<<<<<<<,=======, and>>>>>>>) before you mark the file as resolved. Leaving any of them behind will throw errors in your code.
Once you’re happy with your edits, you can commit the resolution directly in the UI. After that, you're free to complete the merge.
A More Powerful Local Resolution Workflow
The web editor is great for quick fixes, but more complex conflicts are often way easier to handle locally in your code editor. Tools like VS Code have excellent Git support baked in that makes the whole process much more intuitive.
When you try to merge locally and a conflict pops up, your editor will highlight the affected files. Open one up, and you'll see the same conflict markers, but this time with helpful, clickable actions. VS Code, for instance, gives you a few options:
- Accept Current Change: Keeps the version from your current branch.
- Accept Incoming Change: Keeps the version from the branch you're merging.
- Accept Both Changes: Combines both versions, placing one right after the other.
After you've made your choices and manually tweaked the code to perfection, you just stage the resolved file (git add <file-name>) and finish the merge with a commit (git commit). This local approach gives you the full power of your dev environment, letting you run tests and validate your fix before finalizing everything.
Professional Merging Techniques and Best Practices

Once you've got the basics down, it's time to level up. Moving beyond simple merges is what separates high-performing engineering teams from the rest. Adopting professional habits and the right tools can make a huge difference in your team's workflow, keeping your repository clean, stable, and easy to navigate.
A powerful technique to add to your arsenal is the rebase workflow. Instead of cluttering your history with merge commits, git rebase essentially replays your feature branch's commits right on top of the latest version of the target branch. The result? A clean, linear project history that's a dream to read and debug.
But there's a catch. A rebase rewrites commit history, which is a big no-no for shared branches. It's perfect for tidying up your local commits before you open a pull request, but using it on a shared branch like main can cause chaos for your teammates.
Enforcing Quality with Branch Protection
You can't have a stable project if broken code is constantly sneaking into your main branch. This is where GitHub's branch protection rules become your best friend. Think of them as automated quality gates for your repository.
You can set up rules that enforce specific conditions before any pull request can be merged. Here are a few must-haves for any serious project:
- Require a pull request review before merging: This simple rule ensures at least one other person has signed off on the changes, which is invaluable for catching issues you might have missed.
- Require status checks to pass before merging: This rule blocks merges until your CI pipeline—things like automated tests or builds—gives the green light. No more "it worked on my machine" excuses.
- Require conversation resolution before merging: This prevents a PR from being merged if there are still open review comments, making sure all feedback is actually addressed.
Setting these up creates a baseline for code quality. To make things even smoother, you can how to automatically assign reviewers in GitHub to make sure the right people see new code without any manual effort.
Adopting branch protection isn't about adding bureaucracy; it's about building a safety net. It automates your team's standards, freeing up developers to focus on building features instead of fixing preventable bugs.
Managing High-Velocity Workflows with a Merge Queue
On busy repositories with lots of developers merging code frequently, the main branch can turn into a real bottleneck. You've seen it before: a pull request passes all its checks, but by the time you hit merge, someone else has already pushed a change that breaks everything.
To solve this classic problem, GitHub introduced the merge queue in mid-2023. It's a brilliant feature that automates the merging process by creating temporary branches that combine the latest main with queued pull requests. It then runs CI checks on this combined code before actually merging anything.
This process guarantees that only compatible, fully-tested pull requests are merged sequentially. It's an elegant solution that prevents broken builds and developer traffic jams. You can read more about it on the official GitHub blog.
Frequently Asked Questions About Merging
As you start merging branches in GitHub, a few common questions almost always pop up. Getting these sorted out early will save you a ton of headaches down the road. Let’s clear up some of the key distinctions you'll run into.
What Is the Difference Between Merging and Rebasing
You'll hear "merge" and "rebase" thrown around a lot. Both get your code from one branch to another, but they do it in completely different ways.
A standard merge is straightforward—it combines the histories of two branches by creating a special merge commit. This new commit acts as a knot, tying the two histories together. It's a non-destructive operation that preserves the exact history, showing the messy, real-world path of development.
Rebasing, on the other hand, is like rewriting history. It takes all the commits from your feature branch and moves them, one by one, to the tip of the target branch. The end result is a perfectly clean, linear commit history that’s much easier to follow. The catch? It changes the commit hashes, which is a huge deal. That's why you should never rebase a branch that's already been pushed and shared with others.
A simple rule of thumb: use
mergefor shared, public branches likemainordevelopto preserve history. Userebaseto clean up your own local, private feature branches before you even think about opening a pull request.
Can I Merge Without a Pull Request
Technically, yes, you can. It's entirely possible for a developer to run git checkout main, then git merge my-feature, and finally git push—all from their local machine.
But in any real-world team environment, this is a terrible idea and strongly discouraged.
Pull requests (or merge requests, depending on the platform) are the bedrock of collaborative software development for good reason. They create a crucial checkpoint for:
- Code Review: This is your team's first line of defense, letting others catch bugs, suggest improvements, and ensure quality.
- Automated Checks: Pull requests are the perfect trigger for your CI/CD pipeline to run tests, linters, and security scans.
- Documentation: They create a permanent, auditable trail of why a change was made, who reviewed it, and who approved it.
Skipping the pull request means throwing away all of these safety nets. While the terms are sometimes used interchangeably, it's worth understanding the subtle differences between a pull request vs. merge request to see how different platforms approach this critical workflow.
Ready to stop chasing down code reviews? PullNotifier delivers real-time pull request updates directly to Slack, cutting through the noise and helping your team merge faster. See how it works at https://pullnotifier.com.