- Published on
Getting Started with Git: A Beginner's Guide
- Authors

- Name
- Gabriel
- @gabriel__xyz
Getting started with Git can feel like learning a whole new language, but it's really just a safety net for your code. Think of it as the ultimate undo button combined with a powerful collaboration tool. It lets you track every change, roll back to previous versions, and work with a team without stepping on each other's toes.
Why Git Is Your Development Safety Net
Before we jump into the commands, let's talk about why Git is so essential. It’s way more than a simple file tracker; it's the backbone for managing project complexity and keeping your work safe.
Picture this: you accidentally delete a critical feature file just hours before a deadline. Without Git, you'd be frantically digging through old backups, hoping to piece things together. With Git, recovering that file is just a single command away. What could have been a disaster becomes a minor hiccup.
The Power of a Distributed Model
Unlike older, centralized version control systems, Git operates on a distributed model. This is a game-changer. It means every developer has a complete copy of the project's history on their own machine.
This approach comes with some huge advantages:
- Work Anywhere: You can commit changes, check the project history, and create new branches even without an internet connection.
- Blazing Speed: Since most operations happen locally, they're incredibly fast. No more waiting for a central server to respond to every little action.
- Built-in Redundancy: If the main server ever goes down, any developer's local copy can be used to restore the entire project. No sweat.
This distributed nature is a major reason why 72% of developers say version control cuts their development time by up to 30%. Teams can work on different features in parallel without getting in each other's way.
A clean, well-maintained Git history does more than just track changes; it tells the story of your project’s evolution. It showcases professionalism and makes onboarding new team members significantly easier.
For anyone serious about building a solid software developer career path, mastering tools like Git is non-negotiable. As your team scales, managing these workflows becomes even more critical. To level up your process, check out our guide on some https://blog.pullnotifier.com/blog/5-underrated-github-apps-to-manage-your-team-better.
Getting Your Git Environment Set Up
Before you can start tracking changes or collaborating on projects, you've got to get Git running on your machine. Don't worry, this is a one-time setup, and it's pretty straightforward no matter what operating system you're on. Once it's done, you're good to go.
The best place to start is the official Git website. Head over there to grab the right installation files for your system.
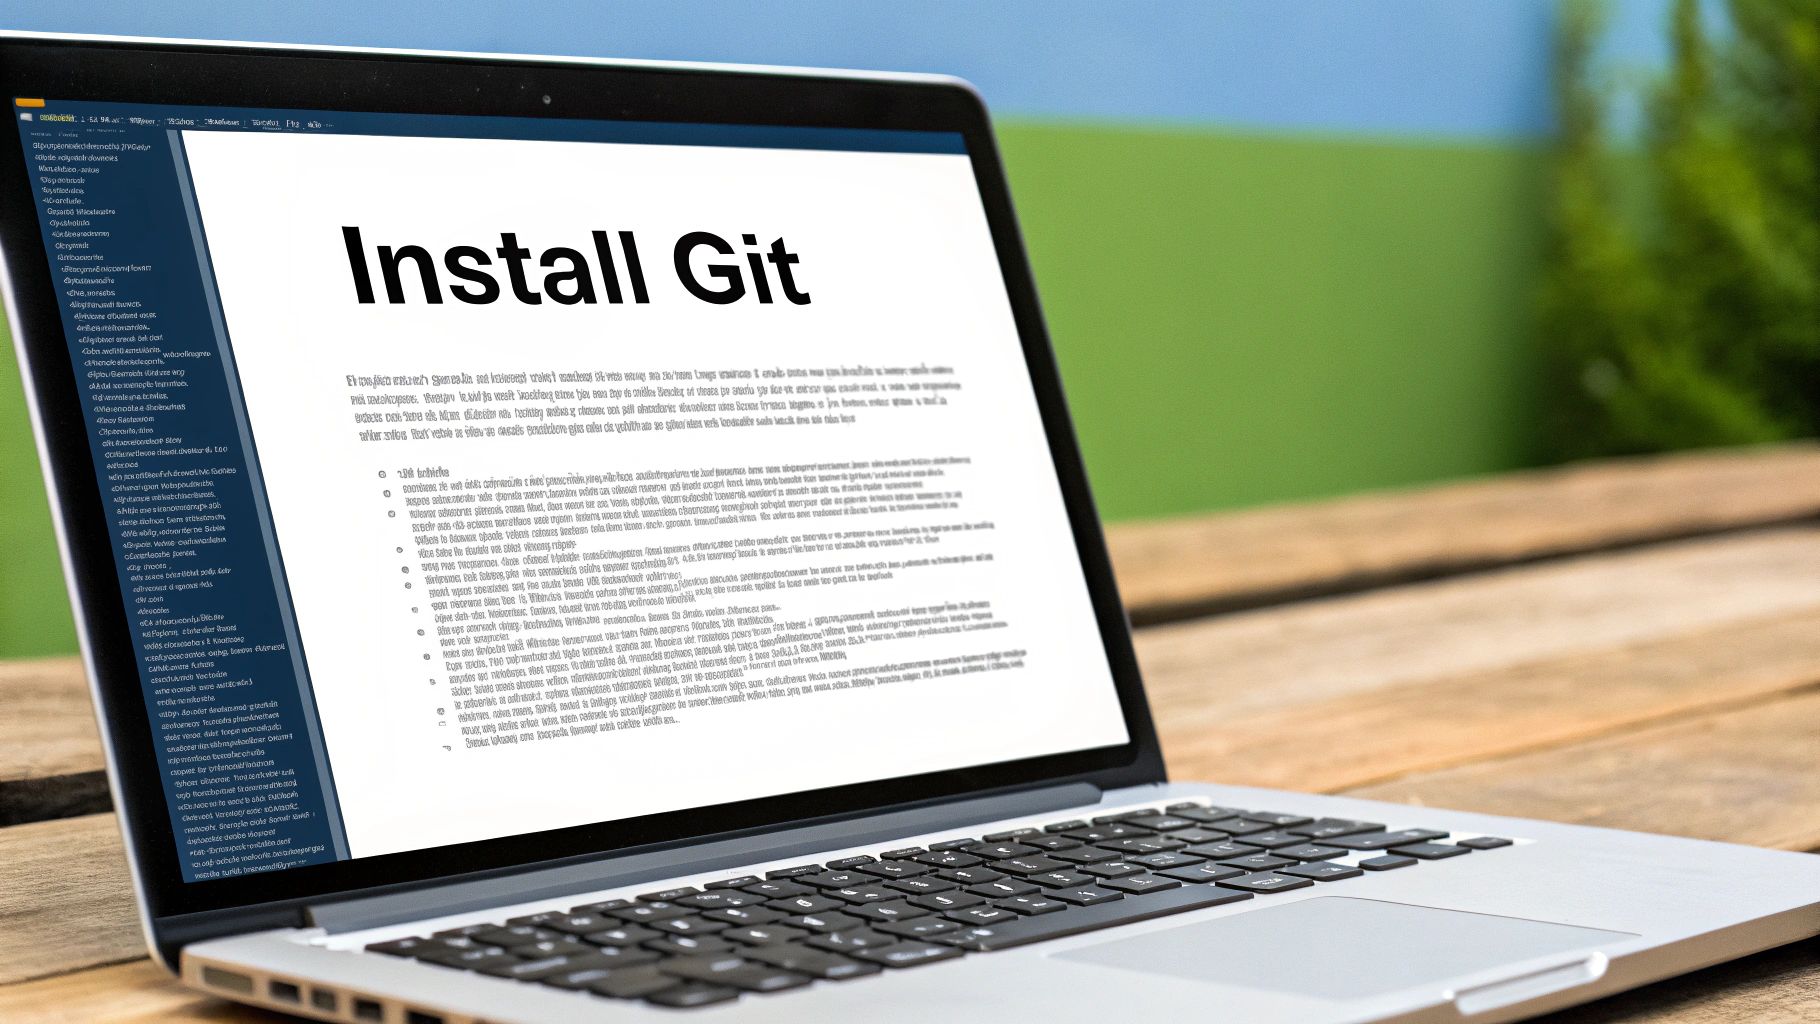
The download page is smart enough to detect whether you're on Windows, macOS, or Linux and will point you to the correct installer. Just download it, run through the installation, and if you're just starting out, accepting the default options is perfectly fine.
Your First-Time Configuration
Once Git is installed, there are a couple of quick but crucial commands you need to run. This is how you tell Git who you are, making sure every commit you make is properly credited to you.
Open up your terminal or command prompt and pop in these two lines, swapping the placeholder text with your own details:
git config --global user.name "Your Name"
git config --global user.email "youremail@example.com"
That --global flag is important—it tells Git to use this information for every single project on your computer, so you only have to do this once. Think of it as your digital signature; it’s how your contributions will be identified on platforms like GitHub, which is fundamental for team collaboration.
It's like signing your name to your work. This little configuration connects every line of code you write back to you, which is essential for keeping a clean, understandable project history when you're working with others.
You can also make a few other tweaks to improve your experience. For example, you can set a default text editor or, my personal favorite, enable colorized output to make Git's feedback much easier to read.
To get some color in your terminal, just run this:
git config --global color.ui auto
This simple command adds a splash of color to commands like git status, helping you quickly spot the difference between staged, unstaged, and untracked files at a glance. It’s a small change, but it makes a big difference in your day-to-day workflow. Getting these initial settings dialed in will set you up for a much smoother ride as you start creating and managing your repositories.
Creating Your First Git Repository
Alright, you've got Git installed and configured. Now for the fun part: putting it to work. When you're starting a project with Git, you'll almost always take one of two paths.
You'll either start a brand-new repository from scratch inside a project you already have on your machine, or you'll clone a project that already exists somewhere else, like on GitHub. Understanding when and how to do both is the key to getting off the ground.
Let's break down how each one works.
Initializing a Brand New Repository
Say you've already started a new project—maybe a personal website or some scripts you've been tinkering with. The folder exists on your computer, but Git has no idea it's there. Turning this folder into a Git repository is surprisingly simple.
Just open your terminal, navigate to the root directory of your project, and run this one command:
git init
And that’s it. Seriously. This command creates a hidden .git subdirectory inside your project folder. This little folder is the brains of the operation; it holds all the files and history Git needs to start tracking your work. Your existing files aren't being tracked just yet, but the foundation is now in place.
This is the go-to method when you're kicking off a project locally.
Cloning an Existing Repository
More often than not, especially in a team setting, you'll be jumping into a project that already has a history. It might be your company's main codebase or an open-source project you want to contribute to. In these cases, you'll use the git clone command.
First, you need the repository's URL. You can grab this from its page on GitHub, GitLab, or Bitbucket. Once you have it, run this command in your terminal:
git clone https://github.com/example/project-name.git
This command is doing more than just downloading the files. It creates a complete, local copy of the project—including every single commit from its history—and automatically sets up a connection to the remote server so you can pull updates and push your own changes later.
Initializing vs Cloning a Repository
To make it crystal clear, here’s a quick comparison of when you’d use git init versus git clone. Think of it as building a new house versus buying one that's already built.
| Action | Command | When to Use It | Outcome |
|---|---|---|---|
| Initializing | git init | When starting a brand new project on your local machine. | Creates a new, empty .git repository in your existing project folder. |
| Cloning | git clone [url] | When you want to work on a project that already exists on a remote server. | Creates a local copy of the entire remote repository, including its full history. |
Getting comfortable with both git init and git clone is non-negotiable. These two commands are your entry points into the entire version control workflow.
The industry has clearly picked its winner, with Git adoption projected to climb from 87.1% in 2016 to a staggering 93.87% by 2025. This isn't just a popular tool; it's a core competency. You can dig into more of the data in this analysis of version control system popularity. Nailing these first steps is how you start building that critical skill.
Your Everyday Git Workflow
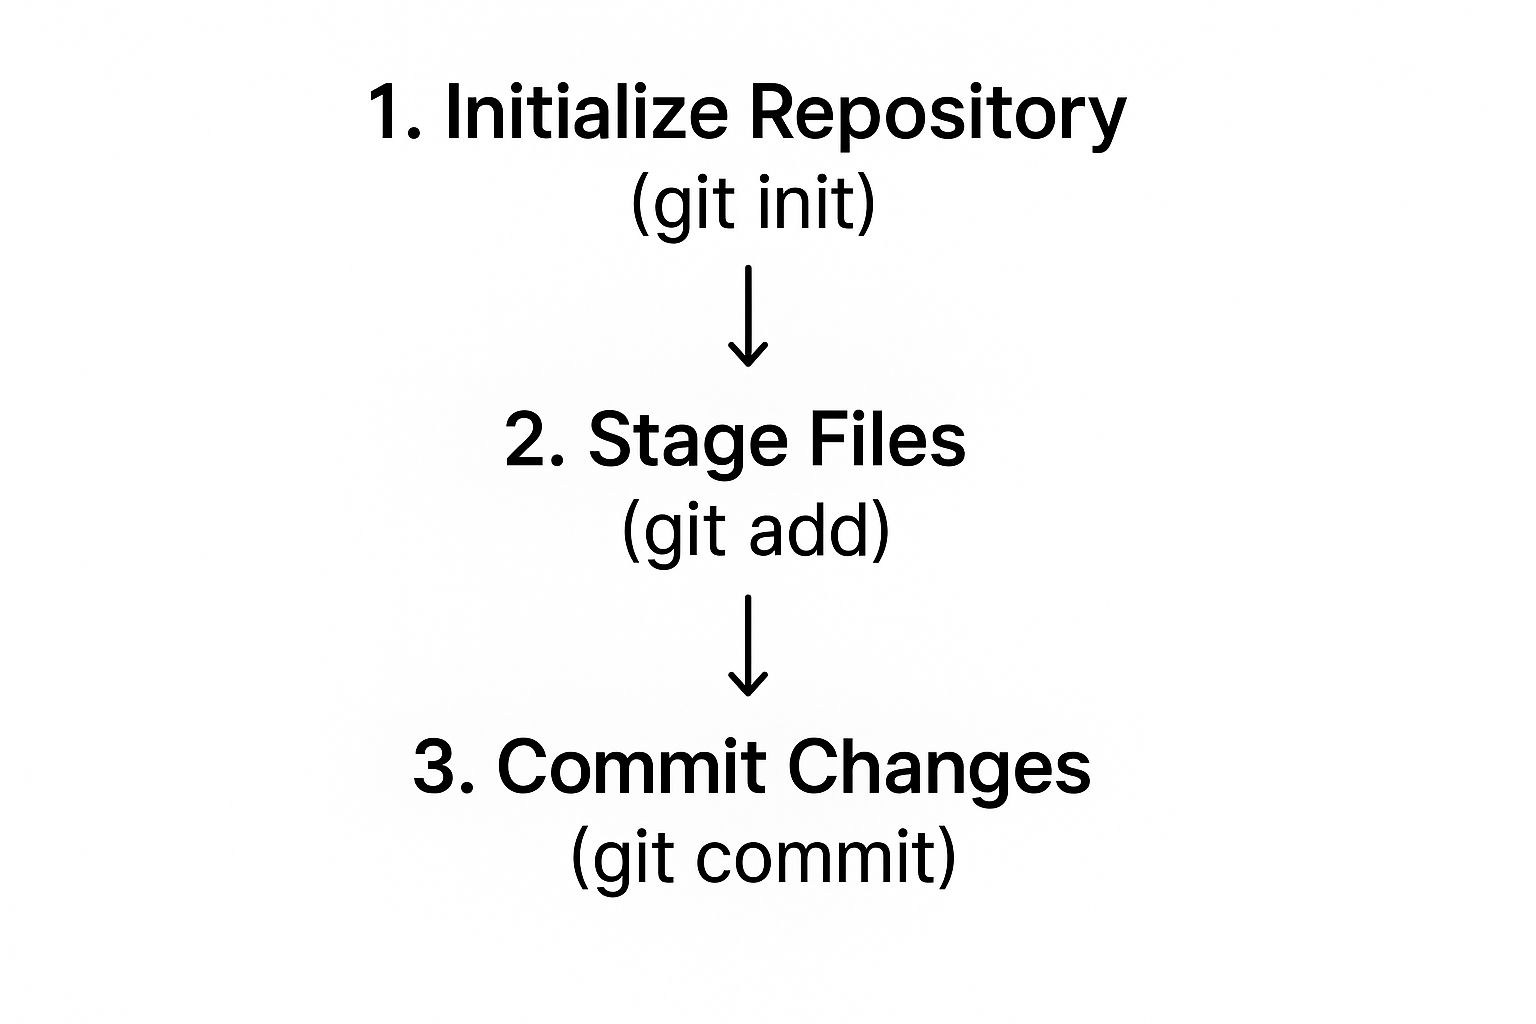
Once you have your repository set up, you'll find yourself falling into a simple, powerful rhythm. This is the core loop you'll repeat constantly when working with Git, and it's built around a three-stage process that gives you complete control over your project's history.
Think of it like this: your project folder is your working directory, which is where you actually edit your files. When you're happy with a change, you move it to a temporary staging area. From there, you take a permanent snapshot of everything in the staging area and save it to your project's official history.
This whole process is the foundation of Git development, and it’s how every single change gets tracked.
This workflow might seem a bit much at first, but that middle "staging" step is what makes Git so flexible.
Staging Your Changes
Let's say you've just modified a file—maybe you updated index.html to add a new heading. Git knows you made a change, but it isn't ready to be saved into the project's history just yet.
First, you have to tell Git to include this specific change in the next snapshot. This is called "staging," and you do it with the git add command.
You can stage a single file: git add index.html
Or, if you want to stage all the files you've modified (which is pretty common), you can just use: git add .
This command basically tells Git, "Okay, I'm happy with these modifications. Get them ready for the official record." Staging is a crucial intermediate step; it lets you group related changes together into a single, logical update, even if you’ve been working on multiple files at once.
The staging area is one of Git’s most powerful features. It acts as a buffer, allowing you to carefully craft your commit by selecting only the changes you want to include, rather than just saving everything you’ve touched.
Committing to History
Once your changes are staged, the final step is to save them permanently to the project’s history with a commit. A commit is just a snapshot of your staged files at a specific moment. Each commit gets a unique ID and, more importantly, a descriptive message you write yourself.
git commit -m "Add user profile section to homepage"
This command takes everything in the staging area and locks it into the repository's history with the message you provided. Writing clear, concise commit messages is a vital skill. It creates a readable log of the project's evolution, making it way easier for you and your teammates to understand what changed and why.
With your changes safely committed locally, the next logical step is to share them with your team by pushing them to a remote repository like GitHub using git push.
Managing Work with Branches and Merges
If there's one Git feature that hooks new developers, it's branching. Seriously, it's a game-changer. Think of a branch as a clean, parallel universe for your code. It gives you a safe space to build a new feature or stomp out a bug without messing with the stable, working version of your project.
This isolated workflow is what makes modern, parallel development possible. Let's say you're tasked with building a new user profile page. Instead of coding directly on the main branch and praying you don't break anything, you can spin up a dedicated branch just for that feature.
Creating Your First Branch
Getting a new branch up and running is ridiculously simple. It’s just one command. Pop open your terminal in your project directory and run this:
git checkout -b feature/user-profile
That single line does two things at once: it creates a new branch named feature/user-profile and immediately switches you over to it. From this point on, any files you add, code you write, or commits you make are contained entirely within this branch. Your main branch remains untouched and stable.
This whole approach is the bedrock of modern development, and it’s a big reason why the version control market is booming. The market was valued at USD 1.48 billion in 2025 and is expected to hit USD 3.22 billion by 2030, mostly because branching fits so perfectly into agile and DevOps workflows. You can dig into more details about this growth in the version control market.
A branch is just a lightweight, movable pointer to one of your commits. It’s an independent line of development that lets you work on different things at the same time without them tripping over each other.
Merging Your Completed Work
Okay, so you've built the new feature on its branch and everything checks out. Now it's time to bring that shiny new code back into the main project. This is called a merge.
First, you'll want to hop back over to your primary branch, which is usually called main or master.
git checkout main
Next, you run the merge command to pull in all the changes from your feature branch.
git merge feature/user-profile
Git is smart enough to weave the two histories together, applying your new commits right on top of the main branch. Just like that, the new user profile feature is officially part of the project.
As your team gets bigger, figuring out who should review these merges becomes a job in itself. You can streamline that process and learn how to automatically assign reviewers in GitHub to keep things moving. This simple cycle of branching and merging is what makes collaborative coding work.
Common Questions for Git Beginners
Once you start getting the hang of the daily Git workflow, you'll inevitably run into a few common questions. Getting these sorted out early on will save you a ton of confusion and help you build confidence a lot faster. Let's walk through some of the most frequent hurdles that trip up beginners.
One of the first things that seems to confuse everyone is the difference between Git itself and services like GitHub.
Git vs. GitHub: What Is the Difference?
Here's the easiest way to think about it: Git is the tool, and GitHub is the workshop. Git is the actual version control software that runs on your computer, tracking changes and managing your project's history. GitHub, along with its counterparts like GitLab and Bitbucket, is a web-based service that hosts your Git repositories.
GitHub provides a central place to store your code online, but more importantly, it adds powerful collaboration features on top of Git, like:
- Pull requests for structured code review
- Issue tracking for bugs and new features
- Project management boards
You use Git on your local machine to create commits. You use GitHub to push those commits to a remote server so you can share your work and collaborate with your team.
How Do I Undo My Last Commit?
We've all been there. You just made a commit and immediately spotted a typo in the message or forgot to include a small change.
If you haven't pushed the commit anywhere yet, git reset --soft HEAD~1 is your best friend. This command moves the pointer back one commit but keeps all your file changes staged. It's like saying, "Oops, I want to rephrase that commit message or add one more thing."
To prevent these kinds of mistakes from getting pushed in the first place, a solid review process is key. Our guide on building a great code review checklist can help your team establish a process that catches issues early.
At PullNotifier, we make sure your team never misses an important update by sending concise, real-time pull request notifications directly to Slack. Cut down on noise and speed up your reviews. Check us out at https://pullnotifier.com.