- Published on
Learn how to download from github efficiently
- Authors

- Name
- Gabriel
- @gabriel__xyz
Getting your hands on code from GitHub is something developers do every day. But the best way to do it? That depends entirely on what you're trying to accomplish.
If you just need to quickly grab a project's files to inspect them, the "Download ZIP" button is your fastest route. But for active development, where you plan on tracking changes or contributing back, git clone is the powerful, industry-standard approach.
Choosing the Right Way to Download from GitHub
Figuring out the right download method comes down to a simple question: what do you need this code for? Are you just kicking the tires, using it as a one-off dependency, or are you planning to work on it?
Each scenario has a perfect tool for the job. Picking the right one from the start will save you a ton of time and prevent headaches down the road. This guide is here to help you build that intuition.
This decision tree gives you a quick visual guide for choosing the right download method.
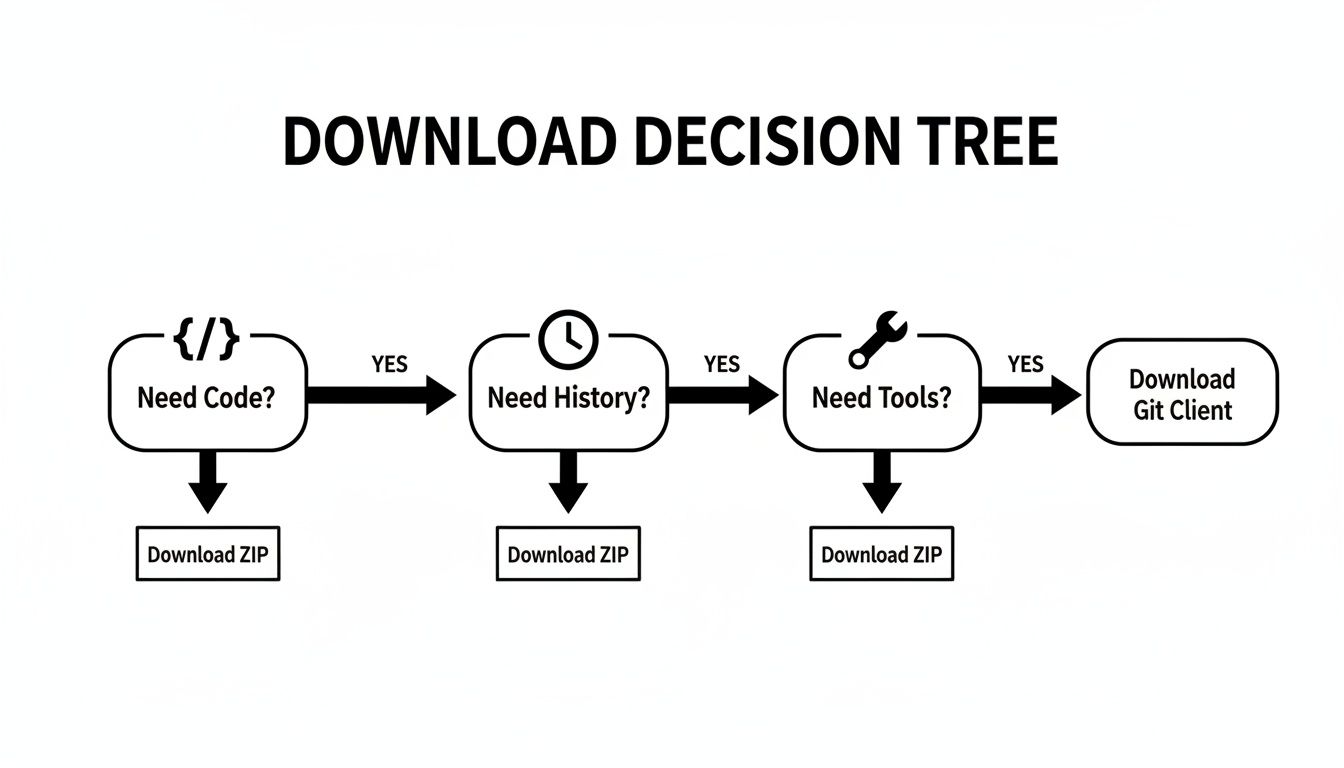
As you can see, the main decision point is whether you need the project's version history. That’s what separates a simple file download from a full version-controlled clone.
To help you decide at a glance, here’s a quick comparison of the most common methods we’ll cover.
GitHub Download Methods at a Glance
| Method | Best For | Requires Git? | Version History |
|---|---|---|---|
| Download ZIP | Quickly getting code for inspection or one-time use. | No | No |
git clone | Active development, contributing, or tracking changes. | Yes | Yes |
| GitHub CLI | Scripting, automation, and command-line workflows. | Yes | Yes |
| GitHub Desktop | Visual, user-friendly Git management without the CLI. | Yes | Yes |
| Single File/Raw | Grabbing just one specific file from a repository. | No | No |
| Releases | Getting stable, compiled application assets. | No | No |
This table should give you a solid starting point for picking the right tool for the task ahead.
Why Your Download Method Matters
It's hard to overstate GitHub's role in the software world. It hosts over 420 million repositories and is the daily workspace for around 100 million developers. With that kind of scale, mastering different ways to get code is a fundamental skill.
Choosing the wrong method is more than just an inconvenience; it can lead to real frustration. For instance, repeatedly downloading ZIP files to get project updates is incredibly inefficient compared to running a simple
git pullin a cloned repository.
The methods we'll dive into fall into a few key categories:
- Simple Web Downloads: Using the "Download ZIP" button or grabbing a single "Raw" file directly from the browser.
- Command-Line Cloning: The classic
git clonecommand using either HTTPS or SSH. - Modern Tooling: Using the GitHub CLI or the GitHub Desktop app for a more integrated experience.
Understanding these options helps you work smarter, not harder. It's also helpful to know how different plans can affect your access and capabilities, especially if you manage multiple projects. For more on that, check out our guide on GitHub pricing.
Quick Downloads with the GitHub Website
 Sometimes you just need the code, not the entire git history that comes with it. When that's the case, the fastest way to get files is directly from the GitHub website. No special tools needed—just your web browser.
The most common approach is grabbing a complete snapshot of a repository. This is perfect when you want to quickly test a project, pull a library into a project that isn't managed by Git, or just save a specific version of the code for your records.
Just head to the main page of the repository you need. Look for the green <> Code button. A click reveals a dropdown menu where you’ll find the Download ZIP option. This bundles the current state of the default branch into a single compressed file, ready for you to save and extract.
When to Use the Download ZIP Method
This method is my personal go-to for quick and simple tasks. It’s incredibly efficient when you don’t need the baggage of version control.
- Quick Code Inspection: Download the code to open it in your favorite editor and explore its structure without cloning anything.
- Using a Small Library: If you need a simple JavaScript library for a small project, downloading the ZIP is often easier than setting up a package manager.
- Offline Archiving: Save a specific version of a project for your records without needing a full Git repository.
This approach is a digital equivalent of grabbing a project's "tarball," a concept from the early days of open source where developers would distribute code as compressed archives. It’s a direct, no-fuss way to get what you need.
Downloading a Single File
But what if you only need a single configuration file, a script, or a specific image? Cloning or zipping the entire repository is total overkill. Luckily, there’s a simple trick for this.
Navigate through the repository's file browser until you find the exact file you want. Once you click on the file to view its contents, you'll see a row of buttons at the top of the file view. Look for the one labeled Raw.
Clicking Raw opens the file's raw content directly in your browser. From here, you can just use your browser's "Save Page As" feature (usually a right-click or a Ctrl+S / Cmd+S shortcut) to save the file to your computer. Easy.
Getting Pre-Compiled Software from Releases
Many projects on GitHub aren't just source code; they're full-fledged applications. For these, developers often provide pre-compiled, ready-to-run versions. You'll find these on the Releases page.
Look for the "Releases" link on the right-hand sidebar of the repository's main page. This section contains tagged versions of the software, complete with changelogs and a list of assets.
These assets often include installers for Windows (.exe, .msi), macOS (.dmg), or Linux (.deb, .AppImage), as well as compressed archives of the built application. This is the correct way to download a tool, rather than trying to build it from the source yourself.
Using Git Clone for Active Development

When downloading a ZIP file feels too temporary and you actually plan to work on a project, it’s time to use git clone. This is the go-to command for any developer who needs a complete, local copy of a repository, including its entire version history.
Unlike a simple download, a cloned repository is a living, breathing copy on your machine. It keeps a direct connection to the remote on GitHub, so you can pull down updates, push your own changes, and collaborate with others. It's the real starting point for any serious development.
If you're still getting the hang of Git itself, our guide can help you get started with Git and your first steps to version control.
Choosing Between HTTPS and SSH
When you click the green Code button on a GitHub repo, you'll see URLs for both HTTPS and SSH. Which one you pick really comes down to your workflow and security setup.
HTTPS: This is the easiest way to get started, especially with public repositories. It works almost everywhere because it uses the same port as normal web traffic. When you work with private repos, you'll just need to use a Personal Access Token (PAT) as your password.
SSH: This method uses a key pair to create a more secure and seamless connection. You go through a one-time setup to add your public SSH key to your GitHub account, and after that, you can push and pull without constantly re-entering your credentials. It’s the standard for developers who contribute frequently.
To clone a repo, just copy the URL you want from the Code dropdown and run this in your terminal: git clone <URL>.
From my experience, starting with HTTPS is fine, but investing 15 minutes to set up SSH keys is a massive quality-of-life improvement. You'll thank yourself every time you interact with a repository without having to type a password.
Cloning a Specific Branch
By default, git clone only grabs the main branch (usually called main or master). But what if the code you need is on a different branch, like a new feature or a release candidate?
You can clone the repo and check out a specific branch all in one command. It's a nice little timesaver that avoids a separate git checkout step right after cloning.
Just use the -b or --branch flag, followed by the name of the branch: git clone -b develop https://github.com/example/project.git
This command clones the project.git repository and immediately switches you to the develop branch, so you're ready to start coding right away.
Saving Time with a Shallow Clone
Some projects have a massive history, with years of work and thousands of commits. Cloning all of that can be a real drag on your time and disk space. If you only need the latest version of the code to run a build or a quick test, a shallow clone is your best friend.
By adding the --depth flag, you tell Git to only download a specific number of recent commits. To get just the very latest version, you can use --depth 1.
git clone --depth 1 https://github.com/large/repo.git
This creates a clone with just the most recent commit, which drastically cuts down on download time and storage. It's a total lifesaver for CI/CD pipelines and quick checks on large repositories.
Of course, to collaborate effectively, you need to know how to sync your project with GitHub. This focus on efficient, secure practices is part of a larger trend; developers proactively updated 50% more vulnerable packages than in the previous year, helping secure 18 million projects, showcasing a community-wide commitment to better workflows.
Modern Tools for a Faster Workflow
 While
git clone gets the job done, your workflow can be so much faster. Modern tools like the GitHub CLI and GitHub Desktop are built to bring the full power of GitHub right to your machine.
Think of them as more than just downloaders. They connect you directly to issues, pull requests, and releases, letting you manage everything without constantly switching back to your browser.
The Power of the GitHub CLI
If you live in the terminal, the GitHub CLI—or gh—is a must-have. It turns your command line into a remote control for GitHub, letting you do almost anything you could on the website.
Cloning a repo is simple: gh repo clone owner/repo. But the real magic is what comes next.
The GitHub CLI isn't just a replacement for
git clone. It’s a full-featured remote control for your GitHub account. From personal experience, being able to create a pull request or check on an issue status with a quick command saves a tremendous amount of context-switching.
Once you’ve cloned a project, you can manage it instantly:
gh pr listto see open pull requests.gh issue createto report a bug you've found.gh release download <tag>to grab a specific release asset.
This command-centric approach is perfect for scripting and automation. It's a favorite for developers who value speed and efficiency, and learning it is a big step toward a more professional setup.
A Visual Approach with GitHub Desktop
Not everyone wants to live in the command line, and that's where GitHub Desktop comes in. It’s a clean, intuitive GUI that makes Git and GitHub incredibly approachable.
Cloning is a breeze. Just log in with your GitHub account, and you'll see a list of your repositories ready to be cloned with a single click.
GitHub Desktop really shines by making complex Git operations simple and visual:
- Committing Changes: Visually select which files to include in a commit.
- Switching Branches: See all your branches in a list and switch between them with a click.
- Viewing History: Browse the commit history in a clear, linear timeline.
For developers new to Git, it offers a much gentler learning curve than memorizing commands. This willingness to adopt tools that improve productivity is a strong trend. For example, among those who try GitHub Copilot, more than 50% continue using it long-term. This shows a clear developer preference for tools that integrate smoothly into their workflow, and you can see more insights about developer tool adoption on Quantumrun.
Handling Advanced Download Scenarios
Sooner or later, you'll run into a project that doesn't fit the simple git clone model. Real-world development often involves specialized situations, like massive repositories or corporate environments, where a basic download just won’t cut it.
This is where you need to get a bit more creative. Learning how to handle these advanced scenarios will save you a ton of time and disk space.
One of the biggest headaches you can run into is a monorepo—a single, huge repository that houses dozens of separate projects. Cloning the entire thing just to work on one small part is a massive waste of resources.
Working with Monorepos and Sparse Checkouts
Thankfully, Git has a powerful feature called a sparse checkout that solves this exact problem. It lets you tell Git to pull down only the specific folders you need, ignoring everything else.
To get started, you'll want to initialize an empty local repository and connect it to the remote monorepo.
git init my-project cd my-project git remote add origin https://github.com/large-org/monorepo.git git config core.sparseCheckout true
Next, you have to tell Git which directories you're interested in. You do this by adding their paths to a special file. For example, if you only need the apps/web folder:
echo "apps/web/" > .git/info/sparse-checkout
Now, when you finally pull the code, Git will only download the files and history for the apps/web directory. This is a game-changer for anyone working with large, complex monorepos.
Tips for GitHub Enterprise Users
If your company uses GitHub Enterprise, your day-to-day workflow will feel almost identical, but there are a couple of key differences to keep in mind.
The most obvious change is the URL. Instead of github.com, your repos will live on a custom company domain, like github.mycompany.com.
Authentication can also be a little different. While SSH keys and Personal Access Tokens (PATs) still work, many organizations tie everything to their single sign-on (SSO) provider. This might mean you have to re-authorize your Git client through your company's identity portal every so often. For a closer look at this setup, you might be interested in our article explaining how GitHub Enterprise Server works.
Security Best Practices Before You Download
Before you download code from any repository—especially one you're not familiar with—it’s smart to do a quick security check. Blindly trusting code from the internet is a recipe for disaster.
- Check the Stars and Forks: A high number of stars and forks is a good sign that other developers trust the project. It's not a guarantee, but it’s a strong social signal.
- Review Recent Activity: Is the project still actively maintained? Look for recent commits and pull requests. An abandoned project might have unpatched security holes.
- Look for Security Advisories: Always check the Security tab on the repository page. This is where maintainers disclose known vulnerabilities.
Always take a moment to vet a repository before downloading. A few minutes of due diligence can prevent hours of headaches from dealing with buggy, abandoned, or malicious code.
Automating Downloads with the GitHub API
For truly advanced use cases like building a CI/CD pipeline, you can use the GitHub API to automate your downloads. This method is perfect for scripts because it gives you precise, programmatic control.
You’ll need to generate a Personal Access Token (PAT) with the right permissions. From there, you can use a tool like curl to make authenticated requests to API endpoints.
A common workflow is to download a specific release asset. You’d first hit the Releases API to find the asset’s browser_download_url, then use that URL to grab the file. This is the backbone of countless automated build and deployment systems.
Common Questions About Downloading from GitHub
Once you start pulling code from GitHub regularly, a few common questions always seem to pop up. Let's tackle the big ones I see most often in developer communities so you can get past these roadblocks quickly.
Can I Download a Private Repository?
Nope, not unless you've been invited. Private repositories are locked down by design to protect proprietary code.
If you try to clone a private repo you don't have access to, Git will usually throw a 'repository not found' error. This isn't a bug—it’s a security feature. The only way in is to contact the owner and ask them to add your GitHub account as a collaborator or to a team with access.
What Is the Difference Between a Fork and a Clone?
This mix-up is a classic rite of passage for new developers, but the distinction is crucial, especially for open-source work.
- A fork is your own copy of a repository that lives on GitHub's servers. It lets you mess around with the code without touching the original project.
- A clone is a local copy of a repository that you pull down to your computer.
The standard contribution workflow looks like this: you first fork the original project on GitHub, and then you clone your fork to your local machine. This gives you a safe sandbox to make changes before you submit them back to the original project through a pull request.
How Do I Download a Previous Version of a Repository?
Great news—if you've cloned a repository, you already have its entire history on your computer. To jump back in time, pop open your terminal and run git log to see a list of all the commits.
Find the commit hash (that long string of letters and numbers) for the version you want. Then, you can check out that exact state of the project with this command:
git checkout <commit-hash>
This command rewinds your entire project to that specific point. If you only need a single file from the past, you can grab just that without changing your whole working directory: git checkout <commit-hash> -- <path/to/your/file>.
Using Git commands to time-travel is way more efficient than digging through commit history on the GitHub website. It gives you surgical control over your project's versions.
Why Am I Getting a Permission Denied (publickey) Error?
Ah, the dreaded SSH Permission Denied (publickey) error. It's one of the most common hiccups when you're starting with Git, but it's almost always an easy fix. It just means your computer couldn't prove its identity to GitHub.
The problem usually boils down to one of these three things:
- You never generated an SSH key on your machine.
- You generated a key but forgot to add the public part to your GitHub account.
- Your local SSH agent isn't running or configured to use your key.
To fix it, first confirm you have an SSH key. Then, copy the entire contents of your public key file (it's typically named id_rsa.pub or something similar) and paste it into the 'SSH and GPG keys' section of your GitHub settings. You can then test the connection by running ssh -T git@github.com.
At PullNotifier, we believe in making development workflows smoother. Our tool integrates seamlessly with Slack to deliver clear, actionable pull request notifications, cutting through the noise so your team can focus on what matters most—shipping great code. Try PullNotifier for free and see how it can accelerate your code review process.