- Published on
Make a Slack App From Scratch The Definitive Guide
- Authors

- Name
- Gabriel
- @gabriel__xyz
To get a Slack app up and running, you'll start by creating an application in the Slack API dashboard, picking a development workspace, and then configuring permissions known as scopes. This initial setup is the foundation for everything that comes next, like event subscriptions and authentication, which will transform your idea into a real tool your team can use every day.
Why Build a Custom Slack App for Your Team
Before we jump into the technical side, let's talk about why you'd even want to build a custom Slack app. The Slack App Directory has thousands of pre-built solutions, but a custom app is all about solving the unique, specific pain points and workflows of your team. It moves beyond generic features to fix your exact problems.
Think about the repetitive tasks your team gets bogged down with daily. A custom app can automate those, embedding critical processes right where your conversations are already happening. This isn't just a minor convenience; it's a direct path to better productivity by cutting down on the constant need to switch between different tools and browser tabs.
Solving Real-World Problems with Custom Apps
The real magic of a custom Slack app is its ability to tackle tangible business challenges. Instead of forcing your team to adapt their workflow to a tool, you build the tool to fit your team's existing habits. The goal is to meet your developers where they already are, removing friction from their daily grind.
Here are a few practical scenarios where a custom app adds immediate value:
- Automated Stand-up Reports: An app can prompt team members for their daily updates and neatly compile them into a single thread in the team channel. This saves a ton of meeting time.
- Production Issue Alerts: Your app can listen for alerts from monitoring systems like Datadog or Sentry and post detailed, actionable notifications directly to an
#ops-alertschannel, complete with logs and quick links. - Streamlined Code Reviews: You can build an app that pulls data from GitHub, like new pull requests, and pings the right reviewers. Our detailed guide on how a https://blog.pullnotifier.com/blog/how-github-slack-integration-improves-code-reviews explores this concept further, showing how it can seriously speed up development cycles.
Deciding between building your own solution and using a pre-built app comes down to your team's specific needs. A custom app offers unparalleled flexibility, while an off-the-shelf solution provides speed and convenience.
Here's a quick look at the core differences:
Comparing Custom Apps vs Off-the-Shelf Integrations
| Benefit | Custom Slack App | Off-the-Shelf App |
|---|---|---|
| Flexibility | Tailored to your exact workflow and processes. | Limited to pre-defined features and settings. |
| Control | Full control over functionality, updates, and data. | Dependent on the third-party provider's roadmap. |
| Maintenance | Requires ongoing development and maintenance. | Maintenance and updates are handled by the provider. |
| Cost | Initial development cost plus ongoing server fees. | Typically a recurring subscription fee (SaaS). |
| Speed to Deploy | Slower; requires planning, coding, and testing. | Fast; can be installed and configured in minutes. |
Ultimately, a custom app is a powerful investment for teams with unique challenges that can't be solved by generic tools. The initial effort pays off by creating a more efficient, focused, and productive work environment.
The Impact on Team Efficiency
The cumulative effect of these small automations is huge. Slack’s own data reveals that its platform helps teams slash internal emails by 32% and meetings by 27%. This efficiency is amplified by a massive community of over 500,000 developers building custom apps to automate tasks and improve workflows. Building your own app lets you tap into this powerful ecosystem, creating a more focused and productive work environment for your team.
Building a Slack app is fundamentally about workflow optimization. You identify a manual, repetitive, or inefficient process and embed an automated solution directly into your team's central communication hub. The return on investment is measured in hours saved and reduced cognitive load for your entire team.
Setting Up Your First Slack App Environment
This is where the magic starts. Before you can write a single line of code, you need to register your app within Slack's API ecosystem. Think of this as getting a birth certificate for your bot—it creates a central dashboard where you'll manage all its settings, permissions, and features.
First things first, head over to the Slack API website. You'll see an option to create a new app, which is the foundational step for everything that follows. You're essentially reserving a spot for your application in Slack's world.
Starting From Scratch for Maximum Control
Slack gives you two ways to create an app: from a manifest file (a pre-configured setup) or "From scratch." For our goal of building a custom GitHub notifier, we're going From scratch. This route gives you total control and helps you understand every component you add, which is a lifesaver for learning and debugging later on.
Using a manifest is fine for deploying standard apps quickly, but it abstracts away too much of the learning process. By building from the ground up, you'll make conscious decisions about every permission and feature, so you'll know exactly how your app ticks.
When you start, a modal will pop up asking for two key things:
- App Name: This is what everyone in your workspace will see. Pick something clear and descriptive. For our GitHub tool, something like "PR-Bot" or "GitHub Review Buddy" gets the job done.
- Development Workspace: This is the Slack workspace where you'll be building and testing. It should be a safe sandbox environment where you can experiment without spamming your colleagues. Most developers just use a free, dedicated Slack workspace for this.
Once you create the app, you'll land on a dashboard that looks something like this. This is where all your applications will live.
From this central hub at api.slack.com/apps, you can manage existing apps or click "Create New App" to kick off the process.
After you confirm the details, Slack instantly generates your app’s configuration page. You've now officially created the shell of your app. It's an empty vessel at this point, but all the controls for adding real functionality are now right at your fingertips.
Navigating the Basic Information Page
You'll be automatically redirected to the "Basic Information" page, which is essentially your app's command center. Get comfortable here—you'll be coming back often to add features, manage permissions, and grab your credentials.
Pro Tip: Bookmark this page right now. Seriously. Having quick access will save you a ton of clicks as you bounce between your code and the Slack UI. Every second you're not context-switching is a win.
Take a quick look at the sidebar on the left. You'll spot sections like "App Home," "OAuth & Permissions," and "Event Subscriptions." We’ll be digging into these soon, but just knowing where to find them is a great start. This dashboard is where we'll turn our empty app shell into a dynamic, interactive tool.
At this stage, you have a registered Slack app tied to a development workspace. It can’t do anything yet, but this setup is the essential foundation we need. Next, we’ll start breathing some life into it by defining what it's allowed to see and do.
Handling App Permissions and Authentication
With the basic app framework in place, it's time to build its most critical foundation: security. Authentication is the backbone that makes sure your app interacts with Slack safely and predictably. It might sound intimidating, but it really just boils down to two things: proving your app's identity and defining exactly what it's allowed to do.
Slack handles all of this using the OAuth 2.0 protocol. Think of OAuth as a secure valet key. Instead of giving your app the master key to an entire Slack workspace (like a user's password), you grant it a special key—a token—that only opens specific, pre-approved doors. This is how users can safely install your app without ever having to share their personal credentials.
Understanding Scopes and the Principle of Least Privilege
Those "doors" your app can open are defined by scopes. Scopes are just granular permissions that spell out what actions your app can perform and what information it can access. When you're building a Slack app, one of the most important security practices you can follow is the principle of least privilege.
The principle is simple: only request the permissions you absolutely need. If your app's only job is to post messages, it has no business asking for permission to read all channel history or user profiles. Over-requesting scopes is a red flag for users and creates unnecessary security risks.
Let's break down the scopes we might consider for our GitHub notifier:
chat:write: This is the big one for any app that sends messages. It lets your app post in channels where it has been added.im:write: You'd need this scope if you wanted the app to send direct messages to users.users:read: This scope would be necessary if your app needed to look up user information, like their name or profile picture.
For our project, chat:write is all we need to get started. Being selective here builds trust with users and minimizes our app's potential attack surface. Beyond just app permissions, ensuring user account security often involves methods like understanding Two-Factor Authentication (2FA), which adds an essential layer of protection.
A classic rookie mistake is requesting broad, powerful scopes like
chat:write.publicjust to dodge permission errors during development. Always start with the most restrictive scope possible (chat:write) and only add more if your app’s functionality truly demands it. This discipline will save you from major security headaches later.
Locating and Securing Your Bot Token
Once you've defined your scopes, it's time to install the app into your development workspace. This process generates the single most important credential you'll handle: the Bot User OAuth Token.
This token is a string of characters that acts as your app's password. It's what authenticates your app with the Slack API, proving that requests coming from your server are legit. You can find this token in your app's dashboard under the "OAuth & Permissions" section. It will start with xoxb-.
Treat this token like a highly sensitive password. You must never hardcode it directly into your application's source code. If you commit it to a public repository like GitHub, malicious bots can find it in minutes and use it to hijack your app, potentially spamming channels or stealing private data. In fact, thousands of secrets like API keys and tokens are leaked on public GitHub repositories every single day.
The industry-standard best practice for managing this token is to store it as an environment variable.
Using Environment Variables for Secure Token Storage
An environment variable is a value that lives outside your application's code, stored directly on the server where the app runs. Your code can then access this variable when it's needed, without ever exposing the secret in the codebase itself.
Here's a simple, practical way to do it:
- Create a
.envfile: In your project's root directory, create a new file named.env. This is where you'll store your secrets locally. - Add the token: Inside the
.envfile, add your token like this:SLACK_BOT_TOKEN="xoxb-your-long-bot-token-string-here" - Use a library: For a Node.js project, a package like
dotenvcan load these variables into your application's environment automatically. - Ignore the file: This is the most important step. Add
.envto your.gitignorefile. This tells Git to never track this file, making it impossible to accidentally commit it to your repository.
By following this process, you can securely access your token in your code (e.g., process.env.SLACK_BOT_TOKEN) while keeping the actual secret safe. This simple step is one of the most important you'll take to build a Slack app that is both functional and secure.
Right, so your Slack app is built and authenticated, but it's just sitting there. It can't see or react to anything happening in your workspace. Let's fix that by hooking into Slack's Events API. This is the magic that turns a static app into a dynamic, active participant in your team's workflow.
The Events API uses a "push" model. Instead of your app constantly pinging Slack asking, "Anything new?", Slack proactively tells your app the moment something happens. It's way more efficient and enables the real-time interactions that make Slack apps so useful. To get these updates, your app needs a public web address—what Slack calls a Request URL—where it can send all this event data.
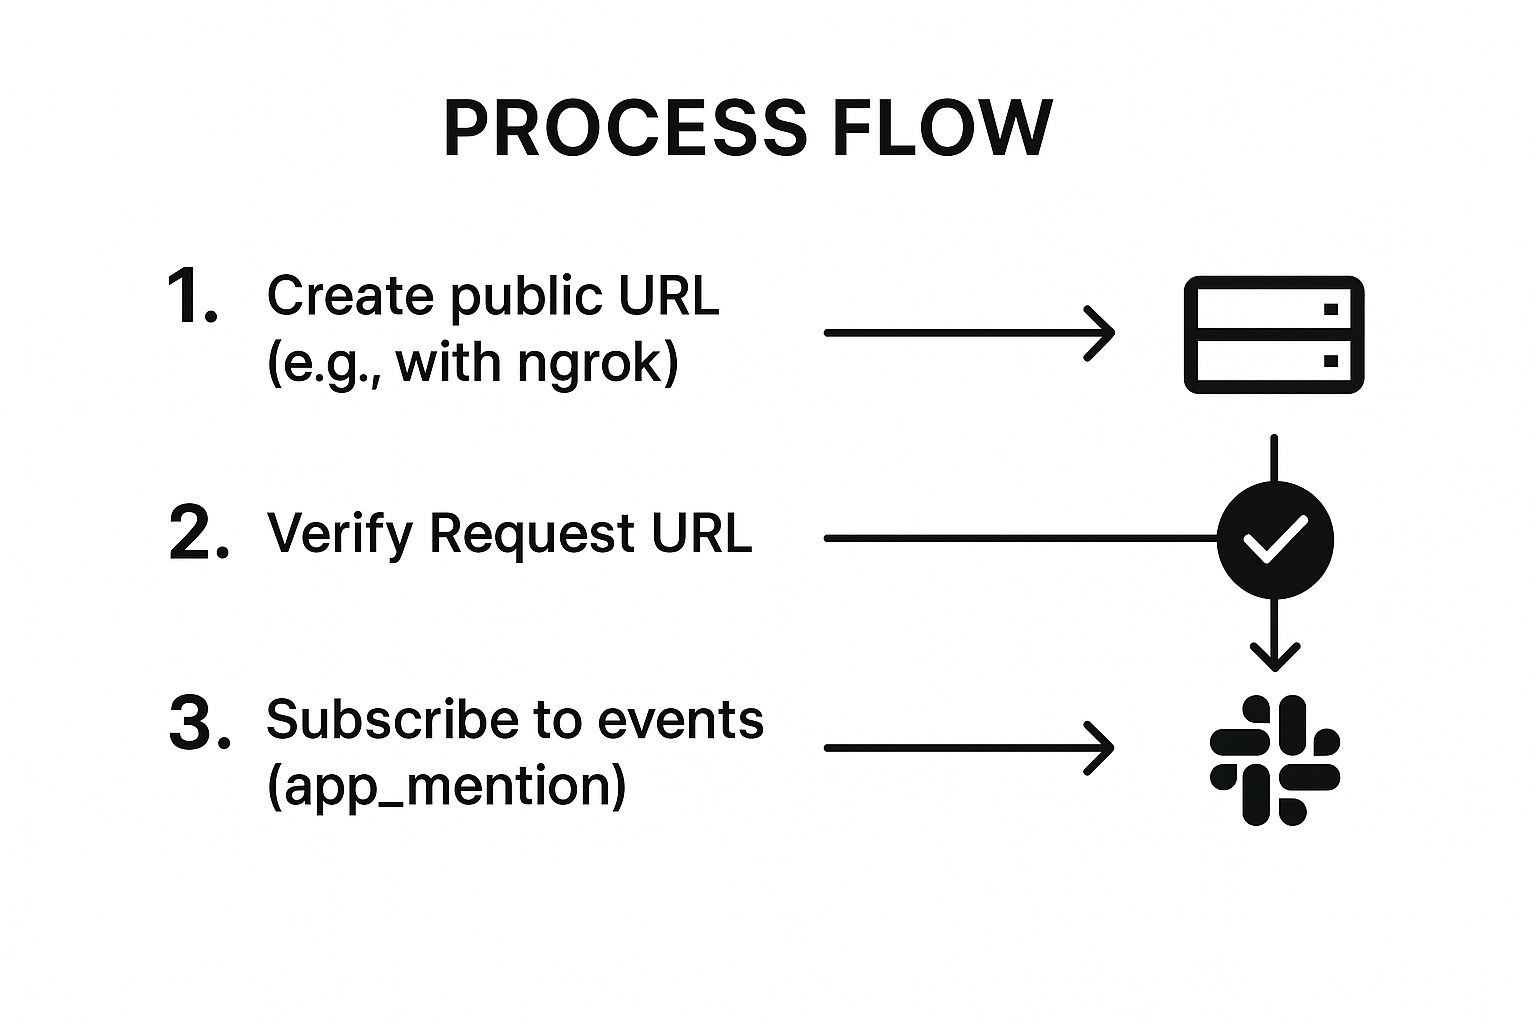
Getting a Public URL with ngrok
When you're building on your local machine, your server is private. Slack can't see it, which is a problem. How can it send events to an address it can't reach? This is exactly what tools like ngrok are for.
Ngrok creates a secure tunnel from a public URL straight to a port on your local computer. Think of it as a temporary public mailing address for your local server. Once your server is running (let's say on port 3000), you just pop open your terminal and run a simple command: ngrok http 3000.
This fires up a unique, public HTTPS URL that forwards every incoming request to your local server. This URL is the bridge between Slack's Events API and your app while you're in development.
Crucial Tip: Every time you restart ngrok, it generates a new public URL. This means you'll need to update the Request URL in your Slack app's settings each time. It's a small but vital step to remember as you code.
Verifying Your Request URL
Slack isn't just going to fire off potentially sensitive data to any URL you give it. First, it needs to confirm you actually own that endpoint. This verification is a quick but critical security check.
Here’s how the handshake works:
- Head to the "Event Subscriptions" page in your app's dashboard and flip the toggle to "On."
- Paste your public ngrok URL into the "Request URL" field.
- The instant you paste it, Slack sends a special
url_verificationevent to your endpoint. The payload contains a uniquechallengetoken. - Your server needs to immediately respond to that specific request with the exact
challengevalue it just received.
If your server plays its part correctly, Slack will give you a green "Verified" status. This handshake confirms your app is ready and listening for real events.
This simple workflow is the foundation of any interactive Slack app, connecting your local code to live workspace activity.
Subscribing to Bot Events
With a verified URL, you can now tell Slack precisely which events your app cares about. You don't want to get spammed with every single message, reaction, and file upload. You subscribe only to the events that are relevant to what your app does.
Scroll down to the "Subscribe to bot events" section and click "Add Bot User Event." A search bar will pop up with a list of all available events. For our GitHub notifier, the key event is app_mention. This event fires any time someone directly mentions your bot in a channel, like @YourBot check PRs.
Subscribing to app_mention is the first step toward building a conversational bot. When a user mentions your app, Slack packages up all the context—who sent it, which channel it was in, the message text—and sends it straight to your verified Request URL. This data payload is what your server will process to figure out what the user wants and how to respond.
For more complex integrations, it’s worth digging into understanding webhooks, as they are the core mechanism for how apps like this receive information. If you hit a wall and notifications aren't coming through as expected, check out our guide on how to fix GitHub Slack notifications not sending for some common troubleshooting tips.
After adding the events, don't forget to hit "Save Changes" and reinstall the app to your workspace. Reinstalling is required to grant your app the new permissions it needs to listen for these events. And just like that, you have an app that's officially listening.
Build a Real World GitHub PR Notifier

Alright, let's connect all the dots. We've talked about app creation, permissions, and event subscriptions. Now it's time to build something genuinely useful: a Slack app that pings a channel the moment a new pull request (PR) is opened in a GitHub repository.
This is a classic automation that saves dev teams a ton of time. No more constant tab-switching to check for new reviews. We’re going to walk through this hands-on example to solidify your understanding of how to solve a real team problem with a custom Slack app.
First, we'll set up a webhook in GitHub to tell our app when a PR event happens. Then, we’ll spin up a simple server to catch that webhook, pluck out the important details, and fire off a clean, useful message to a Slack channel.
Setting Up the GitHub Webhook
The first piece of the puzzle is getting GitHub to talk to our application. GitHub webhooks are perfect for this job. Think of them as a push notification system for your repo—whenever something specific happens, GitHub sends a JSON payload to a URL you provide.
To get started, head over to your GitHub repository's settings and find the "Webhooks" section. You'll create a new one and plug in a couple of key details.
- Payload URL: This is the public URL of your server that's going to listen for GitHub's pings. If you're developing locally, a tool like ngrok is your best friend. It creates a temporary public URL that forwards requests straight to your machine.
- Content type: Make sure you set this to
application/json. This tells GitHub to send the data in a format our server can easily understand.
Finally, you need to tell the webhook which events you actually care about. To keep things clean, choose "Let me select individual events" and check only the Pull requests box. This is a crucial step. It stops your server from getting slammed with notifications for every commit, issue, or comment—noise we don't need for this app.
Building the Server to Catch the Webhook
Now we need a place for GitHub's data to land. Let's build a server that's ready to catch and process the webhook. For this walkthrough, a simple Node.js server using the Express framework will do the trick, but you can apply the same logic to any tech stack.
Your server really only has one job: listen for POST requests at the Payload URL you gave to GitHub.
When a new PR is opened, GitHub sends a POST request with a massive JSON object inside. It contains every detail you could possibly imagine about the event. Our task is to slice through that data and pull out just the essentials for our Slack message.
Here’s what we’re fishing for in the JSON payload:
- The action: We only want to act if the
actionfield is exactly"opened". This filters out updates for PRs being closed, edited, or synchronized. - PR details: We need to grab the PR title, the author's username, and the direct HTML link to the pull request itself.
The real power of a custom notifier is its ability to filter aggressively. The default GitHub integration for Slack is notoriously noisy, spamming channels with updates for every single commit and comment. A custom app lets you deliver only the most critical information, protecting your team's focus.
Once your code can successfully grab these key details, it's time for the final step: building and sending the message to Slack.
Sending a Formatted Message to Slack
This is where your Slack Bot Token finally gets to shine. Using a Slack SDK (like @slack/web-api for Node.js), you'll call the chat.postMessage method. This API call needs your Bot Token for authentication, the ID of the destination channel, and the message content.
But let's not just send plain text. We can use Slack's Block Kit to build rich, interactive messages that are far more scannable and useful. A well-formatted message can include a clear title, fields for the author and repository, and even a big button that links directly to the PR.
A simple but effective message structure might look like this:
- A main header saying "New Pull Request Opened"
- The PR title as a bolded hyperlink
- Fields showing the repository name and the author
- A call-to-action button that says "View PR"
This kind of focused automation is why so many leading companies invest in the Slack ecosystem. As of 2025, Slack is used by 77 of the Fortune 100 companies, including global giants like Uber and Expedia, because it acts as a central hub for critical workflows just like this one. You can find more insights on their official blog.
For teams that want this functionality without the development overhead, there are plenty of specialized tools available. You can get GitHub PR notifications in under a minute with a dedicated app that handles all the setup for you. Still, building it yourself is an invaluable learning experience that shows just how powerful the Slack platform can be.
Common Questions After You Build Your First Slack App
Building your first Slack app is a great start, but the journey doesn't end there. As you move from a working prototype to a real-world tool, a new set of questions will pop up. Development is never a straight line, and knowing what to expect can save you a ton of headaches down the road.
Let's dig into some of the most common hurdles developers face after getting their app off the ground. We’ll cover everything from sharing your creation with other teams to making sure it doesn't fall over at scale.
How Do I Distribute My App to Other Teams?
Once you've built something cool, the next logical step is to share it. Whether you're aiming for the public Slack App Directory or just want to share it with a few other workspaces, Slack has a clear path for distribution.
The absolute key to this is getting your OAuth configuration right. You'll need to set up OAuth redirect URLs in your app's settings. When a user from another team installs your app, they're sent to these URLs after granting permission. This is how your server securely grabs the installation tokens for their specific workspace, allowing your app to work for multiple teams.
What Are the Most Common API Rate Limits?
As more people start using your app, you'll need to pay close attention to Slack's API rate limits. These are essentially traffic rules that limit how many API calls your app can make in a given timeframe. They're in place to keep the platform stable for everyone, and ignoring them will get your app temporarily blocked.
Slack uses a tiered system, meaning some API methods have stricter limits than others. The chat.postMessage method, for example, is far more generous than most.
A non-negotiable strategy here is to implement exponential backoff. If an API request fails because you've hit a rate limit, don't just hammer the server again. Instead, your code should wait a moment, then retry. If it fails again, double the waiting period before the next attempt. This simple technique stops your app from getting blacklisted and gives the API time to breathe.
Designing for efficiency isn't optional when you're building a Slack app. Don't just build for today's features; build for tomorrow's scale. Caching data, batching API calls, and respecting rate limits from day one will save you from massive performance headaches later on.
Can I Build a Slack App Without a Server?
Absolutely, and for many projects, it's the smartest way to go. A serverless approach is perfect for simpler, event-driven apps that don't need a server running 24/7. This can slash both your costs and your operational complexity.
You can use services like AWS Lambda or Google Cloud Functions to run your app's logic only when triggered by an event. Even better, Slack's next-generation platform now lets you run functions directly on their infrastructure. It's a modern approach that makes deploying and maintaining your app easier than ever.
Ready to skip the build and get powerful, noise-free GitHub notifications right now? PullNotifier integrates seamlessly with your workflow to deliver concise pull request updates directly in Slack, cutting through the clutter so your team can focus on shipping code faster. Trusted by over 10,000 engineers, it's the simplest way to streamline your code review process. See how it works.