- Published on
Master the Art of Merging with Master: A Developer’s Guide
- Authors

- Name
- Gabriel
- @gabriel__xyz
When we talk about merging with master, we're really talking about a core ritual in team-based coding: integrating the work you've done on a feature branch back into the main master branch. This is how separate lines of development come together, forming the official history of the project. Getting this right is fundamental to collaborating effectively and keeping the project stable.
Laying the Groundwork for a Flawless Merge
Before you even think about typing git merge, there are a few prep steps that can make the difference between a smooth, painless integration and a frustrating afternoon spent untangling conflicts. Think of it as a pre-flight check for your code. A clean merge always begins with a local environment that’s a perfect mirror of the project's current state.
This isn't just about running commands on autopilot. It’s about making sure your new feature is built on top of the most recent version of the codebase. When developers merge branches that are out of date, they risk re-introducing old bugs or creating nasty conflicts that could have been easily sidestepped.
Syncing Your Local Environment
First things first: get your local master branch completely up-to-date with what’s on the remote server. This single action pulls down all the changes your teammates have merged while you were busy working on your feature. Trying to merge without doing this is a surefire recipe for instant conflicts.
Just as important is having a clean working directory. Before you switch branches or kick off a merge, make sure you don't have any uncommitted changes hanging around. Either commit your work or stash it—this prevents you from accidentally losing progress and ensures the merge process is only dealing with the code you intend to merge.
This infographic breaks down this simple but crucial pre-merge workflow.
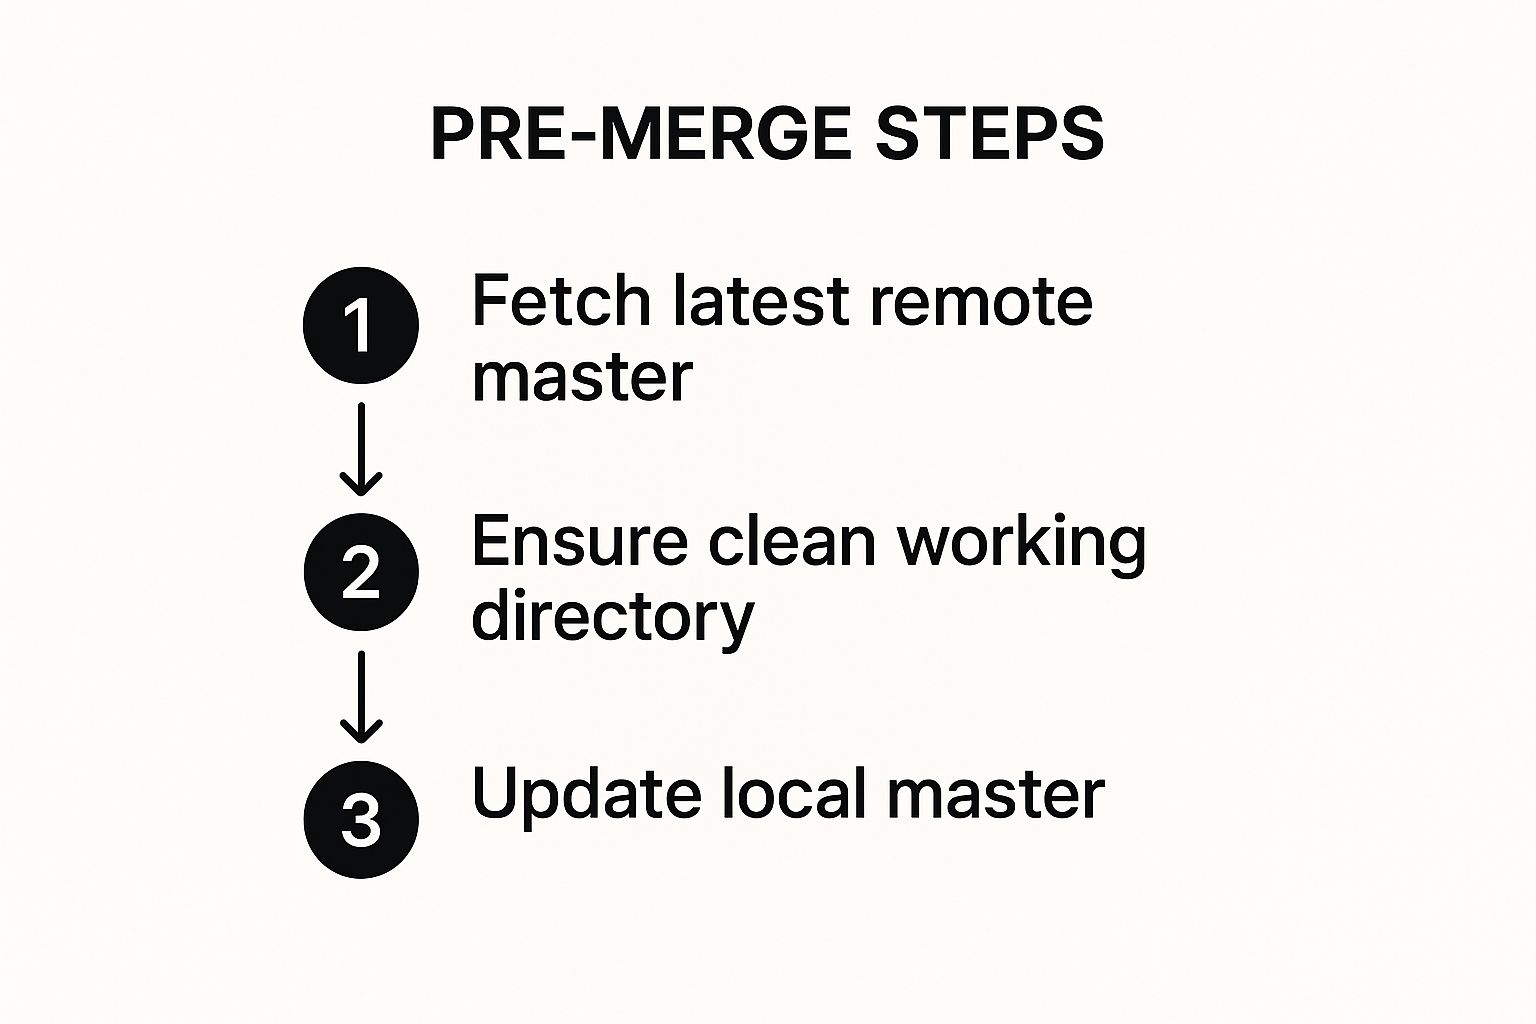
The flow is simple but powerful: fetch the latest changes, make sure your working directory is clean, and then update your local master. Sticking to this discipline minimizes surprises and makes for a predictable, clean merge. For teams juggling larger projects, understanding different monorepo branching strategies can refine this process even further.
Key Takeaway: A successful merge with master is 90% preparation. By ensuring your local repository is clean and perfectly synchronized with the remote
masterbranch before you start, you proactively eliminate the most common sources of merge conflicts. This discipline is a cornerstone of effective team-based development.
The Core Workflow of Merging Into Master

Okay, so you've got a clean and updated master branch. Now for the main event: the merge. This is where Git truly flexes its muscles, weaving together the commit histories from two different branches. Let's walk through a classic scenario: bringing a feature branch, say user-profile-update, back into the master branch.
First thing's first, you need to be on the branch that's receiving the changes. In our case, that's master. Once you're there, it’s time to run the command that brings your new feature home.
git merge user-profile-update
This command tells Git to grab all the unique commits from user-profile-update and apply them to master. Git figures this out by finding a common ancestor between the two branches and then creating a new "merge commit" that ties the divergent histories back together.
Preserving History With No-Fast-Forward
By default, Git tries to be clever. If master hasn’t changed since you created your feature branch, Git will perform what's called a "fast-forward" merge. It just scoots the master pointer forward to the latest commit on your feature branch, creating a perfectly linear history. It’s simple, but it can also erase the context that a group of commits was developed together as part of a single feature.
This is why many experienced teams prefer using the --no-ff (no fast-forward) flag.
git merge --no-ff user-profile-update
Using this flag forces Git to create an explicit merge commit, even if a fast-forward is possible. That new commit serves as a clear, historical marker showing exactly when the user-profile-update feature was finished and integrated. It’s a small change that makes your Git log infinitely easier to read and understand weeks or months down the line.
Why It Matters: A
--no-ffmerge creates a historical record that says, "This group of commits represents a single feature." It’s invaluable for code archaeology, making it easier to identify which feature introduced a bug or to revert a whole feature in one go.
This disciplined approach is a cornerstone of professional development and aligns perfectly with many pull request best practices that emphasize clarity and communication.
Standard Merge vs No-Fast-Forward Merge
Choosing the right merge strategy has a real impact on your project's history. It’s one of those small habits that, when combined with practices like Continuous Integration (CI), leads to more frequent and reliable code integration.
Let's break down the two main approaches side-by-side.
| Attribute | Standard Merge (Fast-Forward) | No-Fast-Forward (--no-ff) Merge |
|---|---|---|
| History View | Linear and clean. | Branching and clear. |
| Feature Context | Can be lost; commits blend in. | Preserved; feature is a distinct unit. |
| Merge Commit | Not created if possible. | Always created. |
| Reverting | Requires reverting individual commits. | Revert the single merge commit. |
| Best For | Very small, trivial changes. | Most feature branches. |
Ultimately, using --no-ff for anything more than a tiny hotfix is a smart move. It preserves the story of your project, making it easier for you and your team to understand how the codebase has evolved.
How to Confidently Resolve Merge Conflicts
Hitting a merge conflict can feel like slamming on the brakes, but it’s a totally normal part of working on a team. A conflict isn’t some scary error—it’s just Git’s way of pausing the process and asking for a human to make a call because it can’t automatically decide which code to keep.
This usually happens when you and another developer have tweaked the exact same lines in the same file on different branches. When you try to merge your work back into master, Git essentially throws its hands up and says, "You sort this out!" The trick is to turn that moment of panic into a routine, manageable task.
Decoding the Conflict Markers
When a conflict pops up, Git will jump into the affected file and insert visual markers to show you exactly where the competing changes are. Getting comfortable with these markers is the first step to taking back control.
You’ll see sections of your code wrapped in these symbols:
<<<<<<< HEAD: This is the starting line for the conflicting code from your current branch (in this case,master).=======: This line is the divider. Everything above it is frommaster, and everything below it is from your feature branch.>>>>>>> your-branch-name: This marks the end of the code coming from your feature branch.
Your job is to play the editor. You need to look at both chunks of code, figure out what the final version should look like, and then delete all the markers Git added.
Pro Tip: Don't just blindly pick one version over the other. The right solution is often a mix of both changes. You might need to keep a line from your branch, another from master, or even rewrite the section completely to make both features work together.
Finalizing the Resolution
Once you’ve manually edited the file so it has the final, correct code—and you’ve removed all the <<<<<<<, =======, and >>>>>>> lines—you’re ready to finish the merge. From here, it's just the standard Git workflow for staging and committing.
First, you’ll need to add the now-resolved file to the staging area.
git add <conflicted-file-name>
After staging all your resolved files, you commit the changes. Git usually has a default commit message ready for you, making it clear that this commit resolves a conflict.
git commit
With that last commit, the conflict is officially squashed, and your feature branch is successfully merged. The whole process goes from being a source of anxiety to just another predictable step in your day.
Let PullNotifier Keep Your Team in Sync
A successful merge is more than just a technical step—it’s a communication milestone. When you merge with master, you’re telling the team that a piece of the puzzle is complete and integrated. But who has time to manually announce every single merge in a Slack channel? It's tedious, easy to forget, and creates information gaps when someone inevitably misses an update.
This is where a little automation goes a long way. Instead of relying on manual shout-outs, a tool like PullNotifier can handle the communication for you. It connects GitHub directly to Slack, giving everyone real-time, consolidated updates without all the extra noise.
Setting Up Effortless Notifications
Getting PullNotifier up and running is ridiculously simple. You can configure it to fire off an instant Slack notification the second a pull request is successfully merged into the master branch. It’s a small change that has a huge impact on team transparency.
This screenshot gives you a peek at just how clean and simple it is to configure your Slack notifications.

The real magic here is the ability to create specific rules that route notifications from different repositories to designated Slack channels. This ensures the right people see the right updates without getting spammed by irrelevant ones.
Key Takeaway: Automating merge notifications does more than save a few seconds. It builds a culture of transparency, creates an effortless audit trail of what’s been integrated, and gives the entire team a real-time pulse on project progress without constant pings and interruptions.
This kind of automation slots right into your existing workflow, making sure everyone stays in the loop with zero extra effort. You can learn how to get GitHub PR notifications in under a minute with their quick-start guide. It’s the easiest way to make every merge into master a visible, acknowledged event for the whole team.
Advanced Tips for a Professional Git History
A clean merge tells a story, but a professional Git history tells the right story. Any developer can get their code into the main branch, but great developers understand that their commit log is a critical piece of documentation for the entire team. It’s about making your contributions clear, understandable, and easy to track down the line.
One of the best tools in your arsenal for this is interactive rebase. Before you even think about merging into master, you have the power to clean up your feature branch's entire history.
Think about it. We’ve all been there, with five messy, incremental commits like "fix typo," "wip," and "oops, forgot a file." These don't add any real value to the project's long-term history. Using git rebase -i lets you consolidate all that noise.
Squashing Commits for Clarity
When you run an interactive rebase, Git opens an editor showing all the commits on your current branch. From there, you can "squash" multiple commits into a single, cohesive one. This allows you to combine all those small, messy updates into one logical commit with a clear, descriptive message explaining the entire feature.
This simple practice makes a huge difference for anyone reviewing your pull request. Instead of trying to decipher a dozen tiny changes, they can review one logical unit of work. It streamlines the whole code review process and makes your project history infinitely cleaner.
Why This Matters: A squashed commit is atomic. If a bug slips through, you can revert the entire feature by reverting just one commit, rather than hunting down and backing out several smaller ones. It’s just a safer, more professional way to integrate your work.
Writing Meaningful Commit Messages
Finally, don't overlook the commit message itself. This is your chance to explain the "why" behind a change, not just the "what." A well-written message can save your teammates hours of head-scratching down the road.
Here's what I mean:
- Bad:
git commit -m "updated user logic" - Good:
git commit -m "Feat: Add email validation to user signup"
Providing this kind of context transforms your commit log from a simple changelog into a valuable historical resource. It helps everyone on the team, including your future self, understand the evolution of the codebase.
Common Questions About Merging to Master
Even with a solid workflow, a few questions always seem to pop up right when you're about to merge. These sticking points can be a bit confusing, but getting the concepts straight will make the path forward much clearer for your team.
Let's walk through some of the most common things developers ask about merging.
What Is the Real Difference Between Merge and Rebase?
Think of git merge and git rebase as two different ways to tell your project's story.
A git merge is like taking two separate threads and tying them together with a new knot—that's your merge commit. It preserves the exact history of both branches, showing all the parallel work just as it happened. It’s transparent and, importantly, non-destructive.
On the other hand, git rebase is more like unspooling your feature branch's thread and carefully re-weaving it onto the end of the master branch. It rewrites your commits to make it look like they were created after the latest changes on master, creating a perfectly clean, linear history.
Key Takeaway: Merging preserves history exactly as it occurred, which makes it the safer option for shared branches. Rebasing creates a tidier, linear history, but since it alters commit history, you should only ever do it on your own private feature branches before you merge into master.
Should I Always Delete My Branch After Merging?
Yes, absolutely. Once your feature branch is successfully integrated into master, it’s done its job. Leaving it hanging around just adds clutter to the repository, making it harder for everyone else to tell which branches are active and which are finished.
Cleaning up is a crucial final step.
- Locally:
git branch -d your-branch-name - Remotely:
git push origin --delete your-branch-name
This simple bit of housekeeping keeps the repository tidy and sends a clear signal to the team that the feature is officially complete.
How Can I Safely Undo a Merge?
This is a big one. If you’ve merged locally but haven't pushed the change yet, you're in luck. You can simply use git reset --hard HEAD~1 to take a step back.
But if that merge is already on the remote server, never reset a public branch. Doing so rewrites history and can cause a world of pain for your teammates.
The safe and proper way to handle this is with git revert -m 1 <merge-commit-hash>. This command doesn't delete anything. Instead, it creates a brand new commit that reverses all the changes introduced by the bad merge. It effectively undoes the merge while preserving a clear and honest project history for everyone on your team.
Ready to stop chasing down merge updates and keep your team effortlessly in sync? PullNotifier sends clean, real-time pull request notifications directly to Slack, eliminating noise and accelerating your review process. Get started for free and see how top engineering teams stay in the loop.