- Published on
Your Guide to RSS Feed to Email Automation in 2026
- Authors

- Name
- Gabriel
- @gabriel__xyz
Imagine trying to keep up with your favorite blogs, news sites, and project updates by checking each one manually. It's a recipe for information overload. Setting up an RSS feed to email pipeline is the perfect fix, turning that chaotic stream of updates into a personal, automated newsletter delivered right to your inbox.
Your Complete Toolkit for RSS Automation
Getting an RSS feed to send emails might sound technical, but it really boils down to four different approaches. Each one is tailored for a specific need, so whether you're just trying to follow a few blogs or you're a developer building a notification system, there's a path that fits.
Figuring out which one is right for you is the first step to taming the information firehose.
The Four Main Approaches
- Simple Hosted Services: These are the "set it and forget it" tools. Perfect for anyone who just wants a simple digest from their favorite sites without any fuss.
- No-Code Automation Platforms: Think of these as digital Lego blocks. They're great for connecting RSS feeds to other apps or building custom workflows without touching a single line of code.
- Self-Hosted Scripts: This is the path for developers and tinkerers who demand total control. If you want to own your data, ensure privacy, and customize every little detail, this is for you.
- Production-Grade APIs: This is the professional standard. When you need to send reliable, scalable, and beautifully designed email notifications for your business or app, you turn to APIs.
The right method really depends on your goal. Are you curating industry news for your team, or are you building an automated notification system for your product? Your answer will point you to the best solution.
This decision tree gives you a quick visual guide to help you choose the right starting point based on how much control you need.
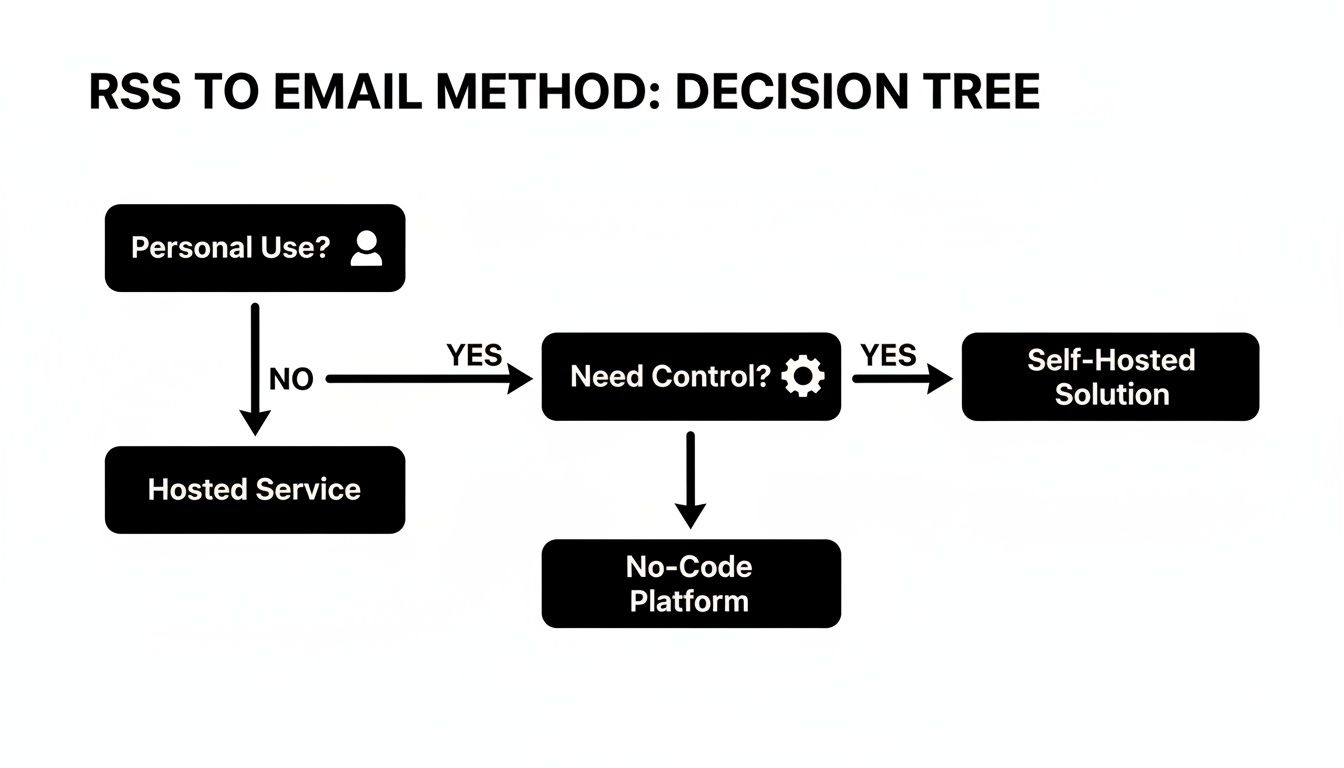
As you can see, most personal projects are well-served by a hosted service or a no-code tool. The minute you need more control, you'll find yourself looking at self-hosted scripts or API-based solutions.
Each of these methods is a form of workflow automation. If you're new to the concept, you can learn more about how workflow automation can boost efficiency in our detailed guide.
Choosing Your RSS Feed to Email Method
To make the decision even clearer, here’s a quick comparison of the four main approaches.
| Method | Best For | Technical Skill | Cost |
|---|---|---|---|
| Simple Hosted Services | Personal blog/news reading | None | Free to Low |
| No-Code Platforms | Custom alerts, connecting apps | Low | Low to Medium |
| Self-Hosted Scripts | Developers wanting full control | Medium (Coding) | Low (Hosting) |
| Production-Grade APIs | Businesses & apps at scale | High (Development) | Medium to High |
Now that you have a high-level view, we'll dive into each of these four methods, complete with tool recommendations and practical steps to get you up and running.
If you just want RSS feeds sent to your email without any fuss, dedicated hosted services are the way to go. These tools do one thing and do it well: watch a feed and email you when something new pops up. It's a completely hands-off, "set it and forget it" solution.
Old-school options like Google's Feedburner are mostly a thing of the past, but modern alternatives offer a much cleaner and more reliable experience. My go-to recommendation for this is Blogtrottr. It’s a dead-simple way to subscribe to any RSS feed and get updates straight to your inbox.
This approach is perfect for individuals or small teams who just need a steady stream of information without the headache of managing their own system.
Finding the RSS Feed URL
The trickiest part is often just finding the RSS feed URL. Most sites don't plaster that classic orange RSS icon everywhere anymore.
Here are a few tricks I use to hunt them down:
- Scan for an Icon: First, do a quick scan of the site’s header, footer, or sidebar for an RSS symbol or a link that says "Subscribe."
- Guess Common URLs: Many sites, especially those on WordPress, use a standard URL. Just try adding
/feedor/rss.xmlto the end of the main domain (likedomain.com/feed). You'd be surprised how often this works. - Check the Page Source: When all else fails, this is the surefire method. Right-click anywhere on the page and select "View Page Source." Hit Ctrl+F (or Cmd+F) and search for
rssorapplication/rss+xml. You'll almost always find a link tag pointing directly to the feed.
Once you’ve got that URL, the hard part is over.
Setting Up Your Email Updates
Getting set up with a service like Blogtrottr takes less than a minute. You just paste the feed URL into the box, type in your email, and pick a schedule that fits how you work.
You’ll usually see a few key delivery options:
- Real-time: Get an email the moment a new post is published. This is great for time-sensitive news or critical alerts you can't afford to miss.
- Daily Digest: Receive one email per day that rounds up all the new posts from that feed. This is my personal preference for most blogs—it keeps my inbox sane.
- Weekly Digest: A good choice for feeds you just want to browse casually when you have time.
For example, you might want a daily digest for a tech news blog to get a morning summary. But if you’re tracking a project status feed, real-time alerts are probably the better call.
The real value of these hosted services is their simplicity. You can have a fully automated RSS-to-email system running in under a minute, with zero code and zero server maintenance.
The Pros and Cons of Hosted Services
While these tools are incredibly convenient, you're making a few trade-offs.
Pros:
- Instant Setup: You can be up and running in a couple of minutes flat.
- Zero Maintenance: The provider handles everything—server uptime, software updates, you name it.
- Cost-Effective: Most services have a generous free plan that's more than enough for personal use.
Cons:
- Limited Customization: You're stuck with their email template. No changing the design or layout.
- Provider Branding: Free plans will almost always have the service's logo and branding in the emails.
- Potential Reliability Issues: You’re entirely dependent on a third party. If their service goes down, your updates stop.
This method is the perfect entry point for anyone getting started with RSS automation. But if you find yourself needing more control over the email content, filtering, or branding, you’ll want to check out the more powerful no-code platforms we’ll cover next.
Flexible No-Code Automation with Zapier and Make

When the quick-and-dirty hosted services just don't cut it, it's time to bring in the no-code automation platforms. Tools like Zapier and Make are the digital equivalent of duct tape and WD-40, letting you connect an RSS feed to email clients and literally thousands of other apps.
Instead of being stuck with a one-size-fits-all email template, you get total control over how your emails look, what they contain, and what happens before or after they're sent.
This is perfect for anyone who wants to do more than just get a simple notification. You can build out powerful, multi-step workflows visually, without writing a single line of code. For example, you could filter an RSS feed for specific keywords, format a custom email, and then ping a summary over to a Slack channel—all in one go.
Building Your First Automation with Zapier
Zapier is the go-to for many because of its massive library of over 6,000+ app integrations and its dead-simple, linear workflow builder. It’s a great place to start connecting an RSS feed to your email. The whole thing is built around "Zaps"—a trigger that kicks off one or more actions.
Let's imagine you want to get a custom email from your own Gmail account every time your favorite tech blog drops a new post.
Your trigger is the "RSS by Zapier" app. You'll select the "New Item in Feed" event and just paste the blog’s RSS feed URL into the field. Zapier will run a quick test to make sure it can pull in the data.
An optional but highly recommended step is to add a "Formatter by Zapier" action. RSS feeds sometimes include messy HTML in the description field. The Formatter can clean that right up—just use the "Text" action and the "Remove HTML Tags" transform. It makes for a much cleaner, more readable email.
Finally, you add your "Gmail" action, choosing "Send Email" as the event. After you connect your account, you can map the data from the RSS feed directly into the email fields. For the subject, you could use something like New Post: {{Title}}, where {{Title}} is the post title pulled from the feed. The body can be a mix of your own text and dynamic fields like the post summary and a link.
A killer feature in Zapier is the "Filter" step. You can drop a filter between your trigger and action so the Zap only runs if the RSS item meets your criteria—like if the title contains "AI" or "automation." This is a lifesaver for high-volume feeds.
If you're looking for flexible, no-code solutions, it's worth checking out some of the top no-code automation tools to see which platform fits your specific needs best.
Designing Visual Workflows in Make
Make (which you might remember as Integromat) takes a more visual approach. Instead of a linear list, you build "scenarios" on a drag-and-drop canvas, connecting modules like you're drawing a flowchart. This makes it incredibly powerful for complex logic with multiple branches.
Let's set up the same RSS-to-email workflow in Make to see the difference.
You'll start with the "RSS" module and pick the "Watch RSS feed items" trigger. Same as Zapier, you paste in the feed URL and tell Make how often to check for new posts. Make's canvas will show this as a single bubble.
Next, you'll add an "Email" module (for Gmail, Outlook, or a generic SMTP server) and drag a line to connect it to the RSS module. Make visually shows the data flowing from one module to the next, which is a really nice touch.
Customizing the Email Content
Once inside the email module, you can map the data from the RSS module into your email fields just by clicking on them. It’s very intuitive.
- Recipient: Your email address.
- Subject:
[New Article] {{1.title}} - Content: You can craft a message like: "A new post was just published:
{{1.title}}. Read it here:{{1.link}}. Summary:{{1.description}}"
Make's visual canvas really shines when things get more complicated. For instance, you could add a "Router" after the RSS trigger to send articles with certain keywords to different email addresses. This kind of branching logic is often where Make feels more powerful than Zapier.
Both platforms are fantastic for getting rid of tedious, manual work, a topic we cover in more detail in our guide on how to automate repetitive tasks and boost productivity.
Zapier vs Make: Which Is Right for You?
Honestly, choosing between them often boils down to how your brain works and how complex your needs are.
| Feature | Zapier | Make |
|---|---|---|
| User Interface | Linear, step-by-step list | Visual, drag-and-drop canvas |
| App Integrations | 6,000+ (Largest library) | 1,500+ (Growing steadily) |
| Free Plan | More limited; single-step Zaps | More generous; includes multi-step scenarios |
| Best For | Quick, simple integrations and business workflows. | Complex, multi-branch automations and visual thinkers. |
For a basic RSS feed to email setup, either tool will get the job done without breaking a sweat. My personal advice? If you're new to automation, start with Zapier. Its interface is a bit more straightforward for beginners. But if you think your workflow might get more complex down the road, Make's visual builder and more generous free plan might be the smarter long-term bet.
Ultimate Control with Self-Hosted Solutions
While hosted services and no-code platforms offer incredible convenience, they operate within a framework someone else built. For developers, tinkerers, and anyone who craves absolute control, a self-hosted solution for sending an RSS feed to email is the definitive path forward.
This approach means you build, own, and operate the entire pipeline. Your data never leaves your infrastructure, your customization options are limitless, and you're not at the mercy of a third-party service's pricing changes or feature limitations. It’s the ultimate expression of "do it yourself."
The infrastructure you need is surprisingly minimal. A small Virtual Private Server (VPS) from a provider like DigitalOcean or Linode, or even a Raspberry Pi humming away in your home office, can easily handle the job. You're in the driver's seat for every single part of the process.
The Classic Command-Line Approach with rss2email
Before diving into modern code, it's worth knowing about a classic, battle-tested tool: rss2email. This command-line utility does exactly what its name implies and has been a favorite among Unix enthusiasts for years. It's a simple, robust way to get started with a self-hosted RSS feed to email setup.
Once installed on your server, you configure it with your SMTP server details (how it will send mail) and then add the feeds you want to follow. It maintains its own little database to keep track of which entries have been sent, preventing annoying duplicates.
The workflow is dead simple:
- Add a new feed using the command
r2e add 'Feed Name' http://example.com/feed.xml. - Run
r2e runto check all your feeds and send out new items as emails.
To automate this, you just create a cron job—a scheduled task—to run r2e run at whatever interval you prefer, whether it's every 15 minutes or once a day. This simple combo of a time-tested script and a cron job creates a remarkably resilient automation pipeline.
Building Your Own Script with Python
For more flexibility, writing your own script is the next logical step. Python is a fantastic choice for this, thanks to its excellent libraries for handling web requests and email. The two key libraries you'll want are feedparser for fetching and parsing RSS feeds and smtplib for sending the emails.
The core logic involves fetching the feed, looping through its entries, and checking if you've already sent an email for that specific entry. To avoid duplicates, you need a way to track sent items. A simple text file, a SQLite database, or even a basic JSON file works perfectly for this.
A crucial part of a custom script is state management. The script needs to remember what it has already sent. Storing the unique ID or link of each sent post in a local file is a simple but effective way to prevent your inbox from being flooded with duplicates.
Here’s a conceptual outline of what a Python script would do:
- Load Sent Items: Read a list of unique post IDs from a local file (e.g.,
sent_items.txt) into a set for fast lookups. - Fetch the Feed: Use
feedparser.parse()to download and parse the RSS feed URL. - Iterate and Check: Loop through each entry in the parsed feed. For each entry, check if its unique ID is in your set of sent items.
- Send New Emails: If an entry's ID is not in the set, use
smtplibto connect to your SMTP server and send a formatted email. After a successful send, add the entry's ID to your set and save it back to the file.
This custom approach lets you format the email exactly how you want, filter posts based on keywords before sending, or even combine multiple new posts into a single digest email.
A Modern Take with Node.js
If you're more comfortable in the JavaScript ecosystem, Node.js offers an equally powerful set of tools. The popular libraries for this job are rss-parser for handling the feed and Nodemailer for sending emails. The logic is identical to the Python example—the only difference is the syntax and the libraries you use.
A Node.js script would follow these steps:
- Initialize
rss-parserandNodemailerwith your configurations. - Read a file containing the GUIDs of previously sent posts.
- Use the parser to fetch the latest items from the feed URL.
- Filter out any items whose GUIDs are already in your "sent" list.
- For any new items, construct an email object and use a
Nodemailertransporter to send it. - Finally, append the new GUIDs to your tracking file to prevent resending.
Below is a simplified conceptual example of what the core sending logic might look like in a Node.js script.
// This is a conceptual example, not a full script
import nodemailer from 'nodemailer';
import Parser from 'rss-parser';

const parser = new Parser();
const transporter = nodemailer.createTransport({ /* SMTP config */ });

async function checkFeed() {
  const feed = await parser.parseURL('http://example.com/feed.xml');
  // Assume 'sentGuids' is a Set loaded from a file

  for (const item of feed.items) {
    if (!sentGuids.has(item.guid)) {
      await transporter.sendMail({
from: 'you@example.com', to: 'recipient@example.com', subject: New Post: ${item.title}, text: ${item.contentSnippet}\n\nRead more: ${item.link}
      });
      console.log(`Sent: ${item.title}`);
      // Add item.guid to your sent list and save it
    }
  }
}
Just like with the other methods, you'd use a cron job to run this Node.js script on a schedule. The power here is infinite—you're only limited by your coding skills. You could integrate with other APIs, apply complex filtering logic, or generate rich HTML emails with ease. This is the ultimate playground for automation.
4. Building Scalable RSS Notifications with APIs
When your side project starts looking more like a real application, the simple tools you started with just won't cut it anymore. That self-hosted script sending an RSS feed to email through your personal Gmail account? It’s going to hit a wall, and fast. For any app needing to send reliable, high-volume notifications, transactional email APIs are the only way to go.
Services like SendGrid, Mailgun, and Postmark are built specifically for this. They aren't just for sending emails; they are all about deliverability. These platforms manage the messy world of sender reputation, authentication protocols like SPF and DKIM, and ISP feedback loops to make sure your emails actually hit the inbox, not the spam folder.
Trying to run this from a personal email account is a one-way ticket to getting your IP or domain blacklisted. For a business, that’s just not an option.
Integrating a Script with an Email API
The basic logic is identical to our self-hosted script: fetch a feed, see what's new, and fire off an email. The big difference is that instead of using a library like smtplib to connect to a personal mail server, you’ll make a simple API call to a service like SendGrid.
This usually means grabbing their official SDK and plugging it into your Python or Node.js script.
Here's a quick look at how the flow changes:
- Parse the Feed: You still use a library like
feedparserin Python to fetch and read your target RSS feed. - Track Sent Items: You’ll need a way to avoid sending duplicates, typically with a simple database like SQLite or even a flat file to log the IDs of posts you’ve already sent.
- Connect to the API: This is where things change. You'll initialize the service's API client with a key, which handles all the authentication for you.
- Construct and Send: For each new item, you build a JSON object with the recipient, sender, subject, and body, then hand it off to the API endpoint.
Switching from SMTP to an API call abstracts away a mountain of complexity. It also gives you access to critical analytics on opens, clicks, and bounces—data you absolutely need for any production system.
Creating Beautiful and Dynamic Emails
One of the best parts of using an email API is the power to send rich, dynamic HTML emails. Let's be honest, generic text emails from a script feel clunky and often look broken in modern email clients. Transactional services let you design polished, on-brand templates that look great everywhere.
You can create a template with your company logo, colors, and layout. Your script’s only job is to pass along the dynamic content—the post title, a summary, a link—to the template through the API call. This separation of design from content makes your code cleaner and your emails infinitely more professional.
Pro Tip: Look for a "dynamic template" feature in your email service. You can build a template in their UI with placeholders like
{{post_title}}and{{post_url}}. Your API call then just feeds in the values, making it dead simple to send beautiful, data-driven emails without wrestling with HTML in your script.
Advanced Techniques for Smarter Notifications
Once you're set up with an API, you can start building some truly useful features on top of the basic notification.
- Content Filtering: Not every item in a feed is worth an email. You can build logic into your script to only trigger an email if a post's title or summary contains specific keywords. This is how you turn a noisy, high-volume feed into a high-signal, relevant notification.
- Creating Digests: Instead of bombarding users with an email for every single new item, you can batch them. A common pattern is to run a script that collects all new items over a 24-hour period, bundles them into a single list, and sends one daily digest email. This respects your users' inboxes and prevents notification fatigue.
These techniques take a simple rss feed to email tool and turn it into a sophisticated content delivery platform that's actually tailored to what your users want.
Email Deliverability Best Practices
Sending the email is just one part of the job; making sure it arrives is what really counts. Bad deliverability will kill your application's usefulness.
Stick to these essential practices:
- Authenticate Your Domain: Set up SPF, DKIM, and DMARC records for your sending domain. Every transactional email service has clear guides on this. It's how you prove to receiving mail servers that you are who you say you are.
- Use a Dedicated Subdomain: Send notifications from a subdomain like
updates.yourcompany.cominstead of your main domain. This isolates its reputation, so if something goes wrong, it won't tank your primary corporate email. - Warm Up Your IP: If you're planning to send a high volume of emails, don't just flip a switch and send thousands. Gradually increase your sending frequency over a few weeks. Sudden, massive spikes in volume look like spam to ISPs.
- Process Bounces and Complaints: Pay attention to your analytics. Actively monitor and remove email addresses that bounce, and immediately unsubscribe anyone who marks your email as spam. All the major API services provide webhooks to automate this. Ignoring these signals is the fastest way to destroy your sender reputation.
Email vs Slack for Team Notifications
Connecting an RSS feed to email is a solid move, but is the inbox really the best place for every notification? For a busy development team, the email inbox often becomes a graveyard for urgent alerts. It’s an asynchronous tool by design—perfect for updates that can wait.
Real-time collaboration, on the other hand, lives in tools like Slack. When you’re deciding where to send team notifications, the real question is how fast you need a response.
When to Use Email vs Slack
- Email is ideal for: Daily summaries of non-critical events, weekly project management reports, or general industry news digests. These are things your team needs to see, but not necessarily act on this very second.
- Slack is essential for: Time-sensitive alerts that demand immediate action. Think build failures, new pull requests that need a review, or critical security vulnerabilities popping up in a feed.
A huge problem with default GitHub notifications is the sheer noise. Important pull request updates get buried under hundreds of other alerts, which slows down your review cycles. Pushing all that into email usually just makes the problem worse.
This is where specialized tools really shine. A great example is PullNotifier, which intelligently moves all the chatter around a GitHub pull request out of the noisy inbox and into a focused Slack thread. Instead of getting spammed with separate emails for comments, approvals, and merge conflicts, the entire lifecycle of a PR lives in one clean, actionable place.
This strategy highlights the importance of choosing the right channel for the job. You can dig deeper into this approach in our guide on using GitHub Actions to send Slack notifications. By routing urgent dev updates to Slack, you cut through the clutter and help your team keep up its momentum. Email still has its place, but for any high-velocity workflow, a Slack-first approach is almost always the better choice.
Frequently Asked Questions about RSS to Email
When you start hooking up RSS feeds to your email, a few common questions always pop up. Let's walk through the answers to the ones we hear most often.
Can I Send an RSS Feed to a Mailing List
Absolutely. This is a bread-and-butter feature for pretty much every major email marketing platform out there, from Mailchimp to ConvertKit. They all have built-in "RSS-to-Email" campaign options made for exactly this.
You just set it up once by plugging in your blog's feed URL. The service then automatically pulls new posts and sends them to your subscribers on a schedule you define—like daily or weekly. It's a fantastic, set-it-and-forget-it way to keep your audience engaged.
How Do I Find a Website's RSS Feed
The classic orange RSS icon has mostly disappeared from the web, but the feed itself is almost always still lurking in the background. If you're new to the concept, getting a handle on what an RSS Feed is will be key to building any kind of email automation.
Here are a couple of tricks to find that hidden URL:
- Try Common Endings: Just add
/feedor/rss.xmlto the end of the site's main URL (likeexample.com/feed). This works a surprising amount of the time, especially for sites built on WordPress. - View Page Source: This is the developer's trick. Right-click anywhere on the page and hit "View Page Source." Then, use your browser's find tool (Ctrl+F or Cmd+F) and search for
rssorapplication/rss+xml. This will almost always point you straight to the feed's link.
Is It Possible to Filter an RSS Feed
Yes, and honestly, if you're dealing with a high-volume feed, you have to filter it. Filtering is how you turn a firehose of updates into a stream of information that's actually useful to you.
No-code tools like Zapier and Make have built-in "Filter" steps for this. You can easily set up a rule, for instance, to only let an item pass through if its title contains a specific keyword. If you're coding your own solution, it’s just a simple conditional statement—like an if block in Python—to check an item's content before you decide to send the email.
Filtering is the key to turning a noisy feed into a high-signal notification channel. Don't just subscribe; curate. It prevents inbox overload and makes your automation significantly more valuable.
For example, you could take a broad tech news feed and filter it to only send you emails about "artificial intelligence," ignoring everything else. This kind of control is one of the biggest reasons to move beyond the simple one-click hosted services.
Tired of noisy GitHub notifications clogging up your inbox and Slack? PullNotifier cuts through the chaos by delivering clean, actionable pull request updates directly into focused Slack threads. Stop losing track of code reviews and accelerate your team’s development cycle. Try PullNotifier for free today and see why over 10,000 engineers trust it to keep their workflows moving.