- Published on
A Developer's Guide to the Git Merge Branch Workflow
- Authors

- Name
- Gabriel
- @gabriel__xyz
The git merge branch command is how you weave different timelines of work back together. Think of it as the fundamental way to integrate changes from a feature or bug fix branch into your main project history. It’s the action that brings all those parallel development efforts back into a single, cohesive whole.
Why Merging Branches Is a Core Git Skill

Merging is really the backbone of collaborative coding. On any active software project, developers are constantly working on different tasks in parallel. Without a solid way to combine all that work, progress would just grind to a halt. This is exactly where branching and merging become essential.
Let's say a developer needs to build a new user authentication feature. Instead of working directly on the main codebase (main or develop), they'll spin up a separate feature/user-auth branch. This gives them an isolated sandbox to experiment, build, and test without ever putting the stability of the primary application at risk.
Understanding Source and Target Branches
This whole process involves two key players: the source branch and the target branch. The feature/user-auth branch is the source—it’s where all the new commits live. The main branch is the target, where you want to integrate those changes.
When you're on the main branch and run git merge feature/user-auth, you're telling Git to take the history of the source and combine it with the target. Git handles this by finding a common ancestor commit—the exact point where the two branches diverged—and then creating a new "merge commit" that neatly ties the separate histories back together.
Merging isn't just about mashing code together; it's about preserving the story of your project. Each merge commit acts as a historical marker, documenting exactly when a specific feature or fix was integrated into the main timeline.
Introduced way back in Git’s earliest versions around 2005, the git merge command is fundamental to combining these lines of development. Its efficiency is what has helped Git scale to massive repositories like the Linux kernel, which has over 1 million commits and depends on effectively combining work from developers worldwide.
You can dive deeper into Git’s core mechanics in this detailed guide from Atlassian. Nailing this concept gives you a solid mental model for everything that follows.
Time for Your First Git Merge
Alright, let's move from theory to action and walk through a standard git merge on your local machine. Before you even think about combining code, the absolute first thing you should do is sync up your local repository with the latest changes from the remote server. Trust me, this simple prep step will save you from a world of unnecessary headaches.
The easiest way to do this is to run git fetch to download all the new data from the remote. Follow that up with a git pull on your main branch. This pulls down and merges the latest changes, ensuring the branch you're merging into is completely up to date.
The Core Merge Commands
Once you're all synced up, the process is pretty straightforward. First, you need to be on the branch that will receive the new code—this is your target branch. For most teams, this is usually a develop or main branch.
Let's switch over to it:
Switch to the branch you want to merge INTO
git checkout develop
With your target branch active, you can now run the merge command. Just tell it the name of the source branch (your feature branch) that you want to bring in.
Merge the feature branch INTO your current branch (develop)
git merge feature/user-login
After you hit enter, Git gets to work. The terminal will spit out some feedback telling you exactly what happened, usually showing which files were changed and the number of lines added or removed. This output is your confirmation that the two histories have been successfully combined.
Pro Tip: I always run
git statusboth before and after a merge. Before, it confirms I have a clean working directory with no uncommitted changes. After, it will either show that my local branch is ahead of the remote (ready to push) or, crucially, alert me to any merge conflicts that need my attention.
Pushing Your Merged Changes
So far, this merge has only happened on your local machine. No one else on your team can see it yet. The final piece of the puzzle is to share this newly combined history by pushing the updated target branch back to the remote repository.
A simple git push origin develop will do the trick. This command updates the remote develop branch with your new merge commit and all the work from the feature branch.
This local-first approach is fantastic for simple integrations or solo projects. However, when you're working on a team, this process is typically wrapped into a more structured workflow. To see how this fits into a collaborative environment, you'll want to master the pull request and GitHub workflow, which adds critical layers like code review and automated checks before anything gets merged.
Choosing the Right Merge Strategy
Not all merges are created equal. The strategy you pick leaves a lasting footprint on your project's commit history, so it's worth knowing your options. Are you aiming for a clean, linear history, or do you need a detailed, explicit record of every single feature integration? The answer will usually lead you to one of two places: a fast-forward merge or a three-way merge.
The Default: Fast-Forward Merges
A fast-forward merge is Git's simplest and cleanest approach. It only happens when your target branch—let's say main—hasn't changed since you created your feature branch. Git sees a straight, unbroken line from the tip of main to the tip of your new branch.
Instead of creating a brand-new merge commit, Git just scoots the main branch pointer forward to match your feature branch's latest commit. Boom, done. The result is a perfectly linear history, almost as if all the work happened directly on main. Because it's so tidy, this is Git's default behavior whenever possible.
This little flowchart nails the basic logic Git follows.
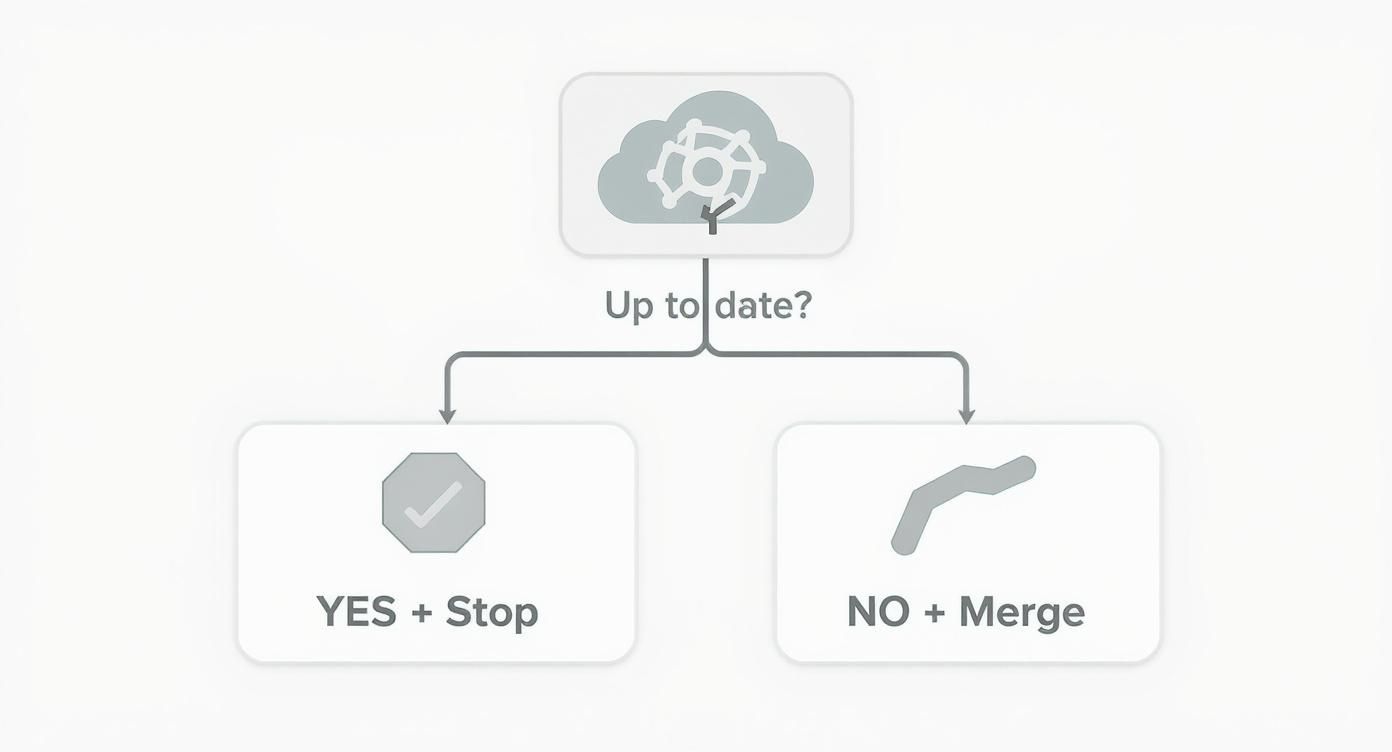
It’s the first check Git runs: if the target branch is already up to date, there’s nothing to do. If not, the merge process kicks off.
Forcing a Merge Commit with --no-ff
But what if you want to preserve the story of a feature branch, even when a fast-forward is on the table? Lots of teams prefer to see an explicit commit that says, "Hey, the user-authentication feature was finished and merged right here." This is exactly what the --no-ff (no fast-forward) flag is for.
When you run git merge --no-ff <branch-name>, you're telling Git to create a merge commit no matter what. This commit serves as a historical marker, neatly bundling all the commits from your feature branch. It keeps the branch's narrative intact, which can be a lifesaver for code archaeology or just figuring out when a specific feature landed.
A
--no-ffmerge creates a new commit object that points to two parents: one from the target branch and one from the source. This is what gives you that classic diamond shape you see in Git history graphs.
Keeping History Tidy with a Squash Merge
Let's be real—feature branches can get messy. They often end up with a trail of tiny commits like "fix typo," "try another thing," and the classic "oops, revert." Dragging all that noise into your main branch history is rarely a good look. This is the perfect job for a squash merge.
Using the --squash flag tells Git to grab all the changes from your source branch, mash them into a single, cohesive set of changes, and get them ready to be committed on the target branch. The key here is that it doesn't create the merge commit for you. Instead, it just stages all the changes, giving you full control to craft one perfect, clean commit message.
Here’s how it works in practice:
- Run
git merge --squash feature/messy-work. - Git applies all the changes and stages them for you.
- You follow up with
git commit -m "Implement new user dashboard feature".
The payoff? Your main branch gets a single, well-defined commit that represents the entire feature. All the messy, intermediate history from the feature branch is left behind. This strategy is fantastic for maintaining a pristine and highly readable history on your most important branches.
Git Merge Flags and Their Impact on Commit History
Choosing the right merge flag is all about controlling your project's narrative. This table breaks down the most common flags to help you decide which one fits your workflow.
| Merge Flag | Default Behavior | Commit History Result | Common Use Case |
|---|---|---|---|
| (none) | Performs a fast-forward if possible, else three-way | Linear history if fast-forward; creates a merge commit otherwise. | General-purpose merging where history isn't a top priority |
--no-ff | Always creates a merge commit | Non-linear history with a clear merge point, preserving the context of the feature branch. | Tracking feature integrations and releases explicitly. |
--squash | Combines all source commits into a single change | A single, clean commit on the target branch. The messy history of the feature branch is not included. | Cleaning up a feature branch with many small, noisy commits. |
--ff-only | Only merges if a fast-forward is possible | A clean, linear history. The merge will abort if a fast-forward isn't possible, preventing an unintended merge commit. | Enforcing a strict linear history workflow. |
Ultimately, the flag you choose depends on your team's philosophy. Do you value a clean, linear timeline, or is it more important to preserve the detailed history of every branch? Understanding these options gives you the power to shape a commit history that's both useful and easy to navigate.
How to Confidently Resolve Merge Conflicts
Sooner or later, every developer runs into it: the dreaded merge conflict. It’s that moment when you try to git merge branch, and Git basically throws its hands up, unable to automatically figure out how to combine competing changes.
While it might feel intimidating at first, untangling a merge conflict is a routine, almost inevitable, part of working on a team.
The root of the problem is pretty straightforward. Two developers have edited the exact same lines in the same file but on different branches. When Git tries to merge them, it doesn't know which version is the "correct" one. Instead of guessing and potentially breaking something, it pauses the merge and asks you, the human, to make the final call.
Identifying and Understanding the Conflict
Your first clue that something is up will be the output in your terminal. Git will tell you point-blank that the merge failed due to a conflict and then list the files that need your attention.
If you run git status at this point, you'll get a clean list of "unmerged paths"—these are the files you need to fix.
When you open a conflicted file, you'll see a bunch of special markers that Git has helpfully inserted to show you exactly where the problem is:
*   `<<<<<<< HEAD`: This marks the beginning of the conflicting lines from **your current branch** (the one you're merging into).
*   `=======`: This is the divider. It separates the two conflicting versions of the code.
*   `>>>>>>> <branch-name>`: This marks the end of the conflicting lines from **the other branch** you're merging in.
Your job is to jump into that section, remove all the Git markers, and decide what the final code should look like. You might keep your version, take the incoming one, or even write something totally new that combines the logic from both.
A merge conflict isn't an error; it's a signal. Git is doing its job by identifying an ambiguity that requires a human brain to resolve. Treating it as just another step in the workflow, rather than a crisis, is the key to handling it smoothly.
Finalizing the Resolution Process
Once you’ve edited the file and you're happy with how it looks, the next step is to let Git know you've resolved the conflict. This part is crucial.
You do this by staging the file you just fixed using the git add command. This is how you signal to Git that the conflict in that specific file is handled.
git add path/to/your/conflicted-file.js
After you've added all the files you fixed, you can finalize the merge by running git commit. Git will usually pop up a pre-populated commit message like "Merge branch 'feature-branch'," which you can typically use as is. This single commit wraps up the merge, officially tying the two histories together with your resolution.
For a more detailed walkthrough, check out our practical guide on how to resolve conflicts in Git, which digs into some more complex scenarios.
Many modern IDEs like VS Code offer slick visual tools that make this process even easier. They'll often show you side-by-side diffs and let you accept one version or the other with just a click.
This whole dance is a super common thing in team environments. In fact, data from GitHub shows over 80% of pull requests involve at least one merge event. Around 30-40% of those are three-way merges from concurrent work, which is exactly the kind of situation that breeds conflicts. You can explore more repository insights from GitHub's documentation to see these patterns for yourself.
Merging Best Practices for Collaborative Teams
Knowing the commands is one thing, but making git merge work smoothly in a team setting? That’s all about having a smart and predictable workflow. A few solid habits can cut down on friction, prevent nasty conflicts, and leave you with a clean, understandable project history that won't give your teammates headaches.
The biggest win comes from keeping feature branches small and focused. When a branch sticks around for weeks and touches dozens of files, it naturally drifts further and further from your main branch. That makes the eventual merge a huge, risky task. Instead, break down those massive features into smaller chunks you can knock out and merge in a day or two.
This isn't just about making merges easier. It also makes code reviews way more effective, since your reviewers are only looking at a small, self-contained set of changes.
The Power of the Pull Request
For team projects, merging directly into a shared branch like main or develop should be a rare event. The industry standard is the Pull Request (PR)—or Merge Request, if you're on GitLab. Think of a PR as a formal request to merge your branch into another.
But it's so much more than that. It’s a dedicated space for your team to collaborate. A good PR serves a few critical functions:
*   **Code Review:** Teammates can comb through your changes, drop comments, and suggest improvements before anything gets integrated.
*   **Discussion:** The PR becomes a living document, capturing the entire conversation and the decisions made about that feature.
*   **Automated Checks:** It’s the perfect trigger for your Continuous Integration (CI) pipeline. This is where you run automated tests and code quality checks to catch problems early.
By making Pull Requests mandatory, you build quality control directly into your development process. It transforms merging from a solitary action into a transparent, team-oriented activity that ensures a higher standard of code.
Preparing Your Branch for a Smooth Merge
Before you even think about hitting that "Create Pull Request" button, a little prep work goes a long way. The single most effective habit you can build is to always pull the latest changes from the target branch into your feature branch right before you're ready to merge.
Let's say you want to merge feature/new-api into develop.
- First, switch to your feature branch:
git checkout feature/new-api - Then, pull the latest from
develop:git pull origin develop
This simple action merges the latest version of the develop branch into your local feature branch. It gives you the chance to resolve any potential merge conflicts on your own turf, within the context of your work, before anyone else on the team even sees them. You're basically doing the cleanup work in private.
The result? The final PR can often be merged cleanly with a single click. This proactive step doesn't just save your reviewers time; it shows professionalism and respect for your team's workflow. Integrating these practices is especially vital when managing complex codebases, such as when using different monorepo branching strategies for teams, where branch divergence can have a much bigger impact.
Common Questions About Git Merge
Even after you've got the hang of git merge, you'll inevitably run into situations that make you pause. Let's walk through some of the most common questions developers have, with clear answers to help you navigate your workflow with more confidence.
How Can I Undo a Git Merge?
It’s a feeling every developer knows: you finish a merge and immediately realize you’ve made a mistake. Don't worry. You have a couple of options, and the right one depends on whether you’ve already pushed the changes.
*   **If you haven't pushed:** The cleanest way out is `git reset --hard HEAD~1`. This command is like an undo button for your last commit. It moves your branch pointer back one step, completely wiping the merge commit from your local history as if it never happened. It's fast and effective, but destructive—so only use it if the merge is still just on your machine.

*   **If you have already pushed:** Once a merge is on a shared remote, rewriting history is off the table. Doing so would create a mess for anyone else who has pulled the changes. Instead, you'll want to create a *new* commit that reverses the merge. The command for this is `git revert -m 1 <merge-commit-hash>`. This generates a new commit that undoes everything introduced by the faulty merge, safely preserving a clean and shared project history.
What Is the Difference Between Git Merge and Git Rebase?
Both git merge and git rebase are designed to integrate changes from one branch into another, but they operate on fundamentally different philosophies about how project history should look.
A
git mergepreserves history exactly as it happened, showing all the parallel lines of development. In contrast,git rebasecreates a clean, linear history by rewriting commits, making it appear as if all the work was done sequentially.
Merging is a non-destructive operation. It takes the histories of two branches and ties them together with a new merge commit, leaving the original branches completely untouched.
Rebasing, on the other hand, actually rewrites history. It takes the commits from your feature branch and replays them one by one on top of the target branch. This is great for keeping the commit log tidy, but it's dangerous on shared branches because it changes the commit hashes, which can cause major problems for your teammates.
Should I Delete a Branch After Merging It?
Yes, absolutely. Once a feature branch has been successfully merged into your main development line (like main or develop), it has served its purpose. Deleting it is a critical housekeeping task and a widely accepted best practice.
Keeping old, merged branches around just adds clutter to your repository. This makes it harder for developers to navigate the project and find the branches that are still active. Deleting the branch is a clear signal that the work is complete and also prevents anyone from accidentally using it again.
Cleaning up is simple with these two commands:
*   `git branch -d <branch-name>` to delete the local branch.
*   `git push origin --delete <branch-name>` to remove the remote branch.
What Does "Already Up to Date" Mean?
When you try to run a merge and Git tells you Already up to date, it's simply saying there's nothing for it to do. This message appears when all the commits on the branch you're trying to merge are already present in the history of your current branch.
In other words, the branch you're on has already incorporated all the work from the other branch. This usually happens if you've already merged that branch or if you simply forgot to switch to the correct target branch before running the command. It's just Git's friendly way of telling you, "No new work found here!"
Streamlining your team's code review process is essential for shipping quality software faster. PullNotifier sends concise, real-time pull request updates directly to Slack, cutting through the noise and reducing review delays by up to 90%. Over 10,000 engineers trust it to keep their development cycles moving smoothly. See how it can accelerate your team at https://pullnotifier.com.